How to Choose the Best Domain Name (11 Tips and Tools)

Choosing the right domain name for your website is crucial for your success. If you choose the wrong domain name, then it can be a hassle to switch later on without hurting your brand and search rankings.

That’s why it’s extremely important that you choose the best domain name from the start.

When first starting out, it can be hard to come up with catchy business name ideas with a perfect domain name.

In this article, we’ll share all the tools and tips you need to get domain name ideas, choose the best domain name, and register your new domain (for free).

How to Choose the Best Domain Name

11 Tips for Choosing the Best Domain Name

When starting a blog, choosing a domain name can be stressful because you don’t want to make a mistake.

To make the process easier, we have a simple 11 step framework that you can use to pick the best domain for your website.

  1. Stick with .com
  2. Use keywords in your domain name search
  3. Keep your domain name short
  4. Make it easy to pronounce and spell
  5. Keep it unique and brandable
  6. Avoid hyphens in domain name
  7. Avoid doubled letters
  8. Leave room to expand
  9. Research your domain name
  10. Use domain generators for clever ideas
  11. Act quickly before someone else takes it
  12. Best place to register a domain name
  13. Get free domain with web hosting
  14. Most popular domain registrars

Let’s take a look at these tips one by one with more details.

1. Stick with .com

Stick to the .com extension

There are plenty of new domain name extensions available today, from the original .com, .net and .org to niche extensions like .pizza, .photography, and even .blog.

We always recommend choosing a .com domain name.

While it can be tempting to come up with clever blog names using new extensions, .com is still the most established and credible domain name extension.

Newer domain extensions like .ninja or .photography can be untrustworthy.

Dot-com domains are also the most memorable. Many users, especially those who aren’t as tech-savvy, will automatically type “.com” at the end of every domain without thinking about it.

If your website is something like jane.photography, and your users accidentally type in jane.photography.com, they will end up on an error page on photography.com website.

It’s smart to avoid that risk by sticking with .com.

Not to mention, most smartphone keyboards automatically have a .com button.

2. Use Keywords in Your Domain Name Search

Keywords play an important role in a domain. By using keywords in your domain name, you tell the search engines what your website is about. Together with quality content and good user experience, keywords in your domain can help you rank higher in Google.

It is very hard to find a good domain with your target keywords, that’s not already taken.

You will need to be creative and combine your keywords with other words to make your domain stand out.

3. Keep Your Domain Name Short

While keywords are important, don’t go overboard with domain length. It’s better to have a domain name that’s short and memorable.

We recommend keeping your domain name under 15 characters. Longer domains are harder for your users to remember.

Not to mention, users will also be more prone to entering typos with longer domain names which can lead to loss traffic.

That’s why it’s a good idea to keep your domain length short.

4. Make Your Domain Name Easy to Pronounce and Spell

You should be able to easily share your domain name when speaking as well as writing. You never know when you’ll be asked to share your domain name in person.

If you’re planning to use your domain name to create a professional business email address, then it definitely should be easy to understand and spell for any listener.

5. Keep it Unique and Brandable

Your blog domain name must be unique, so you can stand out in your readers’ minds. It’s smart to research other blogs in your niche and find out what domain names they’re using.

You don’t want to accidentally use a trademark name or get accused of copying another blogger.

You can also choose to pick a domain name that’s more brandable.

Brandable domain names are unique, catchy, and memorable. For example, “Amazon.com” is a much more brandable name than “BuyBooksOnline.com.”

6. Avoid Hyphens in Domain Name

Never create a domain name with hyphens. Hyphens can be a sign of spam domains which you do not want to be associated with.

Hyphenated domains are also prone to typos. If you choose a domain name with hyphens because the domain you want is already taken, then your users will likely end up at your competitor’s site if they forget to type in the hyphen.

7. Avoid Double Letters

It’s a good idea to avoid domains with doubled letters, because it increases your chances of losing traffic to typos. For example, a domain like Presssetup.com will be more prone to typos, and result in lost traffic.

Avoiding doubled letters will also make your domain easy to type and more brandable.

8. Leave Room to Expand

It’s smart to choose a domain name that’s related to your industry / niche because it gives users some idea of what your website is about. But you also don’t want to limit your long term options too much.

For example, a florist might choose a domain name like orchidblog.com, but then they may want to start blogging about other flowers beside orchids. In that case, the domain might prevent you from attracting readers interested in other flowers.

Properly moving your site to a new domain can be a frustrating process, and it can cause you to lose search rankings if you don’t do it right. That’s why it is important to pick a flexible domain name from the start.

9. Research Your Domain Name

Before you register a domain name, try to find out if there is already a registered business using the same name.

You can perform a trademark search to see if there is already a similar or exact name already trademarked.

Research trademarks to avoid conflicting domain names

You can also perform a Google search and check for the name’s availability on top social media websites like Twitter, Facebook, Instagram, etc.

A similar or matching name would not only cause confusion, but it could also have severe legal implications which may cost you a lot of money.

Once you have your own website up and running, you can learn more about how to trademark and copyright your website name and logo.

10. Use Domain Name Generators for Celever Ideas

Currently, there are more than 360 Million registered domain names. This leads to many people saying that all good domains are already taken.

Searching for individual domain name manually can be very time consuming.

This is where domain name generators come in. These free tools automatically search for your defined keywords to find hundreds of clever domain name ideas.
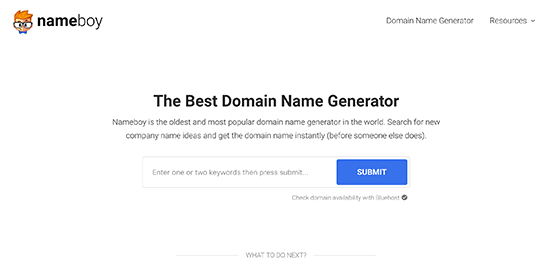
Nameboy domain generator tool

We recommend using Nameboy, which is one of the oldest and most popular domain name generator tool online. You can also use IsItWP’s domain generator to find more domain name ideas.

11. Act Quickly Before Someone Else Takes it

Each day thousands of new domain names are registered from all parts of the world. If you have found a domain name that you like, then don’t wait too long.

Domain names are like real estate. Thousands of people are actively looking for good brandable domain names that they can register for better rates in the future.

If you don’t act fast, then someone may go ahead and register your domain idea.

Since domain names are relatively cheap, we always recommend our readers to act fast. If you change your mind later, then you can simply let it expire.

Best Places to Buy a Domain Name
How to register your own domain name and how to get one for free

There are hundreds of domain registrars on the web. It’s important to choose carefully because it can be difficult to move your domain later on.

Just like with web hosting, pricing for domain registrations can vary anywhere from $9 to $24. You can even get it for free*.

Let’s take a look at how you can easily buy a domain name.

Free Domain Registration with Web Hosting

Majority of web hosting companies also offer domain registration as a service. Some of those companies offer free domain registration with new hosting accounts.

If you’re starting a new website, then it’s a smart idea to take advantage of this offer and get your domain name for free.

Below are the two WordPress hosting companies that are offering our users over 60% off web hosting, free SSL certificate, and a free domain name:

Bluehost is one of the oldest and largest brand name when it comes to web hosting. They’re an official “WordPress” recommended hosting provider.

iPage powers over 1 million websites and is the most budget-friendly web hosting provider on the web. $1.99 / month for web hosting, and you get a free domain name.

It’s important to keep in mind that most hosts offer free domain registrations for 1 year only. After the first year, your domain registration will renew at usually around $14 per year.

A lot of users take advantage of the free domain for the first year because you would have to pay for the domain name regardless, why not get it for free.

Most Popular Domain Registrars

If you just want to register a domain name without purchasing hosting, then you can do that by purchasing it from a domain name registrar.

Domain.com is one of the best domain registrars on the market. They offer all top-level domain names, with a smart search feature, premium domains, and all the necessary tools to manage your domain names.

Search for domain name on Domain.com

Domain.com is offering WPBeginner readers a 25% discount, and our domain.com coupon should be automatically applied on your purchase.

GoDaddy is the largest domain registrar in the world. They manage over 63 million domain names for over 14 million customers.

They also offer web hosting plans as well. If you use our GoDaddy coupon code, then you can get a free domain name.

Final Thoughts

If you are starting a blog for the first time, then you may find our ultimate guide on how to start a WordPress blog helpful because it walks you through everything step by step.

You may also want to check out our WordPress and Blogging Coupons page to find the best deal on other web tools and services.

For more domain name ideas, you can see our post on the 14 best free domain name generators.

That’s all. We hope this article helped you understand how to choose a perfect domain name for your blog or business.

If you liked this article, then please subscribe to our YouTube Channel for WordPress video tutorials. You can also find us on Twitter and Facebook.

The post How to Choose the Best Domain Name (11 Tips and Tools) appeared first on WPBeginner.

Source: Wordpres

The post How to Choose the Best Domain Name (11 Tips and Tools) appeared first on TuneMaster.ml.

5 Best Contact Form Plugins for WordPress Compared

Are you looking to add a contact form on your WordPress site? Not sure which one of the 1625+ WordPress contact form plugins to use? In this article, we have hand-picked the 5 best contact form plugins for WordPress and compared their pros and cons, so you can easily add a contact form in WordPress.

Best WordPress Contact Form Plugins

1. WPForms

WPForms is the most beginner friendly WordPress contact form plugin. We use it on WPBeginner and all of our other websites. WPForms is built by the same team as WPBeginner with a single goal: Make a WordPress forms plugin that’s both easy and powerful.

WPForms Best WordPress Contact form plugin

Pros

WPForms’ drag & drop online form builder makes it the most user-friendly form plugin for WordPress.

WPForms Lite is available for free in the official WordPress plugin directory meaning you can install it on as many sites as you like for free.

The free version comes with all the basic contact form features including basic form fields, captcha for spam protection, email notifications, and a thank-you page for form confirmation.

The premium version allows you to extend the functionality, so you can build any type of forms such as multi-page forms, email subscription forms, payment forms, order forms, and more.

WPForms pro also comes with other powerful form fields and features like smart conditional logic, file upload, geo-location, signature feature, form abandonment, user-submitted content (post submissions), login and user registration for WordPress, and over 150+ pre-made form templates.

You can see all your form submissions right inside your WordPress dashboard as well as get customized email notifications. You can even setup conditional notifications, so the right person in your team gets notified.

WPForms surveys & polls addon is by far the best WordPress survey solution in the market. It comes with interactive survey reports, real-time polls for WordPress, and all smart survey fields like star ratings, likert scale, NPS, etc.

They also have a form landing page solution to help you create distraction-free form pages in WordPress.

WPForms integrates with all popular email marketing and payment platforms. There are documentation and guides available along with email support to help you when you need it.

WPForms is being used by over 1 million websites and have built quite a loyal following (See: WPForms user reviews).

Cons

While the lite version is free, you need to upgrade to Pro to unlock more powerful features.

Even though WPForms is powerful, the #1 goal of this plugin is to make it user friendly. That’s why it doesn’t have the more complex features that some other form plugins offer.

WPBeginner users can use this WPForms coupon that will give you 50% off the premium version of WPForms.

Get WPForms Pro Now »

Alternatively, you can start with WPForms Lite for Free.

2. Formidable Forms

Formidable Forms is the most advanced WordPress form plugin in the market. They specialize in helping developers build complex form-focused solutions quickly.

Formidable Forms Advanced WordPress form plugin

Pros

Formidable is an all-in-one WordPress form builder that comes with powerful addons to help you go beyond simple contact forms.

You can use Formidable drag and drop interface to create advanced forms like quizzes, surveys, payment forms, registration forms, profile forms, and more.

Advanced users will really love the Formidable Views feature because it allows you to format, filter, and display user-submitted data on the front-end of your website. You can use it to create form-focused solutions like directories, job board listings, event calendars, management systems, rating systems, and more.

You can use Formidable’s advanced calculation fields to create powerful order forms as well as smart calculators like Mortgage calculator, car payment calculator, request a quote calculator, and more.

Formidable integrates with all popular email marketing and payment platforms.

They also have a powerful WooCommerce integration to help you build product forms and even WooCommerce product configurator forms that ties directly to your cart.

Cons

Formidable form builder is not as intuitive as WPForms because they focus on advanced users and developers.

But it makes up for it by being the most extendable form solution in the market. If you’re a developer or agency looking to build form-based solutions or data-driven web applications, then nothing in the market comes close to Formidable Forms.

3. Gravity Forms

Gravity Forms is a paid WordPress form builder plugin that comes with a lot of advanced functionality and features. They also specialize in helping developers build complex form related solutions.

Gravity Forms WordPress form plugin

Pros

Gravity Forms is a powerful drag and drop contact form plugin for WordPress.

With the help of additional add-ons, Gravity Forms can be used to create surveys, quizzes, user submitted content, and even web directory.

It comes with premium support options like FAQs, knowledge base, forums, and email support. This means that help is available when you need it.

Cons

Gravity forms does not have a free version, so it can be a bit expensive than other WordPress contact form plugins. However, if you are using it on multiple sites and projects, then the cost should not be a big deal.

4. Ninja Forms

Ninja Forms is a freemium contact form plugin for WordPress. It can be used to create highly interactive form with very little effort.

Ninja Forms WordPress Form Creation Plugin

Pros

The base plugin for Ninja Forms is available for free from the official WordPress repository. This means you can download and install it on as many sites as you like.

There are premium extensions which allow you to extend Ninja Forms functionality such as connecting with Campaign Monitor, Freshbooks, Salesforce, SMS notifications, etc.

There is a helpful community support option, as well as documentation, guides, and email support.

Cons

Even though the main plugin is available for free, the extensions are not. Buying two or more extensions or even the developer bundle will cost you nearly the same amount as WPForms or Formidable Forms.

5. Contact Form 7

Although we don’t recommend Contact Form 7, this list cannot be complete without the oldest and most downloaded contact form plugin in the official WordPress plugin directory.

Contact Form 7 Free WordPress Contact Form Plugin

Pros

Price is probably the most important advantage of using Contact Form 7. You are free to install it on as many sites as you want.

Although if you’re looking for a free WordPress form plugin, then WPForms Lite, Formidable Forms, and Ninja Forms are all significantly better solutions than Contact Form 7.

There are several third-party plugins that act as add-on plugins for Contact Form 7. Most of them are available for free.

Cons

Contact Form 7 is a below-average solution for creating a basic contact form for your blog. It is very difficult to set up for absolute beginners. The user interface is not intuitive at all.

Since it is a free plugin, support options are limited.

There are several third-party add-ons available for Contact Form 7, but the official plugin website doesn’t have an add-ons directory which makes it difficult to find add-ons to extend the functionality of the base plugin.

Which is the Best Contact Form Plugin for WordPress?

The plugins we mentioned in this article can all help you create a contact form plugin. However deciding the best WordPress form builder plugin varies based on your needs.

If you’re a beginner and don’t want to spend any money, then go with WPForms Lite.

If you’re a business owner and want to create powerful forms without learning code or hiring a developer, then go with the WPForms Pro version.

If you’re a developer trying to build more complex forms, then there’s no better solution than Formidable Forms.

Our overall pick for the best WordPress contact form plugin is WPForms.

We hope this guide helped you choose the best contact form plugin for your WordPress site. You may also want to take a look at our guide on the best WordPress backup plugins compared (Pros and Cons).

If you liked this article, then please subscribe to our YouTube Channel for WordPress video tutorials. You can also find us on Twitter and Facebook.

The post 5 Best Contact Form Plugins for WordPress Compared appeared first on WPBeginner.

Source: Wordpres

The post 5 Best Contact Form Plugins for WordPress Compared appeared first on TuneMaster.ml.

How to Choose the Best Products to Sell Online (Beginner’s Guide)

You want to make extra money on the side, so you looked into several online business ideas and decided that creating an online store is the way to go.

The next step is where beginners often struggle the most: choosing which products to sell on your online store.

In this ultimate guide, we will explain how to easily choose the best products to sell online by following our step by step process.

Choosing products to sell online

1. Basics of Choosing Products to Sell on Your Ecommerce Store

Before you start looking into products that you can sell, there are some basics that you need to keep in mind. Let’s look at some of the most important ones first.

1. Choosing Your Ecommerce Platform

First you need to choose a platform that you want to use to sell your products.

Choosing the right eCommerce platform is important because it would affect your choice of products and how you do business.

Choosing an eCommerce platform

WooCommerce is the most popular eCommerce platform in the world. It is easy to use, and you can use it to sell all kind of products while accepting payments using multiple payment gateways. See our guide on how to start an online store to get started with WooCommerce.

However, WooCommerce is not the only platform out there. There are some great WooCommerce alternatives that could be better for you depending on what you are trying to sell.

If you lack technical skills and want a quicker way to build an online store, then you may want to look into Shopify. It is a fully hosted solution that takes care of all the technical stuff. The catch here is that you will be paying a little more, and your costs will grow as you make more sales.

For a side by side comparison, see our article on Shopify vs WooCommerce with the pros and cons of both platforms.

2. Shipping

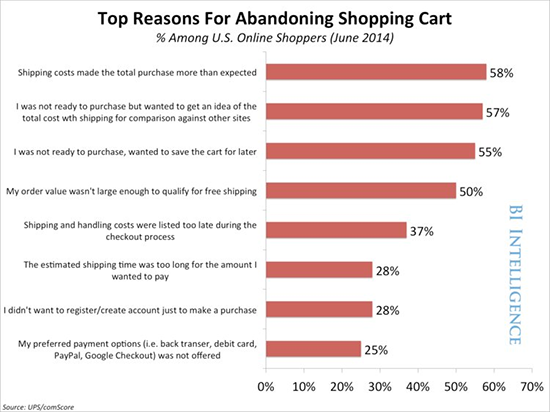
Shipping has a huge impact on the success of an eCommerce store. A study conducted by Business Insider discovered that higher shipping costs are the #1 cause of all abandoned shopping carts online.

Shipping costs more cart abandonment

You would obviously want to select products that you can ship at lower costs or for free. If you only plan to sell digital products (music, video, software, ebook, etc), then you don’t have to worry about shipping because the products will be downloaded by customers online.

3. Inventory

Do you want to manage inventory and keep products stocked? For that, you will need storage space and inventory management through your eCommerce software. Keeping products in stock will increase your cost of business.

On the other hand, drop-shipping solves this problem. You can select products that are shipped directly by the manufacturer or supplier.

4. Price

You’ll need to find products where you can offer a competitive price to your customers. If the product you are selling is more expensive than your competitors, then obviously that would discourage many first time buyers.

2. Types of Products That You Can Sell Easily

There are many different kinds of products that you can sell in your online store. Let’s narrow them down into two major sections.

1. Commoditized Products

These are products that everyone needs and are sold by many small and large stores without any difference in quality. For example, everyday products like soap, detergent, cereal, and more.

These products are made by some of the largest brands in the retail industry and are available widely with little to no difference in price.

This makes it harder for you to compete with giants like Amazon, Walmart, Target, etc. They can offer those products at lower costs, free shipping, and other perks.

This rules out a large number of products for you.

2. Niche Products

These are products that are unique or hand-made, available in limited stocks, and from specific suppliers. Think of home-made soaps, novelty t-shirts, ceramics, gift items, software, and countless other products.

Since these products are not widely available, they give you a competitive advantage.

There are even unique platforms like Etsy stores where you can find small vendors who make beautiful products and would love to partner up with other stores.

Etsy stores

You can also find suppliers abroad using websites like AliExpress or Alibaba.com. These suppliers can make those niche products to your specifications and deliver them to you.

Niche products are available in almost any product category imaginable. You’ll find tons of unique ideas as you do your product research.

This brings us to our next tip.

3. Doing Product Research On Your Own

Don’t use your best guess to select products you sell online. Back it up with data so that you know there is a demand for these products and customers are looking for them.

The first tool you are going to use for your research is Amazon.

It is the world’s largest eCommerce store with thousands of products. Luckily, it is also a treasure trove of free data that you can scrap and make your decisions.

Go through different product categories to find out top performing products in each category. Keep narrowing down your search to sub-categories to find targeted sub-niches of products.

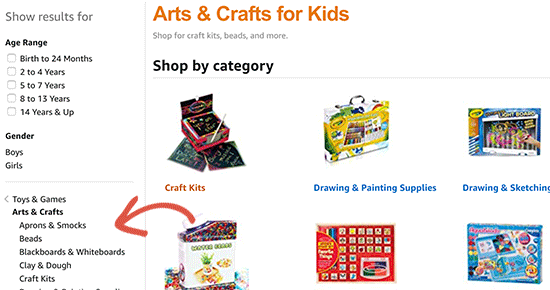
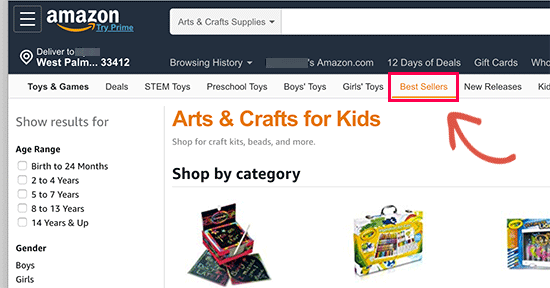
Let’s suppose you wanted to sell kid’s toys, narrow down your search to very specific toy categories. This excludes popular products, and you get a very focused set of products as you filter through.

Narrow down categories to find product data

Switch to the ‘Bestsellers’ view to find the top performing products on Amazon under each category.

Sort products by Bestsellers

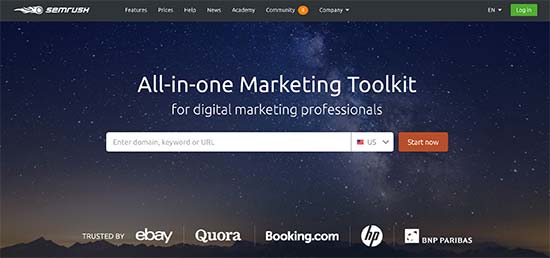
SEMRush is another great tool that you can use to gather data from competitors or any eCommerce store you want.

SEMRush

It shows you where those eCommerce stores are getting most of their traffic, which products they are promoting through paid advertisements, what are their most viewed products, and more.

It also shows your competitor’s product listing ads from Google. You can see their best performing product listing ads, keywords, and other data.

Here are some other tools you can use to gather product data from other websites.

  • Ahrefs – A powerful competitor research tool that will show what’s popular on the websites of your competitors.
  • AdPlexity – A popular eCommerce research tool that helps you collect eCommerce data from across the web, from competitors, or any other website.
  • AmazeOwl – It is an Amazon product reseach tool available as a free desktop application.

4. Use Customer Personas to Find Product Ideas

Using customer personas to find products

A customer persona is a fictional profile of an ideal customer that you want to target. You create this profile by answering simple questions about an ideal buyer.

This is your target audience and personifying them helps you understand them better when you are doing product research.

If you have an existing store, then you can use eCommerce tracking in Google Analytics to build an ideal buyer persona.

If you are just starting out, then use your best guess to build a customer persona. This exercise helps you understand your customer’s needs, questions they may have, and what kind of products they would like to buy.

To learn more about buyer persona, see this guide on creating a concrete buyer persona with ready-made templates and examples.

5. Find Products You are Passionate About

As career advisors say, ‘Choose a job you love, and you’ll never have to work a day in your life’.

Similarly, choosing products that you are passionate about helps you sell them more effectively.

These could be products that you personally love and passionately recommend to your family and friends. These could be products related to a hobby or activity that you are passionate about.

Nothing drives more passion when you build something useful and want others to use it.

Following your passion allows you to look deeply into products and find ideas that offer real value to your customers.

We hope this article helped you learn how to choose the best products to sell online. You may also want to see our article on tips to grow your business online without spending a lot of money.

If you liked this article, then please subscribe to our YouTube Channel for WordPress video tutorials. You can also find us on Twitter and Facebook.

The post How to Choose the Best Products to Sell Online (Beginner’s Guide) appeared first on WPBeginner.

Source: Wordpres

The post How to Choose the Best Products to Sell Online (Beginner’s Guide) appeared first on TuneMaster.ml.

How to Add Social Share Buttons in WordPress (Beginner’s Guide)

Do you want to add social share buttons in WordPress? Social media websites are where people spend a lot of their time on internet.

You can use social media to build user engagement and bring new users to your website. The simplest way to do this is by adding social sharing buttons to WordPress posts and pages.

In this article, we’ll show you how to easily add social share buttons and display share counts in WordPress. We will cover couple of different ways to do this, so you can add social buttons above and below post content or make a floating share bar..

How to Add Social Share Buttons in WordPress - Easy Way

Why You Should Add Social Share Buttons in WordPress?

Social networking is one of the most popular online activities today. It is estimated that by the end of 2019, there will be around 2.77 billion social media users around the globe. (Source)

That’s why social media marketing is now a crucial part of any businesses’ growth strategy. If you want to reach more potential customers, then social media platforms are highly effective channels to communicate with them.

The problem is that when you share your content on your own social media profiles, tit only reaches a limited number of your own followers.

The best way to reach people who don’t follow your business on social media is by adding social sharing buttons to your WordPress site.

Social share buttons prompt your website visitors to share your content on their social media timeline. This allows your content to be seen by their friends and followers who can then add comments, like, and re-share it.

Adding social sharing buttons to your website can help you:

  • Get more traffic to your website
  • Increase your social media following
  • Generate more leads and sales
  • Build social proof and brand recognition

Having said that, let’s see how to easily add social share buttons in WordPress.

Adding Social Share Buttons in WordPress

For this tutorial, we’ll be using the Shared Counts plugin. It is the best WordPress social media plugin available on the market.

Using this plugin, you can easily add social share buttons in your WordPress posts and also display the share counts. The best part is that it is optimized for performance and doesn’t slow down your website.

Unlike other social sharing plugins, Shared Counts uses a unique caching method to have minimal impact on your website’s speed and performance.

The first thing you need to do is to install and activate the Shared Counts plugin. For detailed instructions, see our step by step guide on how to install a WordPress plugin.

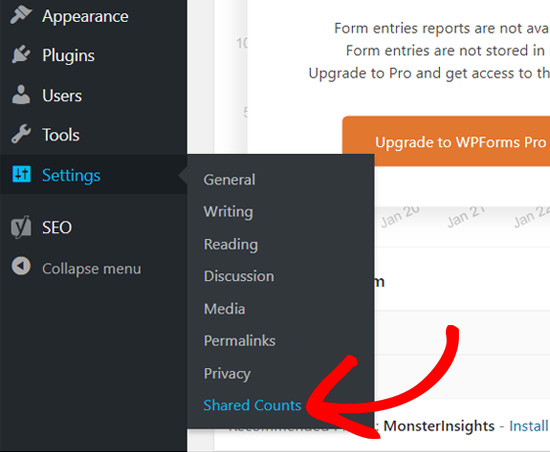
After you’ve installed the plugin, you need to go to Settings » SharedCounts menu to configure plugin settings.

Shared Counts WordPress menu

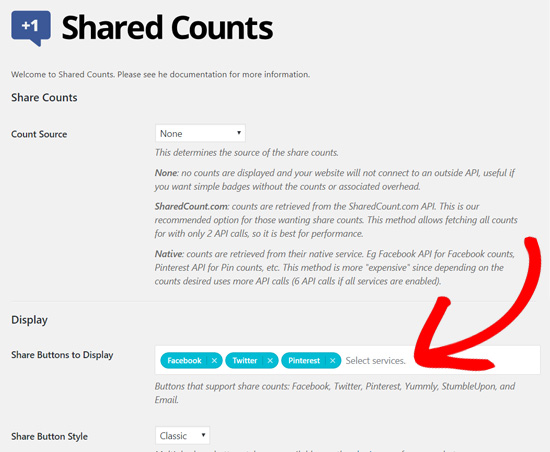
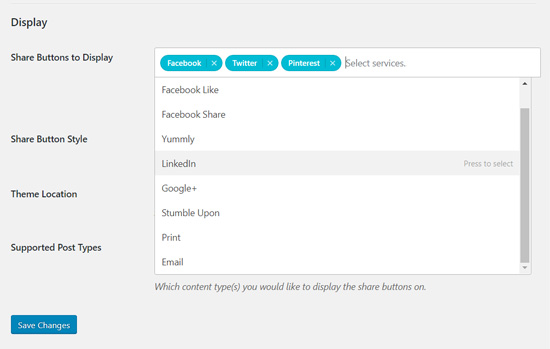
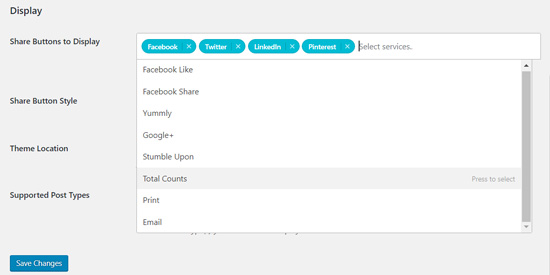
Next, you need to scroll down to the ‘Display’ section and choose the share buttons you want to display. By default, three buttons are selected (Facebook, Twitter, and Pinterest).

Shared Counts Plugin - select social share buttons

You can click on the white area in the field to add additional share buttons that you want.

Add social share buttons in Shared Counts

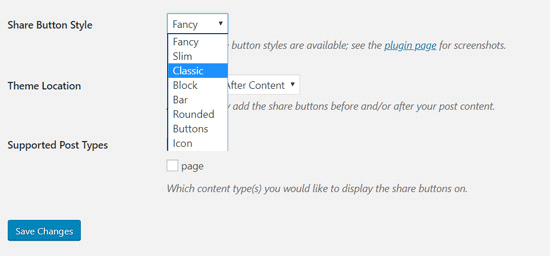
Next, you can choose the share button style from the dropdown menu labeled “Share Button Style”. Shared Counts plugin comes with 8 beautiful button styles.

Shared Counts share button styles

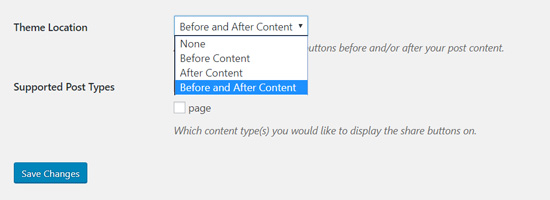
After that, you’ll need to select the theme location where you want to display the social share buttons. You can choose from 3 options: Before Content, After Content, and Before and After Content.

Theme Locations for Social Share Buttons

Lastly, you need to select the supported post types. It has ‘post’ selected by default.

If you want to display share buttons on your pages and other post types, then you can check the box next to page option.

Supported Post types Shared Counts

Don’t forget to click on the Save Changes button to store your settings.

Once done, you can visit any post on your website to see the social sharing buttons in action. Here’s how our demo website looks with the ‘Classic’ button style on default Twenty Nineteen theme.

Social Share Buttons by Shared Counts

How to Display Social Share Counts in WordPress?

As the name suggests, Shared Counts plugin can also show your social share counts without slowing down your website.

To enable social share counts, you’ll need to go to the Shared Counts settings and set up the share count source.

On the Shared Counts settings window, you’ll see the ‘Share Counts’ settings at the top.

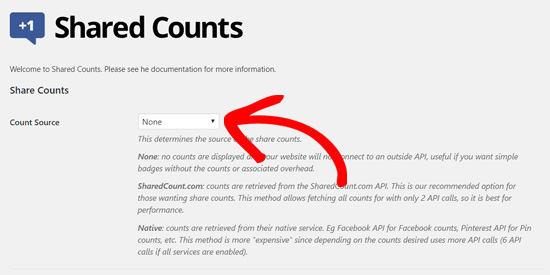
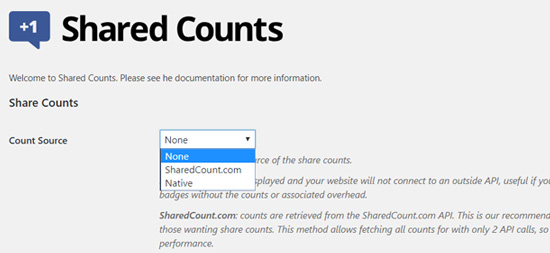
By default, you’ll see the None option selected for ‘Count Source’ which means that share counts are not being retrieved and displayed.

Share Counts Source none Shared Counts

To show the social share counts, you can choose from two sources.

Share Counts Source Options

The SharedCount.com is the recommended option for the plugin. If you choose this option, the counts are retrieved from the SharedCount service API. It allows fetching all counts with only 2 API calls which is the best for performance.

If you choose the ‘Native’ option, share counts are retrieved from the respective social service, like Facebook API for Facebook counts, Pinterest API for Pin counts. This method can slow down your site because it will require multiple API calls.

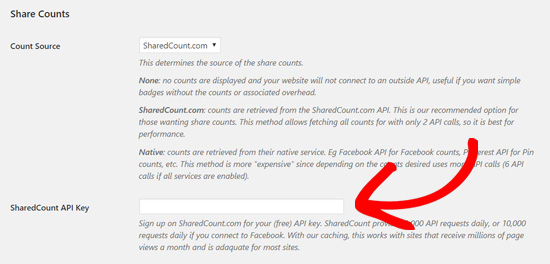
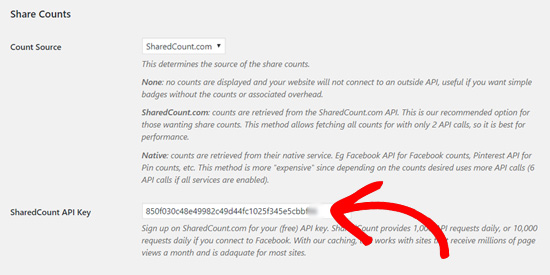
We recommend choosing SharedCount.com as your count source. Next, you’ll see a field for SharedCount API key.

Shared Counts API field

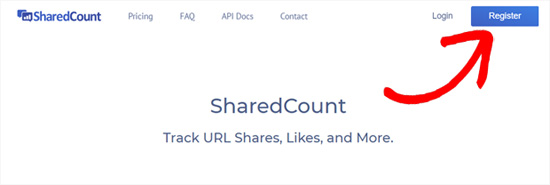
You can get the SharedCount API by signing up to for a free account on SharedCount.com website.

Register for SharedCounts com

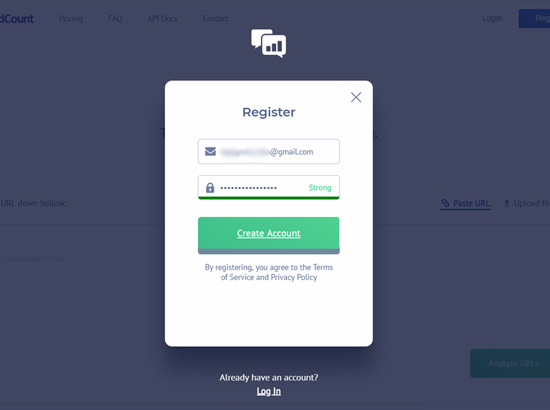
Enter your email address and a password. Then click Create Account.

Create SharedCounts.com account

The website will now send a confirmation link to your email address. You need to click the link to verify.

SharedCounts.com account verified

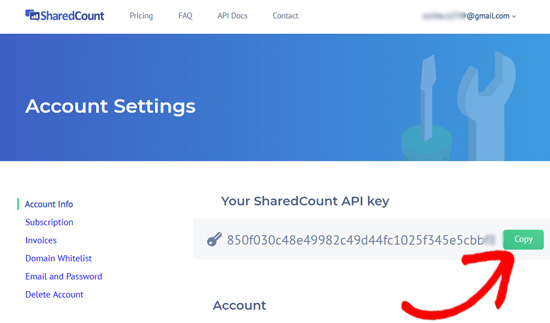
Once your email is verified, you need to log into your SharedCount account and navigate to your account at the top right side of the screen. There, you’ll see your email address and a dropdown icon next to it.

SharedCounts.com account

Next, you need to click the drop-down menu and select ‘Settings’. From here you’ll find your SharedCount API key.

SharedCounts.com API key

You need to copy the API key and go back to your plugin’s settings page on your WordPress site. Now, go ahead and paste the API key in the ‘SharedCount API Key’ field.

Insert SharedCounts API key

Below that, you’ll see some other settings related to social share counts. You can review and change them if you like.

If you want to show the total counts, then you can check the box next to ‘Count Total Only’ option.

We also recommend checking the box to hide empty counts instead of displaying a zero (0).

Share count options

Next, you will see a new ‘Total Counts’ field in the Display section. This allows you to show total share counts alongside your share buttons.

Add Total Counts button Shared Counts Plugin

Don’t forget to click on the ‘Save changes’ button to store your settings.

You can now visit your website to see the social sharing buttons with share count for each blog post.

Adding Social Share Buttons on Selected Pages

Typpically social share buttons aren’t usually added to WordPress pages however sometimes you may want to enable them on some specific pages.

If so then, you can use the Shared Counts shortcode: [[shared_counts]].

You can add this shortcode anywhere on your website to display the share buttons.

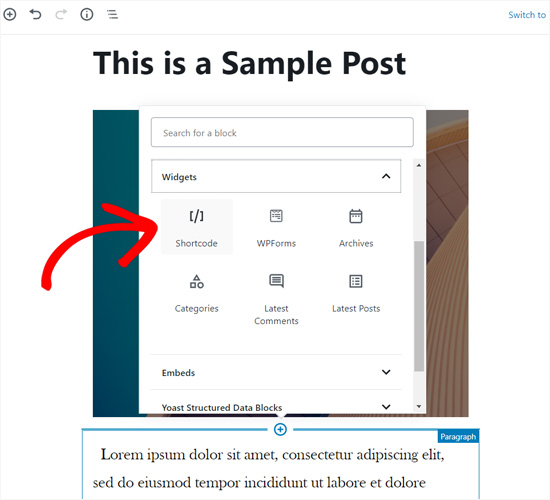
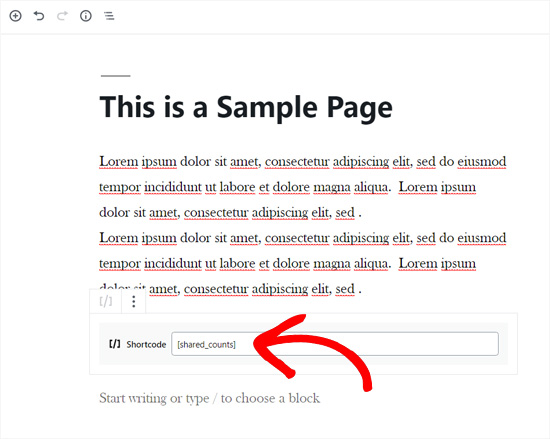
To add shortcodes in WordPress, there is a shortcode block in the WordPress block editor.

Shortcode Block in Gutenberg Editor

You can simply add the block to your content area and then paste the Shared Counts shortcode.

Insert Shared Counts Shortcode

Using the shortcode, you can add social share buttons really anywhere on your site.

Adding Floating Social Share Bar in WordPress

The Shared Counts plugin allows you to add social share buttons above content, below content, or both above and below content. These share buttons are static and not visible all the time.

Another popular way to display social sharing buttons is by adding a floating social sharing bar. It is a social sharing menu that sticks on users’ screens as they scroll down.

Unlike the standard sharing buttons, the floating social share bar will be seen the whole time a user reads your article. Making them more noticeable and helping you boost social sharing.

Some user experience experts argue that it makes your website look bad as it fills out the white space. However, if you can keep it clean, then it can be quite useful.

For the floating social share buttons, you need to install and activate the Sassy Social Share plugin.

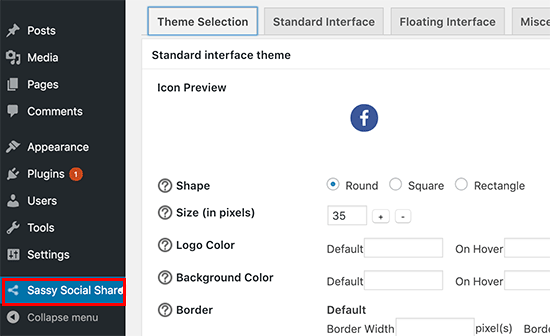
Upon activation, the plugin will add a new menu item labeled ‘Sassy Social Share’ to your WordPress admin sidebar. Clicking on it will take you to the plugin’s settings page.

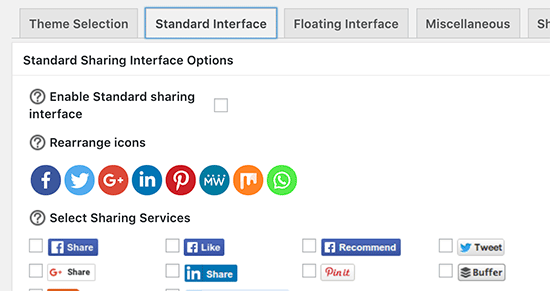
Select your button style

First, you need to choose an icon style. The plugin comes with square, rounded, and rectangle buttons. You can choose styles for both the floating social share bar and the standard share bar.

Next, you need to switch to the ‘Standard Interface’ tab. From here you can enable or disable the standard static social sharing buttons.

Standard sharing buttons

We recommend using either floating or static social buttons. Using both of them will be an overkill and may create a bad user experience.

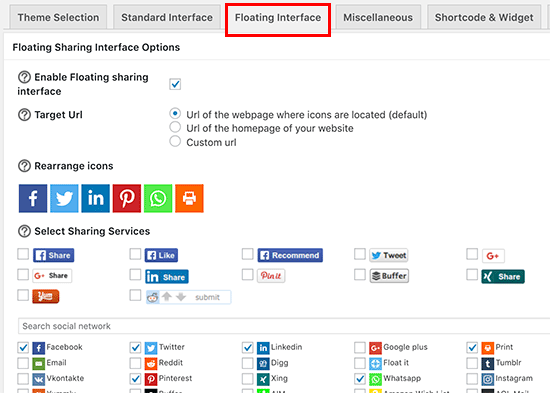
Next, you need to switch to the ‘Floating Interface’ tab and check the box next to ‘Enable Floating sharing interface’ option.

Floating social share plugin settings

After that, you need to choose the social media websites you want to display. You can add or remove buttons and rearrange them by simple drag and drop.

Once you are finished, click on the ‘Save Changes’ button to store your settings.

You can now visit your website to see floating social share buttons in action. Here’s how it looked on our demo website.

Floating social share buttons

We hope this article helped you learn how to add social share buttons in WordPress. You may also want to learn how to add social media icons to WordPress menus and how to add the social icons to the sidebar.

If you liked this article, then please subscribe to our YouTube Channel for WordPress video tutorials. You can also find us on Twitter and Facebook.

The post How to Add Social Share Buttons in WordPress (Beginner’s Guide) appeared first on WPBeginner.

Source: Wordpres

The post How to Add Social Share Buttons in WordPress (Beginner’s Guide) appeared first on TuneMaster.ml.
Ultimate Guide to Creating a WordPress Membership Site

Do you want to build a membership website? For a long time, website owners relied solely on advertising and affiliate revenue to monetize their content.
A membership website allows you to make money online by allowing users to pay for premium content, features, and access to the community.

You will need a platform that has features for managing users, memberships, payments, etc. Luckily, there are some really great membership plugins for WordPress that make it super easy.

In this step by step guide, we will show you how to easily create a WordPress membership site without any coding knowledge.

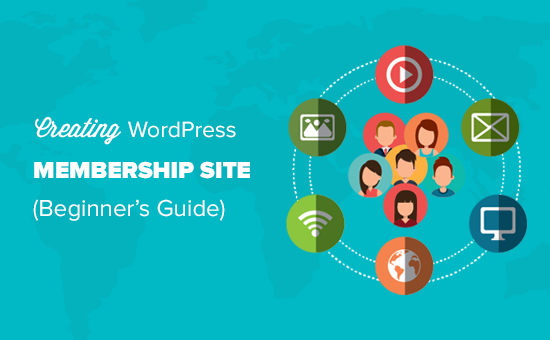
Creating a WordPress membership website

What Do You Need to Start a WordPress Membership Website?

Unlike 10 years ago, it’s quite easy to make a website these days. Out of all the platforms and website builders, WordPress makes it the easiest for anyone to build their own membership website and start selling with little to no technical skills.

You’ll need the following three things to start:

  1. A domain name. This will be your website’s address (Example, wpbeginner.com).
  2. A web hosting account. This is where your website files are stored.
  3. A membership addon (It will convert your regular website into a membership platform).

You can set up a fully functional membership website with WordPress in less than 30 minutes, and we’ll walk you through every step of the process.

Below are the steps that we will cover to help you make a powerful membership website with WordPress.

  1. Getting started with a membership site
  2. Choosing a WordPress membership plugin
  3. Setting up your membership website
  4. Adding payment methods
  5. Adding membership levels
  6. Restricting access based on membership plans
  7. Creating members only content
  8. Creating a pricing page
  9. Adding sign up and login forms
  10. Customizing email templates
  11. Viewing reports to grow your website
  12. Extending your membership website

Ready? Let’s get started.

Step 1. Getting Started with a WordPress Membership Site

To create a membership site, you must make sure that you are using the right WordPress platform. Yes, there are two types of WordPress.

We recommend using the self-hosted WordPress.org version because it gives you unrestricted access to all features and tools that you need (see the full comparison of WordPress.com vs WordPress.org).

For a self hosted WordPress site, you’ll need a WordPress hosting account, domain name, and a SSL certificate.

Typically, a domain name costs around $14.99 / year, web hosting around $7.99 / month, and SSL certificate costs around $69.99 / year.

If you are just starting out, then these startup costs can add up quickly.

Thankfully, we have a way to fix that.

Bluehost, an official WordPress recommended hosting provider, has agreed to offer our users a free domain name, free SSL certificate, and a discount on web hosting.

Basically, you can get all of the above for $2.75 per month.

→ Click here to Claim this Exclusive Bluehost offer ←

Note: At WPBeginner we believe in full transparency. If you sign up with Bluehost using our referral link, then we will earn a small commission at no extra cost to you (in fact, you will save money and get a free domain + SSL certificate). We would get this commission for recommending just about any WordPress hosting service, but we only recommend products that we use personally and believe will add value to our readers.

Once you have signed up for hosting, the next step is to install WordPress. Follow the instructions in our step by step guide on how to start a WordPress blog, and you’ll be up and running in no time.

Since Bluehost already comes with WordPress pre-installed, you can move on to setting up your WordPress membership site.

Step 2. Choosing a WordPress Membership Plugin

There are plenty of free and paid WordPress membership plugins that you can use. However, each one of them has its own pros and cons. We have a full comparison of the best WordPress membership plugins.

To choose the right WordPress membership plugin, you need to decide what kind of membership website do you want to build and what features will you need?

If you just want to allow user registration on your WordPress site, then you can use WPForms. It is a WordPress form builder plugin that allows you to easily create user login and registration forms. You can even allow users to submit articles without accessing the WordPress admin area.

On the other hand, if you want to sell subscriptions, paid content, or digital downloads, then you’ll need a more robust WordPress membership plugin, like MemberPress.

MemberPress comes with advanced membership features that allow you to accept payments, create membership levels, restrict access based on levels, and more.

Selling online courses can be another possible scenario. In this case, you’ll need LearnDash, a complete WordPress LMS plugin with all the learning management features.

You can also integrate LearnDash into MemberPress to create a powerful website with online courses as well as membership subscriptions.

That being said, let’s start setting up your WordPress membership website.

Step 3. Setting up Your WordPress Membership Website

We are choosing MemberPress as our go-to plugin because it has all the features we mentioned above, and it works perfectly with third-party plugins necessary for the growth of your business.

First thing you need to do is install and activate the MemberPress plugin. For more details, see our step by step guide on how to install a WordPress plugin.

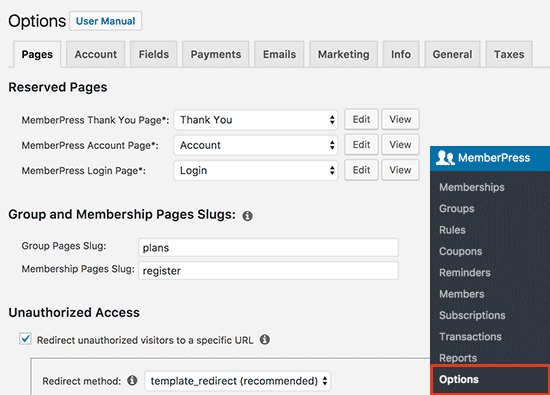
Upon activation, you need to visit the MemberPress » Options page to configure the plugin settings.

MemberPress options page

Step 4. Add a Payment Method

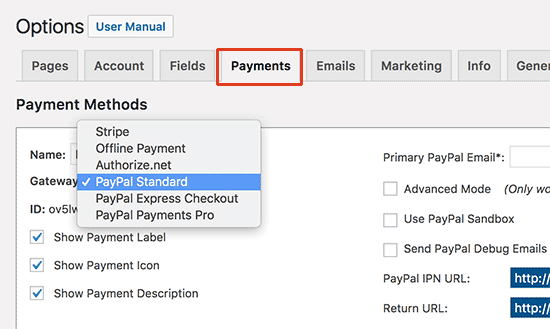
The options page is divided into different tabs. The first thing you need to set up is a payment gateway because it allows you to accept payments on your membership site.

You can do this by switching to the ‘Payments’ tab and then selecting your payment gateway.

MemberPress payments

MemberPress supports PayPal (Standard, Express, and Pro), Stripe, and Authorize.net out of the box. You need to select the payment method you want to setup and provide the required credentials.

You can also add multiple payment methods by clicking on the add button to add another payment method.

We typically use two options: Stripe for credit cards and PayPal as a secondary option because some users prefer PayPal over giving out credit card details.

Don’t forget to click on the ‘Update Options’ button at the bottom of the page to save your settings.

Step 5. Creating Membership Levels

The next step is to create membership levels that your users can purchase. Each membership level can have different pricing plans, perks, and access. You can even have a free membership plan.

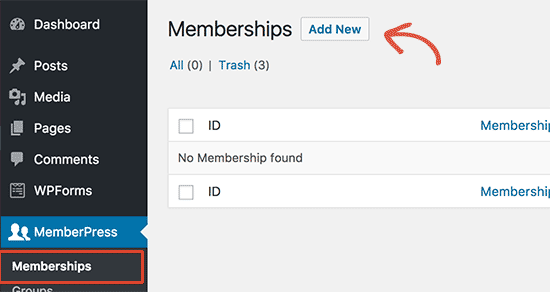
To create a membership level, you need to go to MemberPress » Memberships page and click on the ‘Add New’ button at the top.

Add membership level

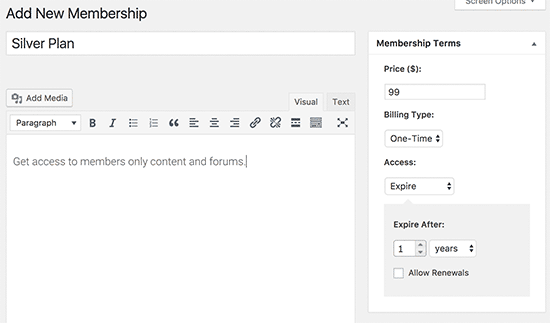
On the next page, enter a title for this particular membership plan and then provide the plan details in the post editor.

You will need to set the pricing and expiration for this plan under the membership terms section.

Membership plan

In the example above, we have created a yearly membership plan.

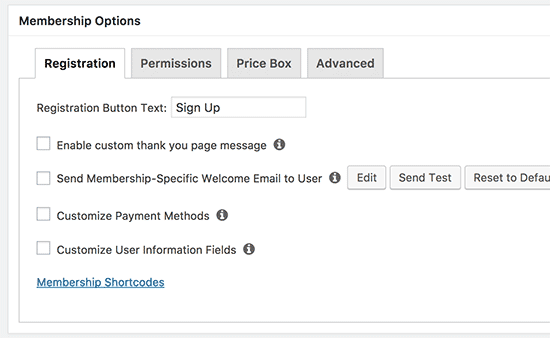
After that, you need to scroll down to the membership options meta box below the post editor. This is where you can customize permissions and membership options for this particular plan.

Membership options

Once you are satisfied with the membership plan, you can click on the publish button to make it available.

Go ahead and repeat this process to create as many membership plans that you need.

Step 6. Restrict Access for Membership Plans

The next step is to select which content would be available to different membership plans on your website. MemberPress makes it very easy to control access using ‘Rules’.

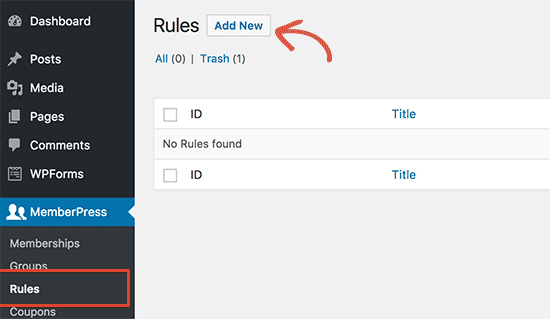
You can setup rules by visiting the MemberPress » Rules page and clicking on the Add New button at the top.

Add new rules

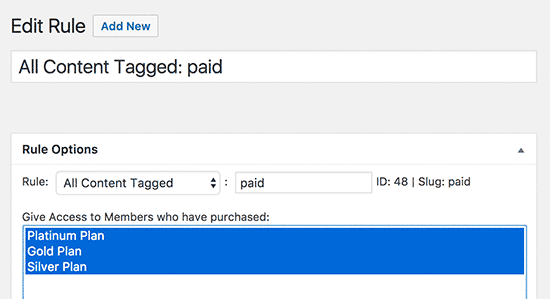
The rule edit page allows you to select different conditions and associate them to a membership plan.

For example, you can select all content that matches a particular tag or category to be available only to members with the silver subscription plan.

Add a rules set to MemberPress

You can also create more specific rules. For example, a single post or page, child pages, or a specific URL.

Below the rules editor, you’ll see the content drip and expiration options.

Drip content allows you to gradually release content to users instead of giving it all away at once. The expiration option makes the content unavailable after a defined period of time.

If you are not sure, then you should leave them unchecked.

Once you are satisfied, go ahead and click on the ‘Save Rule’ button to save your rule settings.

Repeat the process to create more rules as needed for your membership site.

Step 7. Adding Members Only Content

MemberPress makes it super easy to create members-only content using Rules.

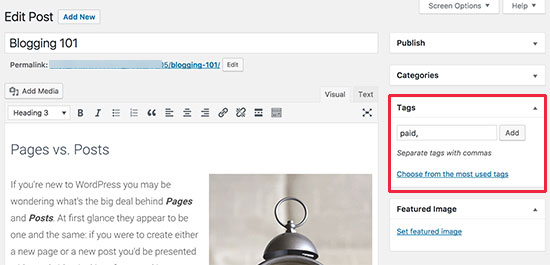
In the above example, we created a rule that restricted all content tagged as paid to be restricted. Now all we need to do is to create our paid content and add the paid tag to it.

Adding members only content

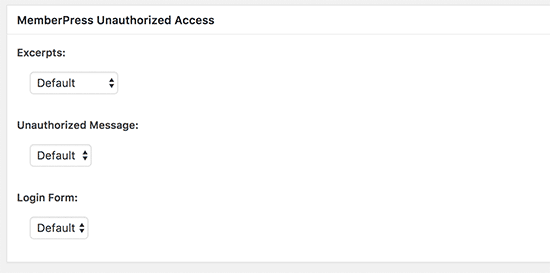
MemberPress also adds ‘MemberPress Unauthorized Access’ metabox below the post editor. This allows you to select what logged out users (non-members) will see when they reach this content.

Restricted content options

You can use the global default settings, or you can show excerpts, login form, or a custom message.

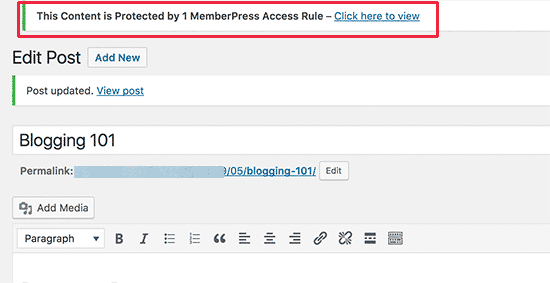
Once you have added members-only content, you can go ahead and publish it. As the page reloads, you will see a success message that this content is protected.

Protected content

Step 8. Create a Pricing Page

This is the page your users will see when they want to sign up for a membership plan. On this page, users will be able to select a membership plan and then move to the payment page.

Users who try to access the restricted or paid areas of your website will also be redirected to this page.

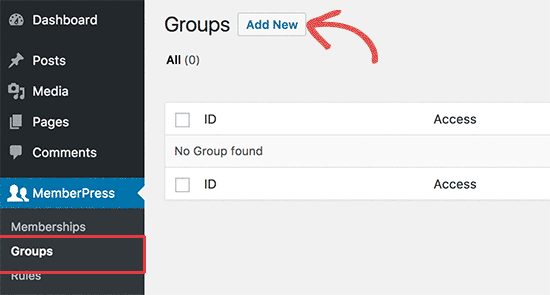
You can configure this by going to MemberPress » Groups page and clicking on the Add New button at the top.

Creating a group

First, enter a title for the group plan page. This will also be the title for the plans page that users will see.

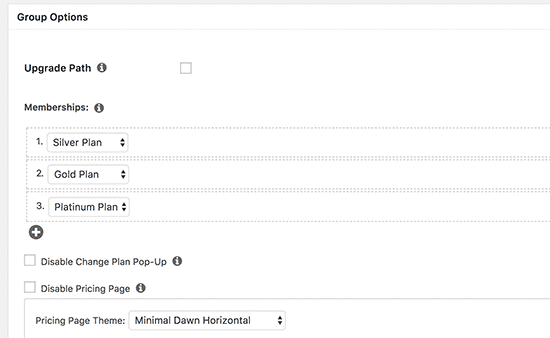
Next, go down to ‘Group options’ metabox and add memberships that you want to display on the page.

Pricing group options

You can also select a theme for the pricing table. MemberPress comes with few ready-made templates for that.

Once satisfied, click on the ‘Publish’ button to make your plan publicly visible.

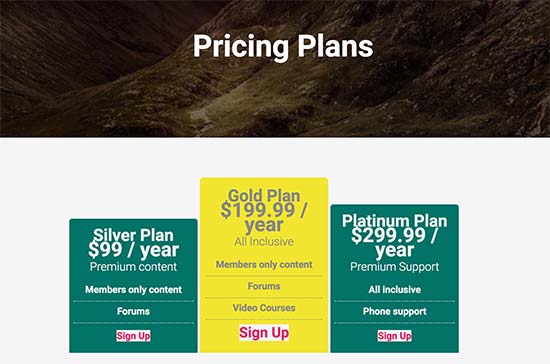
To preview your pricing page, click on the ‘View Group’ link after publishing it.

Pricing page

Redirect users to pricing page

Now that we have the pricing page ready, the next step is to redirect unauthorized users to the pricing page.

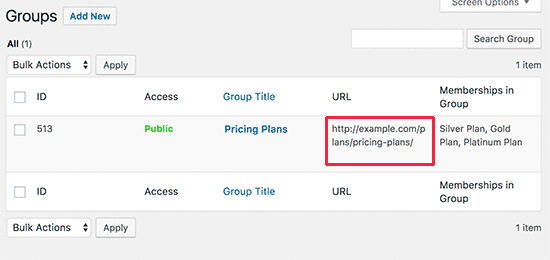
To do that, first you need to visit MemberPress » Groups page and copy the URL next to the group you created in the previous step.

Pricing page URL

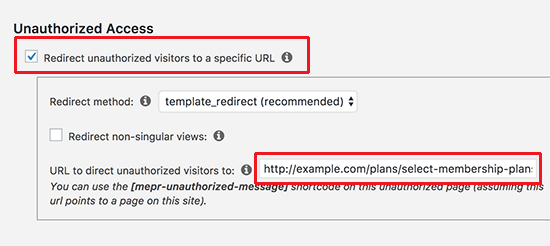
After that, go to MemberPress » Options page and scroll down to the ‘Unauthorized Access’ section.

You need to check the box next to ‘Redirect unauthorized visitors to a specific URL’ option and then paste the group URL you copied earlier.

Redirect unauthorized users to pricing page

Click on the ‘Update Options’ button to save your settings.

Now unauthorized users will be redirected to the pricing plans page when they try to access a members only area.

Step 9. Add Sign up and User Login Forms

Now that you have everything set up, it is time to allow your users to easily find their way around your website.

First, you need to add a user login form so that members can sign in to their accounts.

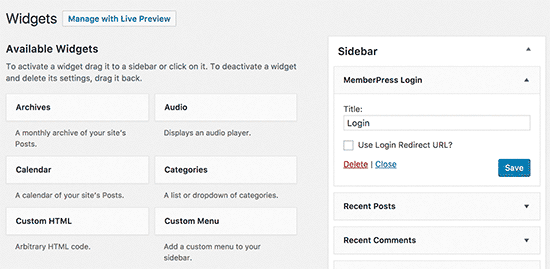
Go to Appearance » Widgets and add ‘MemberPress login’ widget to a sidebar.

MemberPress login widget

Next, we will be adding the pricing page link to the navigation menu, so that new users can select a plan and register.

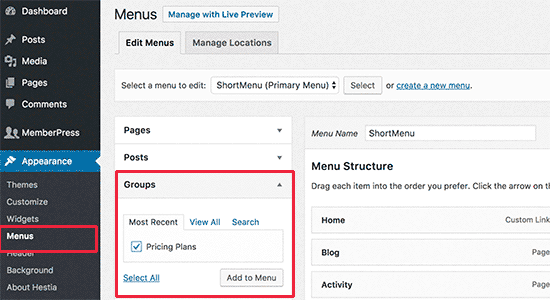
You can do this by visiting the Appearance » Menus page in your WordPress admin. From the left column, you need to click on the Groups tab to expand it. It will show the pricing plan group you created earlier.

Add pricing plans to the menu

Check the box next to your pricing page and then click on the ‘Add to menu’ button.

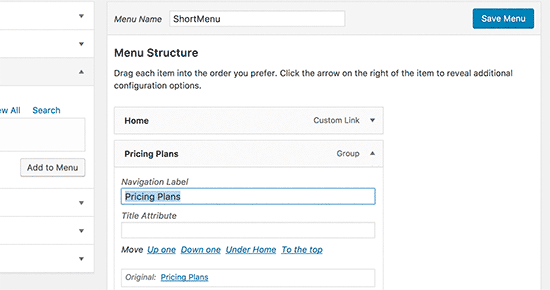
The pricing plan page will now appear in the right column. You can drag and drop to rearrange its position in the menu. You can also edit it and change the link text.

Edit menu item

Don’t forget to click on the save menu button to store your changes.

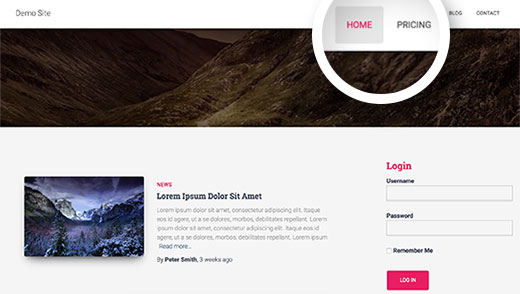
You can now log out of the WordPress admin area and visit your website to see everything in action.

Membership website preview

Step 10. Customizing Membership Email Templates

Your WordPress membership plugin will send several email notifications to members. MemberPress allows you to easily edit those emails and make changes to include your own branding.

Simply go to MemberPress » Options page and click on the ‘Emails’ tab. From here you can manage email notifications sent by MemberPress.

Editing email notifications in MemberPress

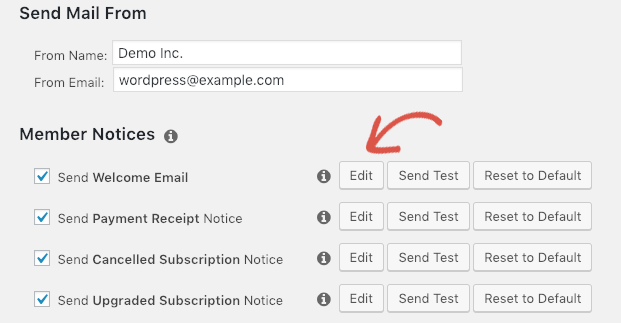
You will see all the email notifications sent by MemberPress to members as well as Administrators. You can click on the edit button to customize any of these notices.

Edit email notices

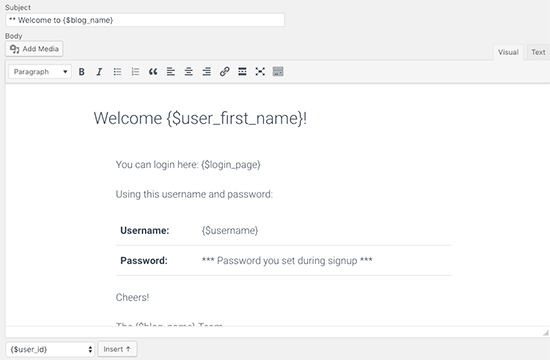
You can use a simple text editor to edit the email message with basic formatting options and smart tags to insert dynamic items like names, username, membership level, and more.

Make sure that you click on ‘Send Test’ button to send yourself a couple of test notifications. This will ensure that MemberPress can send email notifications.

If you are having trouble receiving email notifications, then see our guide on how to fix WordPress not sending email issue.

Step 11. Viewing Reports to Grow your Membership Website

To grow any business, you need data to make informed decisions. MemberPress comes with built-in reports to see how your membership website is doing.

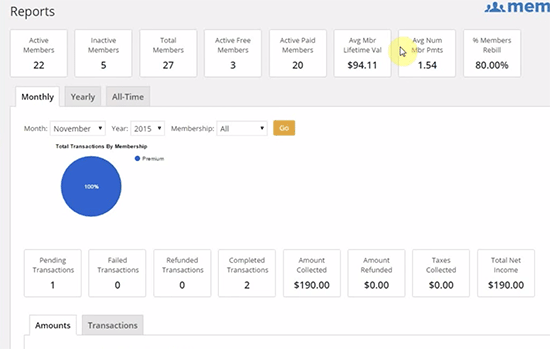
Simply go to the MemberPress » Reports page. From here, you can sort reports by monthly, yearly, or all time data.

MemberPress reports

It will show you number of active, inactive, free, paid, and total members. It will also show you average member lifetime value and other data. You can scroll below to see more charts and click on a date to view transactions.

However, the most important metric of judging a membership website’s success is user engagement.

This is where you’ll need Google Analytics. It allows you to see where your users are coming from and what they do when they are on your website.

MonsterInsights, the most popular Google Analytics plugin for WordPress, offers a complete MemberPress integration that makes it easy to enable Enhanced Ecommerce Tracking for MemberPress.

For detailed instructions, see our guide on how to track user engagement using Google Analytics in WordPress.

Taking Your Membership Website to The Next Level

MemberPress is a powerful WordPress membership plugin. It allows you to easily grow your membership website.

It works beautifully with LearnDash, which allows you to easily create courses and leave the selling part to MemberPress.

You can also use it alongside BuddyPress and bbPress.

Here are some other useful resources to help you grow your WordPress membership site.

That’s all, we hope this article helped you setup your WordPress membership website. You may also want to see our step by step WordPress SEO guide for beginners.

If you liked this article, then please subscribe to our YouTube Channel for WordPress video tutorials. You can also find us on Twitter and Facebook.

The post Ultimate Guide to Creating a WordPress Membership Site appeared first on WPBeginner.

Source: Wordpres

The post Ultimate Guide to Creating a WordPress Membership Site appeared first on TuneMaster.ml.