What you need to know about USB-C audio

A man holding a phone with a Google Dongle in lieu of USB-C headphones.

Seeing as many 2018 flagships ditched the headphone jack, USB-C headphones became the default alternative to conventional 3.5mm earbuds. If you’re one who isn’t quite ready to embrace all-wireless listening, we’ve got you covered on everything you need to know about USB-C audio from the technicalities to actualities.

See: SoundGuys’ best USB-C headphones

What is USB-C audio and who is it for?

It serves as a solution to the missing headphone jack for many of us. While USB-C audio — like anything — has its pitfalls, it’s fine for many especially those who aren’t self-proclaimed audiophiles. What’s more, some manufacturers like Google include USB-C earbuds with the purchase of a headphone jack-less phone, rendering the lack of 3.5mm input a non-issue for general consumers.

Again, USB-C audio has stood as a passable interim remedy for those not yet ready to abandon all modes of wired music playback. Unlike with wireless or true wireless earbuds, listeners don’t deal with connectivity dropouts, Bluetooth codec compatibility, or battery life concerns.

How it works and how it doesn’t  

USB-C audio: Google Pixel USB-C earbuds in white next to Google Pixel 3.

The Google Pixel USB-C earbuds are included with the Pixel 3 and Pixel 3 XL to combat the misssing 3.5mm input.

Similar to converting audio to pass through a headphone jack, USB-C audio requires a DAC and amp for signal processing. Whereas the headphone jack retains processing within the phone, not all USB-C delivery audio uniformly. Thus, delivery methods get a little tricky as a headset can be classified as passive or active.

Quote: Accessory mode support, which means listeners with active USB-C headphones may run into compatibility issues.

If passive, the headphones rely on the smartphone’s DAC and amp to convert the audio signal from analog to digital. If, however, a pair of headphones is active, then it uses its own DAC and amp system. Therefore creating an external conversion process outside of the phone’s domain and into the headset’s.

The main perk of doing is that prolonging an analog signal state and bypassing the smartphone’s internal components mitigates distortion from other smartphone signals. Things get a tad more complicated, though, if you’re using active headphones. In this case, your phone needs to support Audio Accessory mode, which many don’t. Unfortunately, it’s not always apparent which models are active and which are passive, resulting in an expedition of trial and error.

Related: How USB-C headphones work

Issues to be aware of

Razer Hammerhead USB-C audio ANC earbuds.

If your smartphone doesn’t support USB Audio Class 3.0, you may have trouble with the Razer Hammerhead USB-C ANC earbuds.

Although the USB-C port is intended as a universal, multifunctional input, there are some idiosyncrasies that accompany the use of USB-C headphones.

When it comes to audio transmission, the lack of universal Audio Device Class 3 (USB ADC 3.0) integration handicaps the USB-C headphone functionality. Smartphones that don’t meet USB Audio Class 3.0 specifications rely on proprietary add-ons to enable features like noise cancellation. However, if all manufacturers were to adopt USB ADC 3.0, these features could be all-included. Instead, the lack of adoption is forcing its — as thought by some —  irrelevant stature.

In short, there are two sets of rules that USB-C audio abides by: Android OS defaults and smartphone specifications. If you’re in the U.S., think of it like federal and state law, while states can assert their own regulations they must also abide by federal laws. That said, things aren’t always so cut-and-dry.

The lack of USB Audio Class 3.0 adoption makes it difficult to enable additional features like noise cancelling.

Take marijuana legalization: Federally illegal but legal within certain state lines. It’s this kind of mismatch seen in the USB-C audio field that results in confusion and compatibility issues. Until USB ADC 3.0 is universally ratified, some users may continue to experience said inconveniences.

USB-C audio: 2019 and beyond?

USB-C audio JBL Reflect Aware on a piece of wood with an Edison light bulb sticking out from it.

The JBL Reflect Aware earbuds were a fine USB-C option until they were discontinued.

Editor’s Pick

While USB-C earbuds have made headway, the mode’s future popularity may be curtailed. As observed during CES, few companies were investing in USB-C headphones. Admittedly our soles were unable to cover all 2.7 million square feet of the show floor, but the apparent absence of USB-C audio products felt deliberate. That paired with rumors of the headphone jack’s return in the anticipated Huawei P30 and Sony Xperia XZ4 smartphones makes opting for USB-C headphones in 2019 a dubious choice.

One thing is for certain, though: if USB-C headphones cease development, we’ll be left stranded with Bluetooth streaming as our only viable option. Although Bluetooth is fine for casual listening, it can’t outperform wired audio. This leaves us consumers in a bind. Without a dedicated audio port, the future could truly be wireless.

Next: Top 3 excuses companies make for ditching the headphone jack

Source: Android Zone

The post What you need to know about USB-C audio appeared first on TuneMaster.ml.

Google Play still has a clone problem in 2019 with no end in sight

Google Play clone problem featured image
Some problems exist for so long they become normal. Sometimes, like Microsoft’s Blue Screen of Death, they become a meme. App cloning and outright fakes that masquerade as legitimate apps in the Google Play Store are problems like this. Clones are everywhere in the Play Store. Fakes are less common, but potentially even more damaging.

The difference between the two is subtle, but important. A clone is an app or game that looks and acts very similarly to an existing app or game, but is not a full copy. Clash of Lords by IGG is basically Clash of Clans by Supercell, with a couple of minor tweaks to the gameplay, name, and graphical assets. These are generally legal, but annoying.

A fake app tries to clone another app in name, looks, and functionality, often also adding something like malware. Despite Google’s best efforts, both types of apps were fairly common in 2018.

PBG Mobile clone problem

2018 had its fair share of clones

The two biggest mobile games of 2018 were Fortnite and PUBG Mobile. As you can imagine, plenty of other developers wanted in on that action. Battle royale shooters made continuous headlines, garnered millions of downloads, and took the top spots on most mobile game of the year lists. VentureBeat noted that over 100 clones made it to Google Play before either game even launched. The issue hit PUBG Mobile more than Fortnite, as Google actually took steps to prevent clones from stealing Fortnite’s action.

We’d like to say this is a new problem with a quick solution, but it’s not. Every year, a few really big apps or games are followed swiftly by a clone army invasion large enough to make even Palpatine envious. It’s a problem so old we barely even notice it anymore. Most of us simply learned how to wade through the nonsense, or we trust Google enough to put the real version as the top search result.

That didn’t change in 2018.

Android-malware

Fake apps and clones make everything suck more

The threat of fake apps and monotony of game clones affect consumers quite a bit. It causes trust issues and occasionally makes the Play Store confusing and irritating to use. However, if you think consumers are the only ones having problems here, consider what this can do to developers.

There’s an amusing story about how the developers of Blek (a game on iOS) received consistent emails from people complaining about advertising when Blek had no advertising. The people were playing clones and simply didn’t know it, so they complained to the actual developers of the games. Stories like that seem silly and ridiculous, but happen fairly frequently. A well placed clone can cause all kinds of havoc in the Play Store and even Apple’s App Store. In some cases, the clones end up more popular than the actual game, as was the case with the 2048 and Threes.

Fakes can cause some real problems too. In late 2017, a fake Avast app basically farmed phone numbers and five star ratings on Google Play. Google Play removed the real Magisk Manager in mid-2017, and then removed a complete malware-ridden fake in 2018. That same developer had fakes of ZArchiver, Dolphin Emulator, and KKGamer Pro. There was a fad of fake apps using Android device resources to mine cryptocurrency in 2018 as well. You can see where this is going.

Fakes and clones make everything suck and it usually causes at least some sort of damage to both developers and consumers.

This is the featured image for the best battle royale games for android

Can the problem even be solved?

The problem is a little more complicated than it appears on the surface. Cloning a problem, but in some cases it’s also legal, so Google can’t actually do anything about it. Let’s talk about the biggest problems we face with clones and fakes.

Problem One: Re-publishing is easy

The first major problem is re-publishing. A Google Play account costs a single $25 fee and an App Store developer account is $99 per year. That fee is basically pocket change to a cloner making decent money. If you ban the IP address, they can just use a VPN. If you ban the email address, they can just create another email. You can try to ban the app itself, but developers can just change a few lines of code and the package name to subvert that ban. Short of flying to the cloner’s residence and setting them on fire, there isn’t much Apple or Google can do about cloners other than just banning and removing apps when they can.

A ban or app removal is little more than a temporary annoyance to cloners and fakers.

321Mediaplyer is a clone of the popular VLC media player. That’s usually okay because VLC is open source, but 321Mediaplayer has ads and ads aren’t allowed by VLC’s open source license. It was removed in early 2018, and it’s back on Google Play with over 500,000 downloads. Sometimes it’s just that easy to re-publish a clone and keep it under the radar.


Problem Two: Legalese

The second major problem is the legality of it. Video game developers can copyright graphics, music, a story, character design, and a bunch of other stuff. However, they cannot currently copyright game mechanics. The reason is rather complicated, but to put it simply, a developer can’t copyright the idea of a health bar, shooting other players, or other super basic things like that. There are some exceptions, but by and large most game mechanics simply can’t be copyrighted.

Games are like paintings. You can copyright the finished work, but that’s it.

Think of it like artwork. A painter can create a painting of an elephant and copyright that painting. However, that copyright doesn’t prevent other people from painting elephants. They can even use the same brush stroke technique, brand of canvas, and color palette, because you can’t copyright that stuff either. As long as it doesn’t look exactly like the original, it’s not legally considered a fake or a clone. You could end up with hundreds of similar looking elephant paintings with the same canvas, brush strokes, paint type, and colors, and that’s perfectly legal. It is very much the same with mobile apps and games.

You could just let developers copyright game mechanics, but this would destroy the game industry. After all, PUBG Mobile is a shooter, which is hardly unique. It’s not the first battle royale game, nor is it the first survival game with a last-person-standing mechanic. PUBG Mobile is a collection of ideas from other games, as are most games these days. We either let the clones live as they are or we start a horrible legal battle where the developers of Doom, Myst, and Canabalt get everybody’s money.

It’s only illegal if it copies assets and code from the original game.

In the true legal sense, a clone or a fake is only truly illegal if it copies the assets directly from another app or game. We call them clones, but we use it as a slang term. Most game clones on Google Play are just iterations taking part in a fad. It’s a lot like why we got two volcano movies in 1997, two movies about meteors destroying Earth in 1998, or why every country music song uses electronic drum tracks now. People follow success, even if it means shamelessly riding coat tails. Unfortunately, that practice is perfectly legal.


Problem Three: Who’s job is it to fix things?

When I first started writing this article, I was going to follow the popular opinion that Google and Apple simply need to work harder to root out clones. However, Epic Games CEO Tim Sweeney has a very interesting quote in this Polygon interview:

I don’t think we should fault Google or Apple for the appearance of clones. They operate stores that accept hundreds of thousands of products from the developer community, so it would be impossible to keep track of original authorship, and there’s a reasonable DMCA notice process for developers to inform them when copyright infringement does occur.

He’s right and that’s the problem. It’s not really possible or feasible for Google and Apple to judge every submission against all other submissions and existing products to see if it copies an asset or an idea. With everything we’ve talked about so far, we’d basically be asking Google and Apple to create a system that does all this:

  • Sort through hundreds of thousands of submissions annually.
  • Match new submissions with assets from other new submissions or existing products without false flagging legitimate use cases.
  • Apply the extremely complicated laws for copyright infringement without false flagging.
  • Institute a system where developers can appeal false flags that actually works.
  • Operate quickly, because it’s unfair for developers to wait weeks for a submission to go live.

We still have this clone problem, even after Google removed over 700,000 apps and games from the Play Store in 2017 alone. Plus, Google doesn’t have the best history of dealing with app developers, even leaving them to deal with vague bot messages that explain nothing. Look a little further to YouTube, and creators frequently get demonetized, demoted in search rankings, and sometimes flat out banned for hidden reasons without much feedback from YouTube. Google’s AI and Search techniques are super powerful, but even they are not powerful or consistent enough to take on such a large endeavor.

Google’s AI is powerful, but so far Google bots haven’t done great with Google Play, Search, or YouTube.

The most logical course of action is crowdsourcing, developer intervention, and diligence. As Sweeney says, Google has a DMCA notice process for developers. There is also a flagging procedure for all of us normal people. It would take less time, effort, and money for developers and consumers to flag apps on our own rather than depending on Google (or Apple) to build, fund, and hire a whole new department to do it for us. Sometimes, the best answer is just good old fashioned hard work, communication, and paying attention.

Flappy Bird

The good news is blatant fakes are usually easy to spot, and Google is usually willing to remove them once notified. Google also does a good job of removing malware and other types of harmful or dangerous apps long before they reach our devices.

As it stands, any fully implemented system to remove illegal clones from the Play Store would actually change very little. There just isn’t much anybody can do about it unless a law changes at some point.

For now, it’s up to us and developers to root out the problems.

Source: Android Zone

The post Google Play still has a clone problem in 2019 with no end in sight appeared first on TuneMaster.ml.

How to Move WordPress From Local Server to Live Site (2 Methods)

One way to speed up your website development is to build your website locally on your own computer using a software like WAMP (for Windows) or MAMP (for Mac).

Once you’re finished perfecting your website, the next step is to move it from your computer to a live site and share your creation with the world. In this article, we will show you how to easily move WordPress from local server to a live site.
Move WordPress From Local Server to Live Site

We will cover two different methods to move WordPress from local server to your live website (step by step).

The first method uses a WordPress migration plugin and is recommended for beginners. In the second method, we will show you how to manually move WordPress from local server to a live site.

You can choose the method that best suits you:

Before You Begin

In order for you to migrate WordPress from localhost to live server, you need to have a few things in place.

First, we’re assuming that you have a WordPress site running on local server (also called localhost) on your computer, and you have full access to it.

Next, you’ll need to have a domain name and web hosting. We have a list of the best WordPress hosting companies that you can choose from.

To speed it up, you can use Bluehost. They’re an official WordPress recommended hosting provider, and they are offering our users an exclusive 60% off discount + a free domain.

If you need help setting up your website, follow our step by step guide on how to make a website.

Finally, you will need to have a FTP program and know how to use FTP, so you can upload your content to the live site.

Ready? Let’s begin migrating your WordPress site.

Method 1. Transfer WordPress from Local Server to Live Site Using a Migration Plugin

This method is easier and recommended for beginners. We’ll be using a WordPress migration plugin to move WordPress from localhost to a live site.

Step 1. Install and Setup Duplicator Plugin

First, thing you need to do is install and activate the Duplicator plugin on your local site. For more details, see our step by step guide on how to install a WordPress plugin.

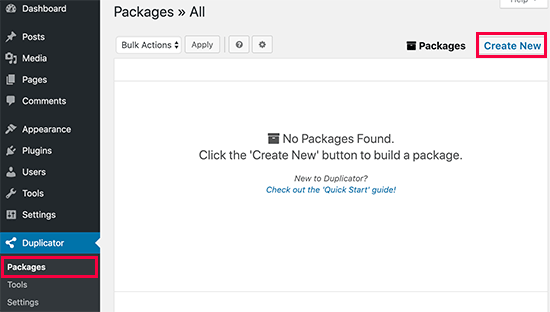
Upon activation, you need to go to Duplicator » Packages page and click on the ‘Create New’ button.
Creating a new Duplicator package

After that, click on the next button to continue.

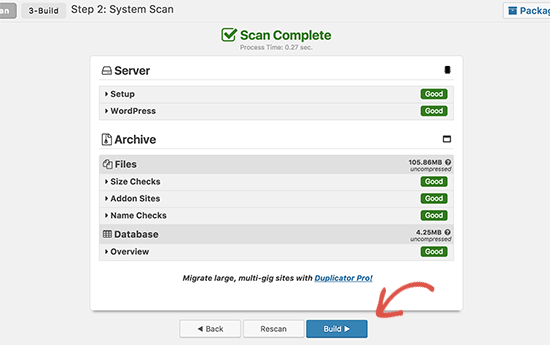
Duplicator will now run some tests to see if everything is in order. If all items are marked ‘Good’ then click on the ‘Build’ button.
Build package

This process may take a few minutes depending on the size of your website. You need to leave this tab open until the process is complete.

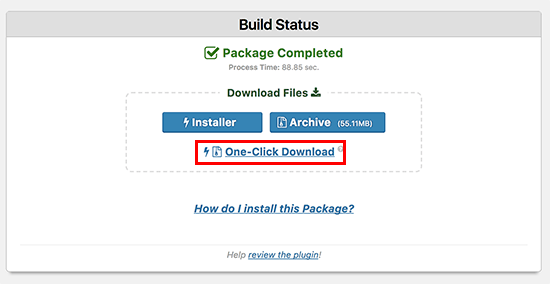
Once finished, you’ll see download options for Installer and the Archive package. You need to click on the ‘One click download’ link to download both files to your computer.
Download package

So what are these files?

Well, the archive file is a copy of your complete WordPress website. It includes all WordPress core files as well as your images, uploads, themes, plugins, and a backup of your WordPress database.

The installer file is a script that will automate the migration by unpacking the archive file.

Step 2. Create a Database for Your Live Site

Before you can run the installer or upload the WordPress website from localhost to your hosting server, you will need to create a MySQL database for your live website.

If you have already created a MySQL database, then you can skip this step.

To create a database you need to visit your hosting account’s cPanel dashboard. Scroll down to the Databases section and then click on the MySQL Databases icon.

Database icon in cPanel

On the next screen, you’ll see a field to create a new database. Simply provide a name for your database and click on the ‘Create Database’ button.

Create new database

cPanel will now create a new database for you. After that, you need to scroll down to the MySQL Users section.

Next, provide a username and password for your new user and click on the ‘Create a user’ button.
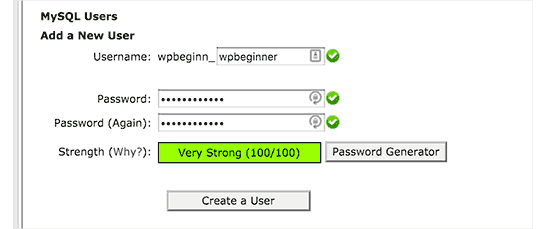
Add a MySQL user

The new user you just created, still does not have permission to work on the database. Let’s change that.

Scroll down to the ‘Add User to Database’ section. Simply select the database user you created from the dropdown menu next to the ‘User’ field, then select the database, and click on the add button.

Save user to the database

Your database is now ready to be used with your WordPress site. Make sure to note down the database name, username, and password. You’ll need this information in the next step.

Step 3. Upload Files from Local Server to Live Site

Now you need to upload the archive and installer files from your local site to your hosting account.

First, connect to your live site using an FTP client. Once connected, make sure that the root directory of your website is completely empty.

Normally, root directory is the /home/public_html/ folder.

Some WordPress hosting companies automatically install WordPress when you sign up. If you have WordPress files there, then you need to delete them.

After that, you can upload the archive and installer files from Duplicator to your empty root directory.
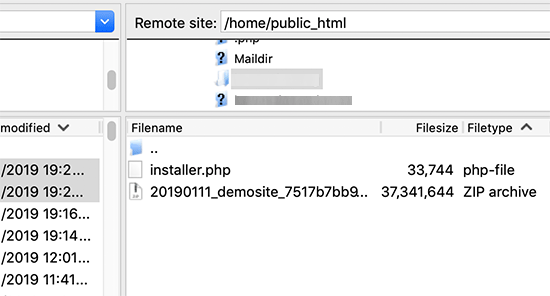
Migration files in the root directory

Step 4. Runing The Migration Script

After you have uploaded the migration files, you need to visit the following URL in your browser:

http://example.com/installer.php

Don’t forget to replace example.com with your own domain name.

This will launch the Duplicator migration wizard.
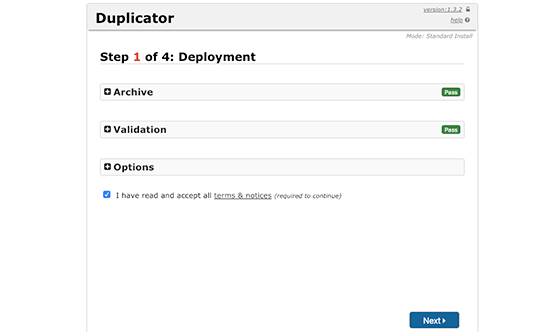
Duplicator intialized

The installer will automatically scan for the archive file and run a validation test. You need to check the terms & conditions checkbox and continue by clicking on the Next button.

On the next screen, it will ask you to enter your WordPress database information.

Your host will likely be localhost. After that, you will enter the details of the database you created in the earlier step.
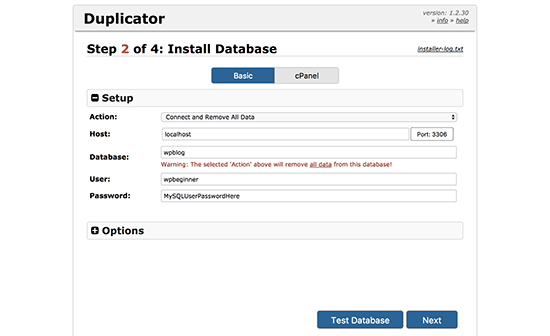
Connect your database

Click on the next button to continue.

Duplicator will now import your WordPress database backup from the archive into your new database.

Next, it will ask you to update site URL or Path. You shouldn’t have to change anything since it automatically detects the URL of your live website, and its path.
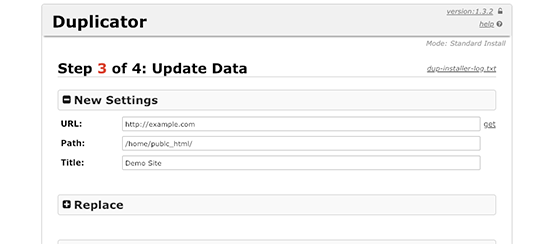
Update site URL

Click on the next button to continue.

Duplicator will now finish the migration and will show you a success screen. You can now click on the ‘Admin Login’ button to enter the WordPress admin area of your live site.
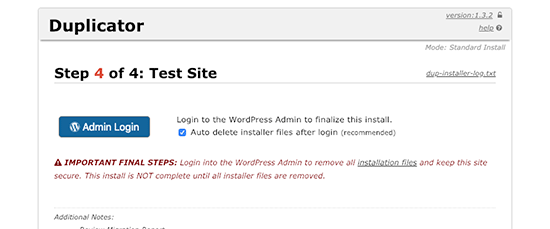
Successfully moved

Once you login to your live site, Duplicator will automatically clean up the installation files.

That’s all, you have successfully moved WordPress from local server to your live site.

Method 2. Manually Transfer WordPress from Local Server to Live Site

In this method, we will show you how to manually move WordPress from local server to your live site. It will come in handy if the first method doesn’t work or you prefer to do it manually.

Step 1: Export Local WordPress Database

The first thing you need to do is export your local WordPress database. We’ll be using phpMyAdmin to do that. If you are unfamiliar with it, then you might want to take a look at our guide to WordPress database management using phpMyAdmin.

Simply go to http://localhost/phpmyadmin/ and click on your WordPress database. Next, click on the Export button from the top menu bar.

Export from localhost

In the Export Method option, you can choose “Quick” or “Custom”. Custom will provide you with more options to export your database.

We recommend choosing Quick, and then click the Go button to download your database.
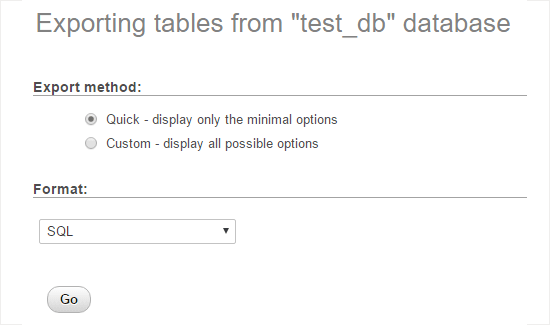
Export WordPress database using phpMyAdmin

Step 2: Upload WordPress Files to Live Site

Now we’ll need to move all your website files to the live site.

To get started, go ahead and open your FTP client and connect to your web hosting account.

Once you’re connected to your live site, make sure you upload the files in the right directory. For example, if you want the site to be hosted on yoursite.com, then you would want to upload all the files in your public_html directory.

Now select your local WordPress files and upload them to your live server.
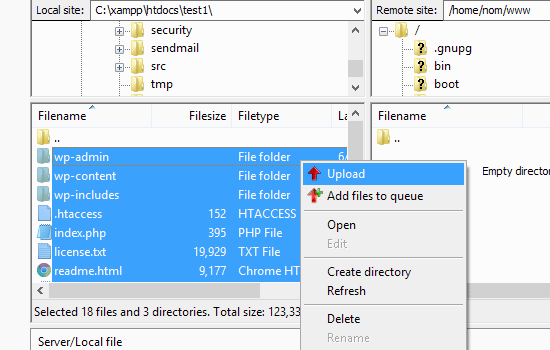
Uploading WordPress from localhost to live site

Step 3: Create MySQL Database on Live Site

While your FTP client is uploading your WordPress files, you can start importing your database to the live server. Most WordPress hosting providers offer cPanel to manage your hosting account, so we’ll show you how to create a database using cPanel.

First, you need to log in to your cPanel dashboard and click on the MySQL Databases icon which can be found in the databases section.

Database section in cpanel

On the next screen, create a database by entering a name for your database and clicking the Create Database button.

New database

After creating your database, scroll down to the MySQL Users section and create or add an existing user to the database.

After adding the user, cPanel will take you to set MySQL privileges for that user. Simply grant all privileges to the user by making sure every box is checked, and then click the Make Changes button.
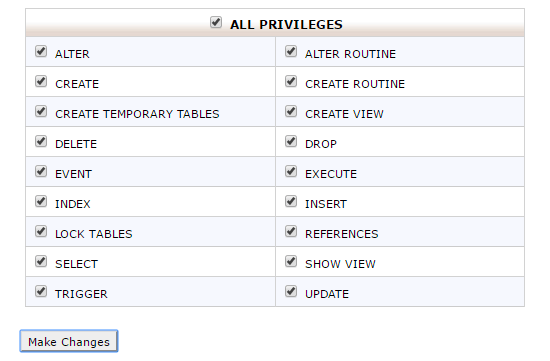
grant all privileges to database user

Step 4: Import WordPress Database on Live Site

The next step in the process is to import your WordPress database.

Go to your cPanel dashboard, scroll down to the databases section and click on phpMyAdmin.

This will take you to phpMyAdmin where you want to click on the database you created in Step 3. PhpMyAdmin will show your new database with no tables.

Click on the Import tab in the top menu. On the import page, click on Choose File button and then select the database file you saved in Step 1.

Lastly, press the Go button at the bottom of the page. PhpMyadmin will now import your WordPress database.
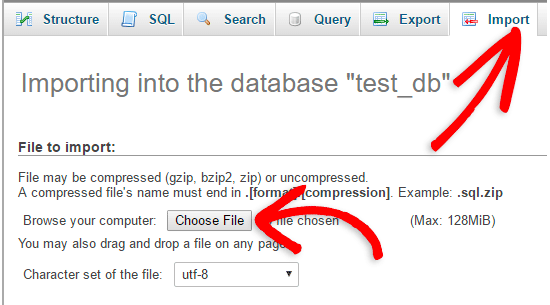
Import database via phpMyAdmin

Step 5: Change the Site URL

Now you need to change the site URL in your database, so that it will connect with your live WordPress site.

In phpMyAdmin, look for the wp_options table in your database that we just imported in step 4. If you changed your database prefix, then instead of wp_options it might be {prefix}_options.

Click on the Browse button next to wp_options or the link that you see in the sidebar to open the page with a list of fields within the wp_options table. See screenshot below:
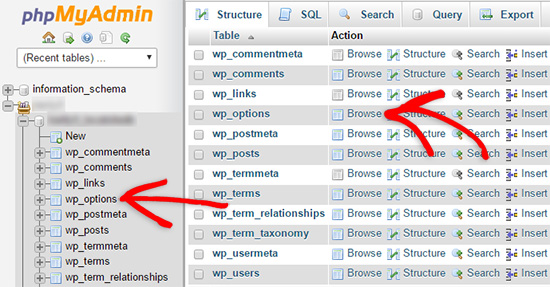
Browse the wp options table

Under the field options_name, you need to look for siteurl. Click the Edit Field icon which can be found at the far left at the beginning of the row.

Edit siteurl in phpMyAdmin

When you click the edit field, an edit field window will appear. In the input box for option_value, you will see the URL of your local install probably something like: http://localhost/test. Carefully insert your new site url in this field, for example: https://www.wpbeginner.com

Save the field by clicking the Go button.
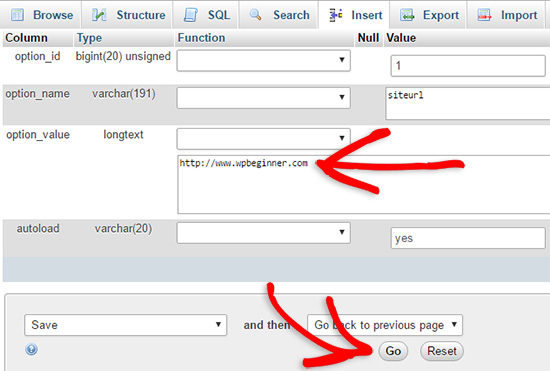
edit the siteurl field

Next, you need to replicate this step for the option name: home. The wp_options page can be a few pages long, so simply find the home tab.

Usually it is on the second page which you can navigate to by clicking on the pagination arrows in phpMyAdmin.

Update the home url to be the same as your siteurl.

Step 6: Setup Your Live Site

Now that we have imported the database and all of our content should be uploaded, it’s time to configure WordPress.

At this time, your site should be showing an Error Establishing Database Connection error.

To fix this, connect to your website using an FTP client and edit wp-config.php file.

You will need to provide the database name, user and password you created earlier in Step 3.

Next, save the wp-config.php file and upload it back to your server.

You can now visit your website, and it should be live now.

Next, you need to login to your WordPress admin panel and go to Settings » General. Without changing anything, scroll to the bottom and click the Save Changes button.

This will ensure that the site URL is corrected anywhere else that it needs to be.

After that go to Settings » Permalink and click Save Changes to ensure that all post links are working fine.

Step 7: Fix Images and Broken Links by Updating Paths

Whenever you are moving a WordPress site from one domain to another, or from local server to a live site, you’ll face broken links and missing images.

You can either use the SQL query or use the Velvet Blues WordPress plugin.

For those who want to do it via SQL, here is a simple SQL query that should solve this problem:

UPDATE wp_posts SET post_content = REPLACE(post_content, 'localhost/test/', 'www.yourlivesite.com/');

Simply go to phpMyAdmin, click on your database and then click on SQL from top menu. Write this query, but don’t forget to change it with your own local site and live site URLs.
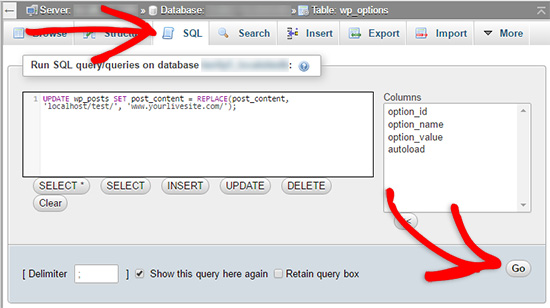
Fixing WordPress images and broken URLs after moving to live site

That’s all, you have successfully migrated WordPress from localserver to a live site!

Hopefully now your live website is up and running smoothly. Be sure to check out your website to make sure that everything is working as expected. If you notice any errors, you can check out our guide to common WordPress errors for help troubleshooting.

If you liked this article, then please subscribe to our YouTube Channel for WordPress video tutorials. You can also find us on Twitter and Facebook.

The post How to Move WordPress From Local Server to Live Site (2 Methods) appeared first on WPBeginner.

Source: Wordpres

The post How to Move WordPress From Local Server to Live Site (2 Methods) appeared first on TuneMaster.ml.

Garmin’s first 4G-connected watch is a repurposed Vivoactive 3 Music for Verizon

Garmin has finally announced its first 4G-connected smartwatch, and it’s coming to Verizon. The company is launching a version of its Vivoactive 3 Music smartwatch on Verizon’s network sometime in 2019.

Under the hood, the Vivoactive 3 Music on Verizon is the same as the smartwatch that launched in June 2018, which means you’re getting a pretty high-end GPS watch for the money. It comes with a built-in GPS, heart rate sensor, support for Garmin Pay, access to Garmin’s Connect IQ store, and local music storage up to 500 songs along with support for Deezer playlists. Spotify support is coming soon too, as well as for the non-4G variant. Garmin says the battery should last around five days in smartwatch-only mode, or roughly four hours while connected to GPS and Verizon’s 4G network.

There are some new safety features baked in that might make you opt for this watch over the non-4G model. If you feel unsafe in any situation while wearing the watch, pressing and holding the physical button for five seconds sends a discrete message to pre-loaded emergency contacts and shares your location. That same message and location-sharing feature will also be sent out to emergency contacts if the smartwatch senses you’ve experienced an impact while walking, running, or cycling. 

Also read: Garmin Vivoactive 3 Music hands-on | Garmin Vivoactive 3 review

Quite frankly, more smartwatches need to have safety features like these built in. If you or a loved one has a habit of exercising around the neighborhood at night, this new watch should give you peace of mind.

Pricing and availability will be announced in Q1 2019, and the watch will require a monthly data plan with Verizon. The non-4G model on Garmin.com costs $299.99 ($249.99 on a good day), so the Vivoactive 3 Music on Verizon may cost around the same amount.

We’ll be sure to update you when Garmin announces more pricing and availability details. Until then, be sure to check out some of our other favorite GPS running watches, and head here for more in-depth CES 2019 coverage!

Source: Android Zone

The post Garmin’s first 4G-connected watch is a repurposed Vivoactive 3 Music for Verizon appeared first on TuneMaster.ml.