Best true wireless earbuds – there’s more than Apple out there

If your new phone’s missing the headphone jack, you’ve probably already had to entertain the idea of switching to Bluetooth. Why stop there? Why not go with a true wireless option, and ditch even the cables connecting the earbuds to each other? There’s more than just AirPods out there.

Read Next: Best mobile accessories

We put a bunch of headsets through the wringer over at SoundGuys, but I’m going to give you the overview here. We measured sound performance, battery life, and isolation, with a calibrated test fixture to suss out what you can expect when you buy true wireless earbuds. In Twitter polls over the last year, it was obvious battery life was the most important metric for true wireless earbuds, followed by sound quality, then isolation. Price was a distant fourth.

A photo of the Apple AirPods in front of a mechanical keyboard on a white desk.

AirPods are justifiably popular, but may not be for everyone because they don’t take reasonable measures to stay in your ears.

Your needs might be different, so we’ve included all our data at the bottom of the article. With that in mind, let’s attack these needs one by one, shall we?

Best battery life: Jabra Elite 65t

If battery life is your main concern, the Jabra Elite 65t is king. Posting the best score by over an hour, Jabra’s true wireless earphones lasted 5 hours 51 minutes on average before they needed to be recharged. Considering most commutes are shorter than that, these should last you through most of the day — even if you take them to the gym.

This is better for power useres that need a near-constant earphone presence. While 76% of poll respondents (n=5,120) use their headphones under 3 hours a day, those that need more than that should look to models like the Jabra Elite 65t.

A photo of the Jabra Elite 65t true wireless earphones.

Jabra’s Elite 65t has stellar battery life, but imperfect audio.

They don’t have the greatest sound, though. While they have a high rating for isolation, they don’t block out low-frequency noise. You may find on the subway you can’t hear your music over the din of a train ride. They’re a great case study for why we show the charts on isolation, because simply reading one number doesn’t tell you the whole story. These are great for the office or walking on the street, but you’ll want to keep looking if you ride the bus or take the train often.

Best sound quality: Samsung Gear IconX (not Apple)

A photo of the Samsung Gear IconX with charging case on a wood desk.

Absolutely loaded with features, the Samsung Gear IconX has the best sound quality too.

Probably one of the most credible options on this list is the Samsung Gear IconX. It offers 4GB of storage for your tunes when you can’t carry your phone with you and offers a boatload of features too. The icing on the cake is that this also offers the best audio performance of the group.

Part of the audio advantage the Gear IconX has is that it’s one of the few models here using the aptX standard, but the biggest check in the plus column is its relatively even frequency response. That may not add as much bass as you might like, but it equalizes your music fairly heavily. On top of that, the music will sound a little more “clear,” making smaller details you may not normally hear with entry-level headphones less likely to be masked out by the earphones themselves.

samsung gear iconx frequency response

If we picked a best overall, this model would be a frontrunner. While Apple’s AirPods measure very similarly, the key difference here is that the Samsung Gear IconX can block outside noise and the AirPods can’t. The AirPods function quite well where there’s outside noise, but the Samsung Gear IconX won’t lose as much quality to the stuff you’d rather not hear. In a lab they’re neck and neck, but on the bus or subway the Samsung Gear IconX is the clear winner.

Unfortunately the Samsung Gear IconX has abysmal battery life. In our tests, it lasted merely 1 hour and 31 minutes on average — something Samsung claimed to fix from its previous model. While that’s more than enough for two 40-minute trips, you should absolutely always put them in the charging case when they’re not in use. They aren’t ideal for long flights.

Best for commuters: Sony WF-SP700N

A photo of the Sony WF-SP700N true wireless earphones

The Sony WF-SP700N not only sits in your ear, but it also uses a helix fin to hold it in place.

Sony’s entry on this list is a really solid jack of all trades, but the WF-SP700N is a master at noise cancellation. Though not as good as its bigger, badder brother the WH1000X M2, the true wireless earphones shown here block out more noise in every range than any other entry on this list. This is super important because the base frequencies of most music live in the lows, which are very hard for in-ears to block out. If low-frequency noise gets into your ear canal, you’ll perceive a larger loss in audio quality due to auditory masking.

The advantage of these earphones is twofold: not only does the ANC unit block out mids and highs (green and cyan, respectively) well, but it also bumps bass frequencies to help mask out the world around you. While we don’t recommend ever cranking the volume to drown out the train, we also know that it’s a necessary evil in a world where bass boost and Beats exist.

A chart from SoundGuys showing the active noise canceling performance of the Sony WF-SP700N.

Even adding that little bit of low-end attenuation helps a lot.

These true wireless earbuds sound pretty decent as well, offering SBC and AAC support, but their shortcoming is battery life. Even though the WF-SP700N lasts a full hour longer per charge than the Samsung Gear IconX, that’s still only about 2 hours, 35 minutes. Definitely keep that charging case handy if you binge music like I do.

True wireless earbuds complete test results

I only highlighted three models here. If you want to see how they all did, the data’s all here. Even the best truly wireless earbuds have a tough time competing with similarly-priced Bluetooth headsets connected by a wire or neckband. Poor battery life, subpar Bluetooth codecs, and terrible connection strength plague this product category.

  Battery life (75dB) Bluetooth Codec Attenuation average
(dBSPL)
Price
Jabra Elite 65t 5.85 hours SBC 14.23 $170
Bose SoundSport Free 4.583 hours SBC Negligible $200
Bang & Olufsen E8 Wireless 4.45 hours aptX Varies by tip $299
JBL Free 4.333 hours SBC 6.9 $129
Sol Republic Amps Air 3.98 hours SBC 8.91 $100
Anker Zolo Liberty 3.567 hours SBC 6.83 $99
Earin M-2 3.5 hours aptX Varies by tip $250
Apple AirPods 3.45 hours AAC Negligible $159
Optoma Nuforce BE Free8 3.1 hours aptX 6.99 $129
Sony WF-SP700N 2.583 hours SBC 19 $179
Samsung Gear IconX 1.52 hours aptX 7.19 $180

You should take those average isolation numbers with a grain of salt, because not every set blocks out the same frequencies. The Jabra and Sony above appeared similarly good, but the Jabra had a 0dB rating under 1000Hz, which is where most of your music is. The difference between the Sony WF-SP700N and the rest of the pack is that it can lop off about 10dB of noise in that range where no other truly wireless earbuds can.

There’s no “one size fits all” standard out there for frequency responses — people’s biology varies too greatly for that. We highlighted the Samsung Gear IconX because it’s not only the easiest to equalize, but it generally sounds the most clear of the options here. Some models targeted something akin to an equal-loudness contour with emphasized bass (pink) and treble (cyan), and others aimed for a more studio (read: “flat” or “neutral”) response.

A chart from SoundGuys showing the frequency response of the Earin M-2.
A chart from SoundGuys showing the frequency response of the Jabra Elite 65t.
A chart from SoundGuys showing the frequency response of the JBL Free.
A chart from SoundGuys showing the frequency response of the Optoma NuForce BE Free8.
A chart from SoundGuys showing the frequency response of the SOL Republic Amps Air.
A chart from SoundGuys showing the frequency response of the Sony WF-SP700N.
A chart from SoundGuys showing the frequency response of the Samsung Gear IconX
A chart from SoundGuys showing the frequency response of the Anker Zolo Liberty.
A chart from SoundGuys showing the frequency response of the Apple AirPods.

How we tested

Audio engineers use a dummy head to test out how products will perform for most people — we did too. Specifically, we tested frequency response, isolation, and battery life to keep things simple. You can read more about it here if you want to know more about the specifics.

  • For each product, we played several sine sweeps through the earphones, and logged the frequency response once we arrived at a repeatable result demonstrating the hallmarks of a good seal.
  • To test the battery, we use pink noise and a real-time analyzer to find the setting needed to output 75dB(SPL) over the products, and we play music on an infinite loop. This means every reading can be directly compared to each other.
  • To test isolation, we took a sample of pink noise at 90dB SPL at one meter, once with the headphones off, and another with the headphones on. We then subtract one curve from the other.

These three tests are simple — they cover the biggest areas of concern with true wireless earbuds. Your battery life will vary if you tend to crank the volume. Additionally, you could squeak out better isolation performance with third-party tips.

What we considered

We buy most of our test units, so this one got expensive. In order to figure out what to test, we used what we knew from reviewing this category since its beginnings. While most people know only the AirPods, a slew of products you may not know much about have hit the market. We took the units that held up the best in daily use, and rolled with that.

A photo of several true wireless earbuds, including the Anker Zolo Liberty, Bose SoundSport Free, Earin M-2, Jabra Elite 65t, JBL Free, Optoma Nuforce BE Free8, Samsung Gear IconX, Sol Republic Amps Air, and the Sony WF-SP700N.

We tested a boatload of true wireless earbuds to figure out if there were any hidden gems.

That means many true wireless earbuds didn’t quite make it into our article for one reason or another. It’s not that they’re bad, they just have a major tradeoff or two. You may find one of these fit your needs better than what’s listed above.

Honorable mentions

  • Apple AirPods: We’re not biased — I swear! These lack in certain areas relating to sound (isolation) and form. They’ve got great features and decent battery life owing to that W1 chip, but some people straight up won’t be able to use them because they don’t seal the ear canal or even really hold your outer-ear’s helix.
  • Bang & Olufsen E8 Wireless: This model was absolutely exceptional in features, battery life, and isolation (memory foam tips are a godsend). However, it had persistent connection issues with Windows 10 and Android devices. Considering it’s the most expensive entry in our competition here ($300), those problems — plus a strange sound — were enough to sink them.
  • Sol Republic Amps Air: This $100 option was decidedly average in sound quality, but decent in isolation and battery life. A steal at $100.
  • JBL Free: Another rock-solid option, these perform well in battery life and sound quality. A playback time of 4 hours, 20 minutes (stop it) was third best in our tests. Also they’re under $130.
  • Earin M-2: These are actually pretty good. We honestly don’t have many nits to pick here, they just weren’t the best in any of our categories. They’re essentially our Mendoza line.
  • Jabra Elite Sport: On top of a good fit, the Elite Sport also has a built-in heart rate sensor to help you more accurately track your workouts. Check out the full review if you’re interested.
  • Bose Soundsport Free: These were disqualified because they could not maintain a connection to three different devices. They have outstanding battery life and sound good enough, but the product has to actually work well for us to recommend it. You can read more in the full review.
  • Erato Apollo 7: These were on our list for a while as the best all-around option mainly because of their size and sound. If all you want is a discreet pair of good ‘buds, give these a look.
  • Jaybird Run: Jaybird has been running the Bluetooth earbud game for a while, and its true wireless ‘buds are also worth checking out. They didn’t make this list mainly because of a jittery connection, but if you can live with the inconsistency these aren’t a bad option.
  • Sony WF-1000X: Sony has been on a tear recently, releasing products that dominate their respective categories (see MDR-1000X M2 or Sony XB40). The WF-1000X true wireless earbuds are one such option which seem to be getting plenty of fanfare and might be worth checking out, though battery life doesn’t seem too great.
  • Anker Zolo Liberty: If you don’t want to spend too much, Anker is always a good bet. Although the Zolo earbuds weren’t perfect and honestly a little disappointing, you can’t go wrong with a sub-$100 price tag. Check out the full review to see more.
  • Bragi Dash: Our experience with these was not very good, but some people report success.

What’s next

So far, only the Apple AirPods have a rock-solid connection with their W1 chip, though Qualcomm’s got a competitor coming out soon. The current crop of true wireless earphones just don’t quite compare to the ease and stability offered by the W1. We’ll be there to document how this product category unfolds at SoundGuys, so check back as things get released!

As IFA comes to a close, we now have a few more models to look forward to, namely the Sennheiser Momentum True Wireless, which promise aptX Low Latency, aptX, and AAC support. However, there are other exciting prospects on the horizon such as the waterproof JBL Endurance Peak and the Audio-Technica Sound Reality, the company’s first true wireless product.

Related:

Source: Android Zone

The post Best true wireless earbuds – there’s more than Apple out there appeared first on TuneMaster.ml.

How to Start a Travel Blog (to Make Money or Otherwise) in 2018

Do you want to start a travel blog but don’t know where to begin? Travel blogs are a popular medium to share your travels with not just family and friends but also with the rest of the world. In this guide, we will walk you through how to properly start a travel blog and even make money from it without any special technical skills.

Starting a travel blog to make money

What do you need to start a travel blog?

There are three things you need to properly start a travel blog.

  • A domain name (this will be your blog’s name that people will type to find your site e.g. wpbeginner.com)
  • Web hosting account (this is where your website files are stored on the internet)
  • Your undivided attention for 30 minutes.

Yes, you can get started with a proper professional-looking travel blog in less than 30 minutes. We will walk you through the process every step of the way.

In this step by step tutorial, we will cover the following items.

  • How to Register a Domain Name for Free
  • How to Choose the Best Web Hosting
  • How to Install WordPress
  • How to Find the Perfect Theme (website design) for a Travel Blog
  • How to Add Content to Your Travel Blog
  • How to Get More Traffic to Your New Blog
  • How to Make Money from Your Travel Blog
  • Resources to Learn WordPress and Grow Your Travel Blog

That being said, let’s get started.

Step 1. Choosing The Right Platform

For most beginners, the biggest mistake is not starting with the right blogging platform. Since you are already here, you will not be making that mistake.

We recommend using WordPress.org. It is the most powerful and popular blogging platform in the world giving you complete freedom to start, grow, and make money from your blog. For more details, see our complete WordPress review.

It is important not to confuse WordPress.org with WordPress.com, as they are two different platforms. WordPress.com is a hosted solution and WordPress.org is a self-hosted platform. For more on this topic, see our comparison of WordPress.com vs WordPress.org.

To start a travel blog with WordPress.org, you will need a domain name and a WordPress hosting account. To learn more, see our article on the difference between domain name and web hosting.

Normally, a domain name costs $14.99 / year and web hosting normally costs $7.99 / month.

That’s a lot for beginners who are just starting their travel blog.

Thankfully, Bluehost has agreed to offer our users a free domain name and discount on web hosting. They are one of the largest hosting companies in the world and officially recommended by WordPress.org.

→ Click Here to Claim This Exclusive Bluehost Offer ←

Basically, you’ll be able to get started for just $2.75 per month.

Bluehost is committed to giving back to the WordPress community since 2005. They have promised us that if you cannot get your blog setup within 30 minutes by following this tutorial, then our expert team will complete the process for you without any cost. They will compensate us, so you don’t have to. Simply contact us for free blog setup help.

Note: At WPBeginner we believe in full transparency. If you sign up with Bluehost using our referral link, then we will earn a small commission at no extra cost to you (in fact you will save money and get a free domain + free SSL). We would get this commission for recommending just about any WordPress hosting company, but we only recommend products that we use personally use and believe will add value to our readers.

That being said, now let’s go ahead and purchase your domain name and hosting for your travel blog.

First, you need to open the Bluehost website in a new browser tab and click on the green get started button.

Get started with Bluehost

Next, you will be asked to select the plan that you want (basic and plus are the most popular among our users).

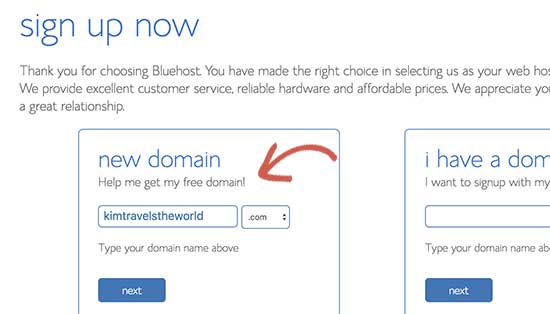
After that, you will be asked to enter the domain name for your website.

Choose domain name

Tip: Make sure your domain name is easy to pronounce and spell. You can also use keywords that you think people will search when looking for a travel blog. This will help you get more traffic from Google search. For more tips, see our guide on how to choose the best domain name for your blog.

After choosing your domain name click on the next button to continue.

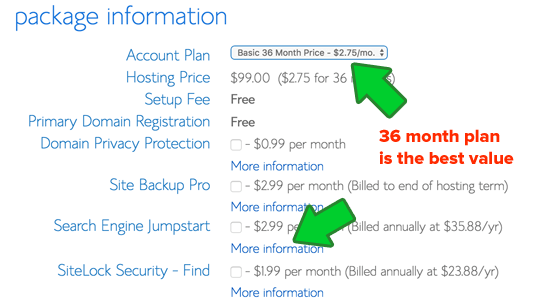
Now, you will need to add your account information and finalize the package information to complete the process. We recommend going with the 36-month plan because that’s the best value.

You will also see some optional extras that you can purchase. We don’t recommend purchasing them right away. You can always add them later on if you decide that you need them.

Finalize package details

After that, you need to enter your payment information and finish the purchase.

Once finished, you will receive an email with details on how to login to your web hosting control panel (cPanel).

Step 2. Installing WordPress

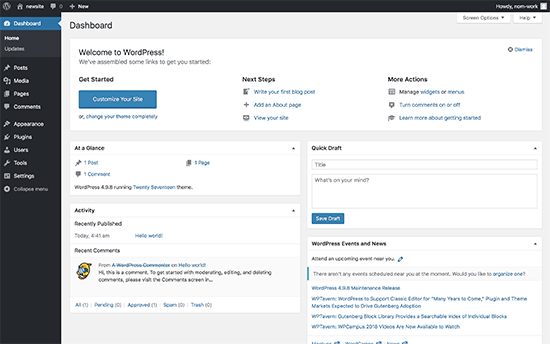
This step is not required as Bluehost will automatically install WordPress on your domain name. You just need to click on the link in the email you received after sign up.

This will take you to your hosting control panel. From here, you can just click on the login to WordPress button to enter your WordPress site’s admin dashboard.

WordPress dashboard

Now you are ready to customize your travel blog’s appearance and start adding content.

Step 3. Choosing a Theme for Your Travel Blog

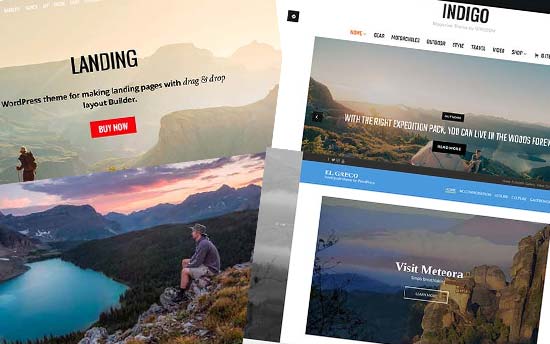
Travel themes

Themes are one of the best things about WordPress. They control your website’s design and appearance and there are thousands of free and paid WordPress themes to choose from.

WordPress is used by all kind of websites so WordPress themes come with lots of choices. A WordPress theme designed for business websites may not look so great for a travel blog.

You will need a theme that matches the look and feel of a travel blog. The trick here is to strive for simplicity and find the perfect balance between functionality and design.

Need to look at some great examples? See our expert pick of the best WordPress themes for travel blogs.

After you have found a suitable theme, head over to our guide on how to install a WordPress theme for step by step installation instructions.

Step 4. Adding Content to Your New Travel Blog

After you have installed and set up a WordPress theme, the next step is to start adding content. WordPress comes with two default content types, they are called posts and pages. While the posts will be the entries in your travel blog, pages are for adding static content to your website.

We recommend adding the static content first because it helps you build a structure for your website. For example, contact form page, about us page, privacy policy page, and more. See our list of important pages that every WordPress blog should have.

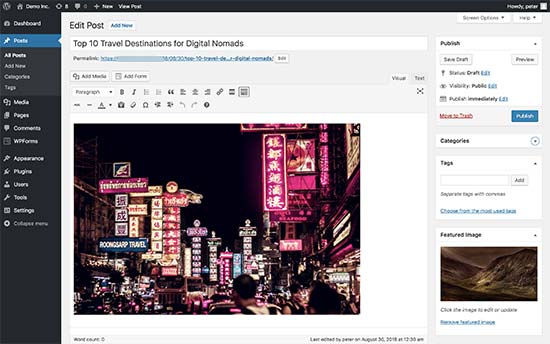
Next, you would want to start adding articles and posts to your travel blog. Go to Posts » Add New page to add your first blog post.

Writing blog posts

You can add any type of content you want. You can write articles, add images, create image galleries, embed videos, audio, and more.

For more details, see our guide on how to add a new blog post in WordPress and utilize all the features.

Step 5. Content Ideas for a Great Travel Blog

Editorial calendar

Your travel blog posts are where you will develop your own voice and engage your audience. They need to be informative, entertaining, and helpful.

You may be able to quickly add first few posts but it will get harder to regularly come up with new ideas for your blog posts. Check out this massive list blog post ideas that are proven to work, and you can easily use them for your travel blog.

We also recommend you to regularly visit popular travel blogs to get inspiration for your own blog post ideas. See what these top blogs are doing and replicate that on your own blog.

We are not advising you to steal or reproduce the same content. You just need to get the ideas, inspiration, and topics and then use them to create unique content with your own voice, style, and flavor.

You will also notice that popular travel blogs publish quite regularly. That’s because maintaining a consistent frequency is the key to successful blogging. You need to stick with a consistent frequency for your artilces. We recommend starting with three articles a week and gradually build up your pace to 5 articles a week.

Step 6. Getting More Traffic to Your Travel Blog

Once you start adding content to your travel blog, the next step is to help users find your website. To do this, you need to do take the following steps.

1. Work on Your Blog’s SEO

SEO

Search engines are the primary source of traffic for most websites and blogs on the internet. They recommend website owners to use certain best practices to increase their site’s visibility in search results. These best practices are called SEO or search engine optimization.

WordPress is very SEO friendly out of the box. However, there is much more that you can do to drive even more traffic to your travel blog. For detailed step by step instructions, follow our ultimate WordPress SEO guide for beginners.

2. Improve Website Speed and Performance

Performance

No one likes a slow website. Your users will leave your website instantly with a bad user experience and you will probably never get them again. It also affects your website’s search rankings as Google considers speed one of the top ranking factors.

You will not to perform certain WordPress performance adjustments to speed up your website. We have a complete guide with step by step instructions to improve your WordPress speed and performance.

3. Track User Statistics

Website analytics

Most beginners use their best guesses to decide what their users will like to read or view. You don’t need to do that when you can get actual data to show you exactly what your users want and do on your website. Using this data you can make informed decisions to plan your content strategy and grow your website.

To get these insights you need to start using Google Analytics. It tells you how many people are visiting your website, what they see, where they come from, and more.

For instructions, see our article on how to install Google Analytics in WordPress for beginners.

Google Analytics offers a ton of data. However, as a beginner, you may not know what to look where and which reports to monitor.

To answer these questions, we have made a beginners guide on how to easily track user engagement in WordPress with Google Analytics.

4. Make a YouTube Channel

Make a YouTube channel

YouTube is not only the world’s largest video sharing website, it is also the world’s second most popular search engine. You can create a YouTube channel for free and start uploading your travel videos, vlogs, and travel tips videos.

Travel channels are huge on YouTube. In fact, there are already travel vloggers on YouTube making six-figure income through sponsorships, advertisements, and brand endorsements.

Even if you don’t want to become a YouTuber, you can still use the platform to drive traffic to your travel blog.

Step 7. Making Money From Your Travel Blog

Ever wondered how these top travel bloggers go to all these exotic locations all over the world. Travelling is quite expensive and some of these travel bloggers do nothing else but travel. How do they make money?

Here we will tell you how other travel blogs make money and how you can do the same with your travel blog.

1. Sponsorships

The traveling perks for most famous travel bloggers are sponsorships. These sponsorships come from hotels, airlines, cruise ships, tour operators, and even government agencies promoting tourism.

Once your blog reaches a decent amount of regular traffic, you can reach out to these organizations on your own. In return for free stuff, they would want you to mention their place or service on your blog.

How do you find out who would be interested in such a deal? See which other companies are already sponsoring other travel bloggers, or randomly try your luck with hotels and airlines for the places you want to visit.

While sponsorship deals will give you some perks, they will not make money for you.

2. Advertisements

Not just travel blogs, but almost all popular blogs on the internet rely on advertisements. The most popular way to display ads on your blog is by using Google AdSense.

It connects bloggers like you to the advertisers looking for a targeted audience. Advertisers pay Google, which pays you after taking a small cut of their own. For details see our article on how to how to add Google AdSense to your WordPress blog.

3. Affiliate Marketing

Affiliate marketing enables you to recommend travel products that you use and love. You get a referral commission when your users purchase a product after clicking on your link.

To make money with affiliate marketing, you will need to find travel products and brands with an affiliate program. These could be backpack manufacturers, adventure cameras, selfie sticks, travel insurance companies, tour companies, and so on.

The biggest affiliate partner you can sign up for is Amazon Affiliates. They have tons of products in travel gadgets, accessories, luggage, bags, clothing, electronics, and more.

Need help getting started? See our beginner’s guide to affiliate marketing with step by step instructions and tools you will need to succeed.

4. YouTube Travel Vlogger

As we have mentioned earlier, YouTube provides lots of opportunities to travel bloggers. Since videos are much more engaging than plain text or even photos, top brands and advertisers are spending big dollars on YouTube promotions and ads.

YouTube runs its own advertising program too which will generate you some revenue. However, it will help you connect with brands and advertisers while getting new subscribers and followers at the same time.

Step 8. Mastering Your WordPress Skills

WordPress is quite easy to use and manage. However, there is a learning curve involved whenever you start with a new platform. You will continue discovering new things to learn. This is where WPBeginner can help.

WPBeginner is the largest WordPress resource site for beginners. We have lots of helpful content which is created specifically for beginners, business owners, and bloggers.

Following are few of the helpful resources you will find on WPBeginner (all of them are completely free).

  • WPBeginner Blog – The central place for all our WordPress tutorials and guides.
  • WPBeginner Dictionary – Our WordPress glossary is the best place to familiarize yourself with the WordPress lingo
  • WPBeginner Videos – New WordPress users can start with these 23 videos to master WordPress.
  • WPBeginner on YouTube – Need more video instructions? Subscribe to our YouTube channel with more than 110,000 subscribers and 10 Million+ views.
  • WPBeginner Blueprint – Check out plugins, tools, and services we use on WPBeginner.
  • WPBeginner Deals – Exclusive discounts on WordPress products and services for WPBeginner users.

Many of our users use Google to find answers on WPBeginner by simply adding ‘wpbeginner’ at the end of their search term.

We hope this article helped you learn how to start a travel blog and make money from it. You may also want to see our list of essential WordPress plugins for new websites.

If you liked this article, then please subscribe to our YouTube Channel for WordPress video tutorials. You can also find us on Twitter and Facebook.

The post How to Start a Travel Blog (to Make Money or Otherwise) in 2018 appeared first on WPBeginner.

Source: Wordpres

The post How to Start a Travel Blog (to Make Money or Otherwise) in 2018 appeared first on TuneMaster.ml.

Open Beta 1 for the OnePlus 6 brings Android 9.0 Pie

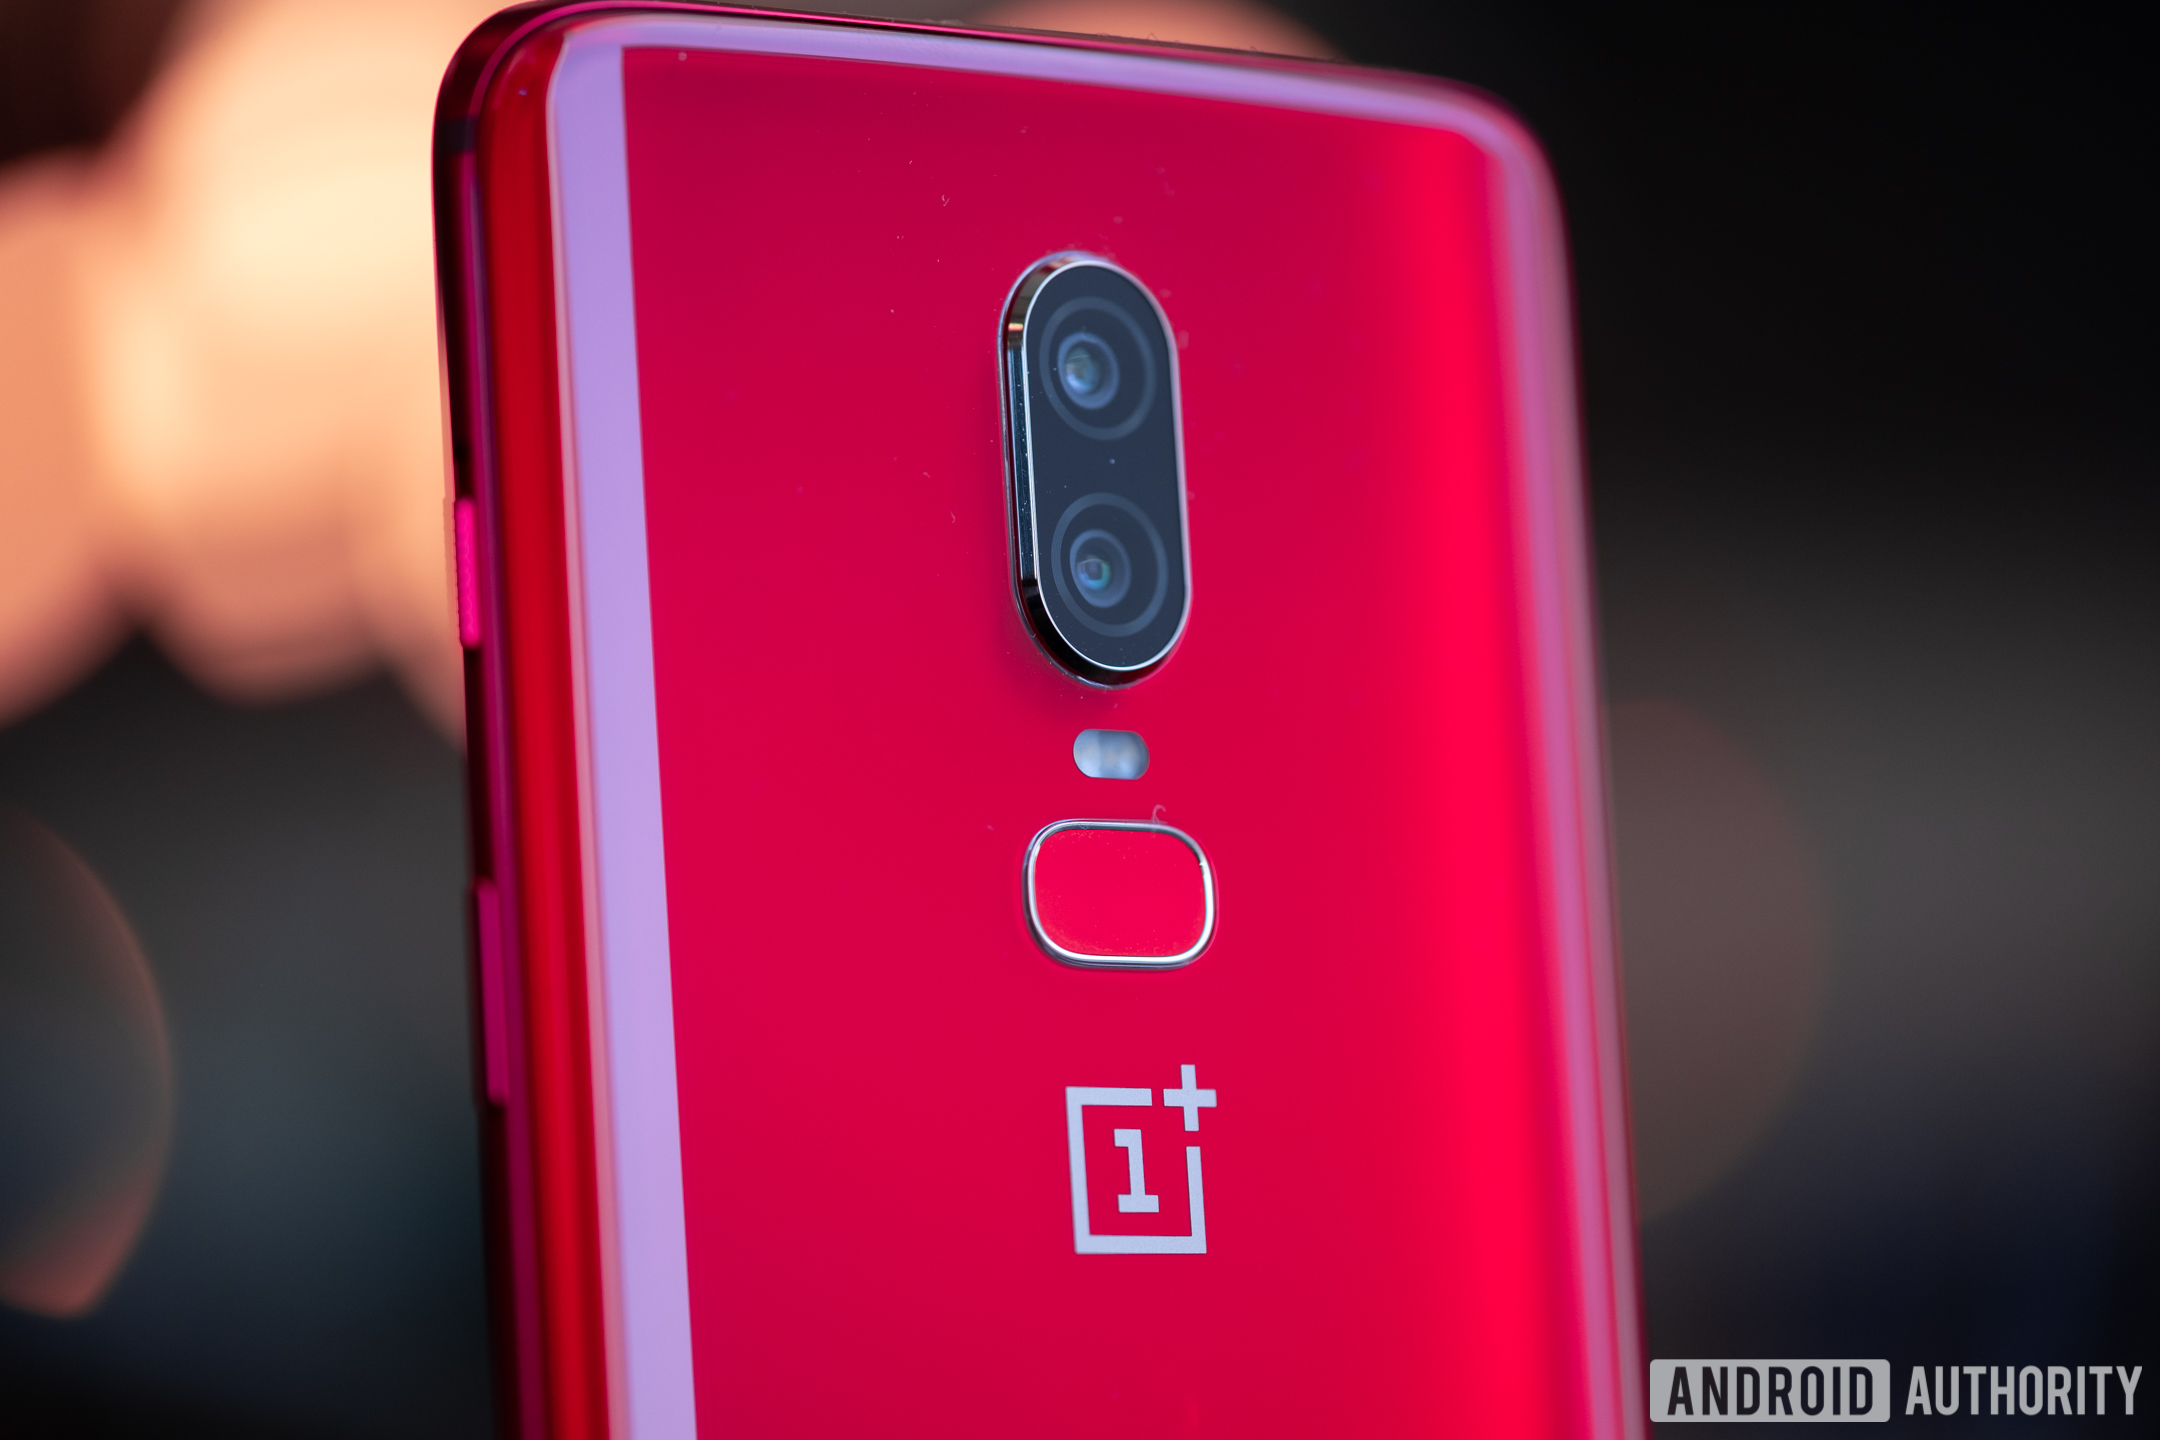
OnePlus 6

  • The first Android 9.0 Pie open beta of OxygenOS is available now for the OnePlus 6.
  • The beta software has a few issues but will give you a taste of what Pie will look like for the OnePlus 6.
  • Anyone can install the beta, but be warned: if you don’t like it, you’ll have to wipe everything to go back to Oreo.

If you own a OnePlus 6 you can test out the first Android 9.0 Pie version of OxygenOS starting today. Simply head here (or click the button at the bottom of this article) to read instructions and get links to the software download.

However, don’t rush off just yet, as there are two things you should know about this software (and OxygenOS open betas in general) before taking the plunge.

First off, even though Android 9.0 Pie has a stable release this open beta is skinned over with some of OnePlus’ OxygenOS features. Granted, OxygenOS is incredibly close to stock Android so you won’t find too many differences between the two, but since they are not the same thing this open beta software is definitely not stable.

Editor’s Pick

For example, this open beta of Pie will have issues with certain applications; most notably, Google Pay will not work. Also, when you go to download apps from the Google Play Store you might see a warning that your device is not certified by Google, which could cause some problems.

The second thing to keep in mind is that if you decide after trying out this beta software that you don’t like the bugs and want to go back to the stable Oreo version of OxygenOS, you must do a fresh install. That means you have to wipe your OnePlus 6 and then reinstall Android, which will force you to reset all your apps and settings as if you just took the phone out of the box. For many, this is a hassle that just won’t be worth it.

That all being said, this open beta release is incredibly exciting because it means that a stable rollout of Android 9.0 Pie is coming soon for the OnePlus lineup, including the OnePlus 6, the OnePlus 5 and 5T, and the OnePlus 3 and 3T. It also increases the likelihood that the OnePlus 6T will launch with Android 9.0 Pie out of the box.

Click the button below to give this open beta a try!

Source: Android Zone

The post Open Beta 1 for the OnePlus 6 brings Android 9.0 Pie appeared first on TuneMaster.ml.