Create richer location-aware Android apps with the Google Places API

Google Play Service’s Location APIs give you an easy way of displaying the user’s current location, but there’s only so much value you can get out of a “You Are Here”-style marker on a Google Map! The Google Places API is a powerful tool which can add an extra layer of functionality to your location-aware apps by giving you access to detailed information about a huge range of places, located all across the globe.

You can use this information as the basis for all kinds of functionality. You might add a Facebook-style check-in feature to your app, or create an app that lets users browse all the take-out spots that’ll deliver to their current location.

Even if you look at the classic location-aware example of a navigation app, cross-referencing user queries against a directory of places means users won’t always have to enter full street addresses. Being able to ask “can you show me the fastest route to the Googleplex?” is a far better user experience than “can you show me the fastest route to 1600 Amphitheatre Parkway, Mountain View?”

In this article we’ll be using the Google Places API to create a location-aware app where the user can explore and gather information about places of interest in their immediate area, and anywhere in the world.

Is Google Places free?

Yes, but it’s complicated — especially if you’re using other APIs in your project.

The Google Places API for Android is free to use, but limited to 1,000 requests per 24 hours by default. Once you’ve setup this API, you can monitor how many requests it’s processing in the Google API Console. Your app will start to fail if it ever exceeds 1,000 requests in a 24 hour period. If your project is approaching this limit you’ll need to increase your quota.

You can increase the limit to 150,000 requests per 24 hours, free of charge, by creating a billing profile in the Google API Console. This requires you to enter your credit card details and mark the project as billable. Although the Google Places API is free to use, at this point your entire project is billable. If you use any billable APIs in your project, you may be charged based on their usage.

If you’re using any other APIs, carefully check their documentation and terms and conditions before increasing your Google Places limit.

If you get caught out, you can disable billing at any time in the Billing pane. This will restrict all your APIs to their courtesy usage limit, and you’ll no longer be charged for any APIs in this project.

Do you have the latest version of Google Play Services?

With that disclaimer out of the way, let’s create our application! The first step is make sure you have the latest version of Google Play services installed:

  • Launch Android Studio’s SDK Manager.
  • Select the SDK Tools tab.
  • Find ‘Google Play services’ and install any available updates.

Get your project’s fingerprint

Create a new project with the settings of your choice, using the Empty Activity template.

In order to access the Google Places API, you need to generate an API key with Android restrictions. This means linking the API key to your project’s package name and certificate fingerprint (SHA-1).

There’s several ways to find your project’s SHA-1 fingerprint, but the easiest method is via the Gradle Console:

  • Select the Gradle tab along the right-hand side of the Android Studio window.
  • Select your application’s root, followed by Tasks >Android > signingReport.

  • Open the Gradle Console tab that appears towards the bottom-right of the screen.
  • The Gradle Console will open automatically. Find the SHA-1 value in this window, and make a note of it.

We’re using the debug certificate fingerprint, which is generated automatically when you create a debug build. This certificate is only suitable for testing your applications, so before publishing an app you should always generate a new API key based on the release certificate.

Generating your API key

Open a web browser, and complete the following steps:

  • Head to the Google API Console.
  • Create a new project by clicking the API Project item in the menu bar, and then selecting the + button.
  • Give your project a name, and then click Create.
  • Click Enable APIs and Services and select Google Places API for Android.
  • Read the onscreen information, and if you’re happy to proceed then click Enable.
  • Select Credentials from the left-hand menu, and then select Create credentials > API key.
  • Click Restrict key.
  • Select Android apps, and then click Add package name and fingerprint.
  • Paste your project’s SHA-1 fingerprint and package name into the subsequent fields. If you’re unsure about the package name, you’ll find this information in your project’s Manifest.
  • Click Save.
  • Back in the Credentials screen, find the API key you just created, and copy it.
  • Switch back to Android Studio and paste the API key into your project’s Manifest. While we have the Manifest open, I’m also adding the ACCESS_FINE_LOCATION permission, which our app will need  to get a lock on the device’s location:
<?xml version="1.0" encoding="utf-8"?>
<manifest xmlns:android="http://schemas.android.com/apk/res/android"
   package="com.jessicathornsby.myapplication">

//Add the ACCESS_FINE_LOCATION permission//

   <uses-permission android:name="android.permission.ACCESS_FINE_LOCATION" />

   <application
       android:allowBackup="true"
       android:icon="@mipmap/ic_launcher"
       android:label="@string/app_name"
       android:roundIcon="@mipmap/ic_launcher_round"
       android:supportsRtl="true"
       android:theme="@style/AppTheme">

//Add your API key. Make sure you replace the “YOUR_API_KEY_HERE” text!//

       <meta-data
           android:name="com.google.android.geo.API_KEY"
           android:value="YOUR_API_KEY_HERE"/>
       <activity android:name=".MainActivity">
           <intent-filter>
               <action android:name="android.intent.action.MAIN" />
               <category android:name="android.intent.category.LAUNCHER" />
           </intent-filter>
       </activity>
   </application>

</manifest>

Add the Places API as a project dependency

Open your project’s module-level build.gradle file and add the latest version of the Google Places API as a dependency:

dependencies {
   implementation fileTree(dir: 'libs', include: ['*.jar'])
   implementation 'com.android.support:appcompat-v7:26.1.0'
   implementation 'com.google.android.gms:play-services-places:11.8.0'
...
...
...

Picking a place: Creating your layout

The Google Places API includes a ready-made place picker widget, which will form the basis of our application.

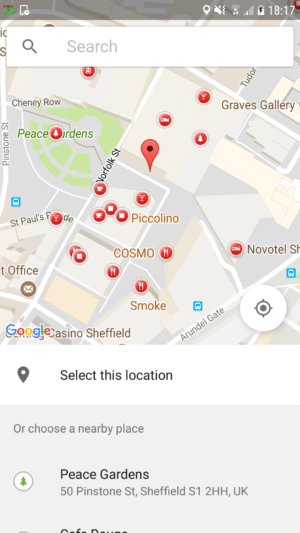
The place picker displays this kind of information:

  • The device’s location on an interactive Google Map.
  • Nearby places of interest, shown as markers on the map.
  • A list of nearby places.
  • A Google search bar.

When selecting a place, the dialog gives you several options:

  • Drag around the Google Maps fragment, and tap any of the place markers.
  • Tap any of the places that appear in the Choose a nearby place list. This list isn’t tied to the user’s current location, so if they drag around the map, the list will update to display different places.
  • Tap the “Powered by Google” search bar and type the name or address of the place you have in mind. The search bar has built-in autocomplete support, so it’ll display a list of suggested places based on the text you’ve entered so far.

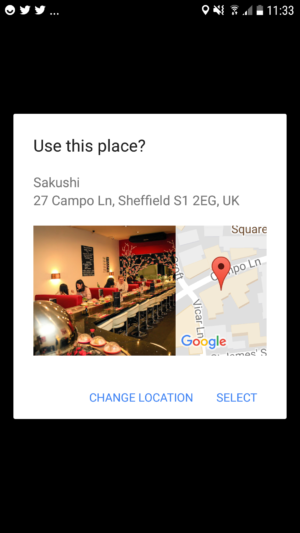
Once you find a place you want to learn more about, just give it a tap and choose Select from the popup that appears. The place picker reacts by creating a Place object containing a range of information. In our application, we’re going to retrieve the place’s name and street address, and display that information on a subsequent screen.

By using the ready-made place picker dialog, you ensure your application is consistent with every other app that features this dialog, including Google’s own applications. This consistency means some of your users may immediately know how to interact with this part of your application, having encountered this dialog many times before in other applications. Using ready-made components wherever possible just makes sense! Why waste time recreating functionality that already exists?

When the user selects a location using the place picker, this data doesn’t persist, so if they rotate their device after selecting a location, the app will return to its initial state.

We’ll be implementing the place picker widget programmatically, so in our activity_main.xml file we just need to do this:

  • Give the user a way to launch the place picker dialog.
  • Display the name and street address of whatever place the user selects in the place picker dialog. If this information isn’t available, our app should display the place’s latitude and longitude values instead.
  • Provide the necessary “Powered by Google” attribution.

That last point requires some explanation. On every screen where an app uses data sourced from the Google Places API, it must display either a Google Map or “Powered by Google” logo.

Since we’ll be displaying the place’s name and address in our activity_main.xml file, we need to include a “Powered by Google” logo.

The Google Play services library provides two versions of this image:

  • For light backgrounds, use @drawable/powered_by_google_light
  • For dark backgrounds, use @drawable/powered_by_google_dark

You can’t resize or modify these images in any way.

Here’s the finished layout:

<?xml version="1.0" encoding="utf-8"?>

<RelativeLayout xmlns:android="http://schemas.android.com/apk/res/android"
   xmlns:app="http://schemas.android.com/apk/res-auto"
   xmlns:tools="http://schemas.android.com/tools"
   android:id="@+id/activity_main"
   android:layout_width="match_parent"
   android:layout_height="match_parent"
   android:paddingBottom="20dp"
   android:paddingLeft="20dp"
   android:paddingRight="20dp"
   android:paddingTop="20dp"
   tools:context="com.jessicathornsby.myapplication.MainActivity">

   <TextView
       android:id="@+id/placeName"
       android:layout_width="wrap_content"
       android:layout_height="wrap_content"
       android:layout_alignParentTop="true"
       android:text="Place Name"
       android:textSize="20sp" />

   <TextView
       android:id="@+id/placeAddress"
       android:layout_width="wrap_content"
       android:layout_height="wrap_content"
       android:layout_below="@+id/placeName"
       android:text="Address"
       android:textSize="20sp" />

   <Button
       android:id="@+id/pickPlaceButton"
       android:layout_width="wrap_content"
       android:layout_height="wrap_content"
       android:layout_alignParentBottom="true"
       android:text="Pick a Place" />

   <ImageView
       android:id="@+id/imageView"
       android:layout_width="wrap_content"
       android:layout_height="wrap_content"
       android:layout_alignParentBottom="true"
       android:layout_alignParentEnd="true"
       android:layout_marginEnd="23dp"
       app:srcCompat="@drawable/powered_by_google_light" />

</RelativeLayout>

Launch the Place Picker dialog

In our MainActivity, we need to perform the following:

  • Request the ACCESS_FINE_LOCATION permission. We declared this permission in our Manifest, but in Android 6.0 and higher applications need to request permissions as and when they’re required at runtime. If the user denies a permission request, make sure they understand the impact this will have on the user experience. If the user denies the ACCESS_FINE_LOCATION permission, our app will respond by displaying a toast.
  • Launch the place picker dialog, by passing an Intent created with PlacePicker.IntentBuilder().
  • Whenever the user selects a place, the place picker returns a Place instance. Our app needs to retrieve this instance, using the PlacePicker.getPlace() method, and then extract the necessary information i.e the place name and place address.
  • If the user exits the place picker without selecting a place, display an error message.

Here’s the completed MainActivity:

import android.support.annotation.NonNull;
import android.support.v4.app.ActivityCompat;
import android.support.v7.app.AppCompatActivity;
import android.os.Build;
import android.os.Bundle;
import android.widget.Button;
import android.content.Intent;
import android.Manifest;
import android.content.pm.PackageManager;
import android.widget.TextView;
import android.widget.Toast;
import android.view.View;

import com.google.android.gms.common.GooglePlayServicesNotAvailableException;
import com.google.android.gms.common.GooglePlayServicesRepairableException;
import com.google.android.gms.location.places.Place;
import com.google.android.gms.location.places.ui.PlacePicker;

public class MainActivity extends AppCompatActivity {

   TextView placeName;
   TextView placeAddress;
   Button pickPlaceButton;
   private final static int FINE_LOCATION = 100;
   private final static int PLACE_PICKER_REQUEST = 1;

   @Override
   protected void onCreate(Bundle savedInstanceState) {
       super.onCreate(savedInstanceState);
       setContentView(R.layout.activity_main);
       requestPermission();

       placeName = (TextView) findViewById(R.id.placeName);
       placeAddress = (TextView) findViewById(R.id.placeAddress);
       pickPlaceButton = (Button) findViewById(R.id.pickPlaceButton);
       pickPlaceButton.setOnClickListener(new View.OnClickListener() {

//Add a click handler that’ll start the place picker//

           @Override
           public void onClick(View view) {

//Use PlacePicker.IntentBuilder() to construct an Intent//

              PlacePicker.IntentBuilder builder = new PlacePicker.IntentBuilder();
              try {
                  Intent intent = builder.build(MainActivity.this);

//Create a PLACE_PICKER_REQUEST constant that we’ll use to obtain the selected place//

                 startActivityForResult(intent, PLACE_PICKER_REQUEST);
             } catch (GooglePlayServicesRepairableException e) {
                    e.printStackTrace();
             } catch (GooglePlayServicesNotAvailableException e) {
                    e.printStackTrace();
             }

          }
       });
   }

   private void requestPermission() {

//Check whether our app has the fine location permission, and request it if necessary//

       if (ActivityCompat.checkSelfPermission(this, Manifest.permission.ACCESS_FINE_LOCATION) != PackageManager.PERMISSION_GRANTED) {
           if (Build.VERSION.SDK_INT >= Build.VERSION_CODES.M) {
               requestPermissions(new String[]{Manifest.permission.ACCESS_FINE_LOCATION}, FINE_LOCATION);
          }
       }
   }

//Handle the result of the permission request//

   @Override
   public void onRequestPermissionsResult(int requestCode, @NonNull String[] permissions, @NonNull int[] grantResults) {
       super.onRequestPermissionsResult(requestCode, permissions, grantResults);
       switch (requestCode) {
          case FINE_LOCATION:
               if (grantResults[0] != PackageManager.PERMISSION_GRANTED) {
                    Toast.makeText(getApplicationContext(), "This app requires location permissions to detect your location!", Toast.LENGTH_LONG).show();
                   finish();
              }
              break;
       }
   }

//Retrieve the results from the place picker dialog//

   @Override

   protected void onActivityResult(int requestCode, int resultCode,
                       Intent data) {

//If the resultCode is OK...//

      if (resultCode == RESULT_OK) {

//...then retrieve the Place object, using PlacePicker.getPlace()//

          Place place = PlacePicker.getPlace(this, data);

//Extract the place’s name and display it in the TextView//

          placeName.setText(place.getName());

//Extract the place’s address, and display it in the TextView//

          placeAddress.setText(place.getAddress());

//If the user exited the dialog without selecting a place...//

       } else if (resultCode == RESULT_CANCELED) {

//...then display the following toast//

            Toast.makeText(getApplicationContext(), "No place selected", Toast.LENGTH_LONG).show();

      }
   }
}

You can download the complete Google Places API application, minus the API key, from GitHub.

Testing your application

Install your project on an Android device. As soon as you launch the app, it should ask for access to your location. Grant this request and then tap the Pick a Place button to launch the place picker dialog.

Select a place using the place picker’s integrated Google Map, the list, or the search bar, and a Use this place? dialog will appear. This dialog will display different information, depending on the location you’ve selected, ranging from the place’s full name, address, and photo, to a simple string of GPS coordinates if Google Places doesn’t have any information about your chosen location.

If you want to use this place, tap Select or choose a new location by tapping Change location.

Once you’ve selected a place, the activity_main layout will update to display the place’s name and address, or a string of GPS coordinates if that information isn’t available.

What other information can I display?

The great thing about the Places API is once you’ve retrieved a Places object, the hard part is done! Your app can extract a range of information from this object:

  • getID. The place’s textual identifier. Your app may use this information to uniquely identify a place, but you typically won’t display this ID to the user.
  • getPhoneNumber. The place’s phone number.
  • getWebsiteUri. The place’s website, if known, for example the website associated with a business or school.
  • getLatLng. The place’s geographical coordinates.
  • getViewport. A viewport, returned as a LatLngBounds object.
  • getPlaceTypes. A list of the place types associated with this place, such as TYPE_AIRPORT, TYPE_CLOTHING_STORE or TYPE_MOVIE_THEATER.
  • getLocale. The locale for which the name and address are localized.
  • getPriceLevel. The place’s price level, ranging from 0 (cheapest) to 4 (most expensive).
  • getRating. An aggregated rating, ranging from 1.0 to 5.0.

Since our app already has access to the Places object, we can display any of the above details, just by changing a few lines of code. Here we’re displaying the phone number and price level of the selected place:

public class MainActivity extends AppCompatActivity {

   TextView placePhone;
   TextView placePrice;
   Button pickPlaceButton;
   private final static int FINE_LOCATION = 100;
   private final static int PLACE_PICKER_REQUEST = 1;

   @Override
   protected void onCreate(Bundle savedInstanceState) {
       super.onCreate(savedInstanceState);
       setContentView(R.layout.activity_main);
       requestPermission();

       placePrice = (TextView) findViewById(R.id.placePrice);
       placePhone= (TextView) findViewById(R.id.placePhone);
       pickPlaceButton = (Button) findViewById(R.id.pickPlaceButton);
       pickPlaceButton.setOnClickListener(new View.OnClickListener() {

           @Override
           public void onClick(View view) {

               PlacePicker.IntentBuilder builder = new PlacePicker.IntentBuilder();
               try {
                   Intent intent = builder.build(MainActivity.this);
                   startActivityForResult(intent, PLACE_PICKER_REQUEST);
             } catch (GooglePlayServicesRepairableException e) {
                   e.printStackTrace();
             } catch (GooglePlayServicesNotAvailableException e) {
                   e.printStackTrace();
             }

           }
       });
   }

 private void requestPermission() {
       if (ActivityCompat.checkSelfPermission(this, Manifest.permission.ACCESS_FINE_LOCATION) != PackageManager.PERMISSION_GRANTED) {
           if (Build.VERSION.SDK_INT >= Build.VERSION_CODES.M) {
               requestPermissions(new String[]{Manifest.permission.ACCESS_FINE_LOCATION}, FINE_LOCATION);
           }
        }
   }

   @Override
   public void onRequestPermissionsResult(int requestCode, @NonNull String[] permissions, @NonNull int[] grantResults) {
       super.onRequestPermissionsResult(requestCode, permissions, grantResults);

       switch (requestCode) {
           case FINE_LOCATION:
                if (grantResults[0] != PackageManager.PERMISSION_GRANTED) {
                     Toast.makeText(getApplicationContext(), "This app requires location permissions to detect your location!", Toast.LENGTH_LONG).show();
                finish();
               }
               break;
        }
   }

   @Override

   protected void onActivityResult(int requestCode, int resultCode,
Intent data) {

        if (resultCode == RESULT_OK) {

            Place place = PlacePicker.getPlace(this, data);

//Display the phone number//

            placePhone.setText(place.getPhoneNumber());

//Display the price level//

            placePrice.setText(String.valueOf(place.getPriceLevel()));

       } else if (resultCode == RESULT_CANCELED) {

           Toast.makeText(getApplicationContext(), "No place selected", Toast.LENGTH_LONG).show();

       }
   }
}

Wrapping up

In this article, I showed you how to add an extra layer of detail to your location-aware apps, using the Google Places API. It’s also easy to pull extra information from the Places API once you’ve retrieved that all-important Places object.

Have you seen any apps using Places information in interesting ways? Let us know in the comments below!

Source: Android Zone

The post Create richer location-aware Android apps with the Google Places API appeared first on trickmost.ml.

Essential shipped fewer than 90,000 Essential Phone units in 2017

  • Research firm IDC announced that Essential shipped fewer than 90,000 units during its phone’s first six months.
  • IDC did not say how many phones were sold, but the number is likely less that 88,000.
  • The number points to a mature smartphone market that makes it difficult for a startup to crack into.

According to industry research firm IDC, Essential shipped 88,000 units since its debut flagship smartphone launched in July 2017. The goodwill that Andy Rubin’s outfit won back after its rocky launch did not translate to sales, it seems.

IDC research director Francisco Jeronimo took to Twitter to unveil the statistic. Jeronimo did not say how many units were actually sold, though we could imagine that number being smaller than the 88,000 that shipped.

This is a reminder that, regardless of Andy Rubin’s reputation and expertise, Essential is still a startup. Manufacturers like Samsung, Huawei, Xiaomi, and even Apple are well-known figures in the smartphone market and have been for years. This is a tougher climate for newcomers to penetrate than it was in 2014, when OnePlus debuted the OnePlus One and took off.

It did not help that Essential weathered a tough 2017. When the Essential Phone debuted, it was criticized for its then-$700 price tag, shoddy image quality, and software that was not well optimized for the hardware. In my time with the phone, I experienced issues like poor cell reception and jittery software, issues that continue to affect devices today.

Editor’s Pick

Essential has since permanently discounted its phone to $500, constantly pushed out software updates, and maintained a constant presence on Reddit with its monthly AMAs. As it relates to software updates, Essential is still pushing camera updates and plans to release Android 8.1 Oreo soon.

The company clearly wants as much goodwill and momentum as possible going into the eventual Essential Phone sequel. With margins seemingly razor-thin, it remains to be seen whether Essential can continue to push forward.

Source: Android Zone

The post Essential shipped fewer than 90,000 Essential Phone units in 2017 appeared first on trickmost.ml.

Amazon reportedly making its own AI chips

  • An anonymous source disclosed that Amazon is making its own AI-powered chips.
  • These chips would be used in future Amazon hardware like the Echo to make response time faster.
  • Moving away from third-party chips is a clear indication that Amazon is all-in on AI.

Right now, when you ask Alexa a question on a piece of Amazon-branded hardware like the Amazon Echo or Echo Show, your question is whisked off into the cloud for processing. The internal hardware in an Echo device is not fast or powerful enough to handle the question on its own, so there’s a slight delay as your question is thrown to the cloud, answered, thrown back, and then finally made audible by Alexa.

But that limitation is poised to change soon. According to The Information, Amazon is creating its own artificial intelligence chips for future Echo devices that will be powerful enough to handle simple questions “in-house,” as it were. Questions like “What time is it?” wouldn’t require the cloud delay, as Alexa would be able to answer immediately.

Editor’s Pick

Amazon now joins Google in the chip-making game. With Google’s focus on Google Assistant and its line of Google Home devices, relying on third-party chips would eventually slow down progress. Google knows this, and heavily invested in making its own powerful cloud AI chips to get Google Assistant in anything it possibly can get into.

This desire to do everything in-house is no doubt a worry for larger chip makers like Intel and Nvidia. What we most likely will see is companies that rely on chip business to start making their own hardware, such as Intel’s drones and their prototype smart glasses.

Another example is Blink, a security camera manufacturer that was purchased by Amazon in December for an undisclosed amount. Blink was founded as Immedia Semiconductor, a chipmaker with a focus on low-power video compression. But the company started to put its own chips into video hardware after it had a hard time selling the chips alone. A successful Kickstarter campaign in 2016 put the company on Amazon’s radar, and now Blink (and their chip-making team of engineers) are under the Amazon umbrella.

Google’s and Amazon’s investments in the chip-making game make one thing clear: AI is a big deal, and you’re going to see it everywhere.

Source: Android Zone

The post Amazon reportedly making its own AI chips appeared first on trickmost.ml.

Deal: Run Android apps (and save $50) on this touchscreen ASUS Chromebook Flip

asus chromebook flip Amazon

It’s only been a few months since Chrome OS officially started to support Android apps from the Google Play Store, and we’ve already got a sweet deal for you.

For a limited time and while supplies last, you can get the touchscreen-enabled ASUS Chromebook Flip for $249 at Amazon, a savings of $50 off the list price. It’s not the current model, but it’s still an awesome deal on a great Chromebook.

The ASUS Chromebook Flip features an all-metal body and a 360-degree hinge. Flipping the display all the way around gives you a tablet-like experience. Weighing in at two pounds, it might be a bit on the heavy side to use as a permanent tablet; but it should be great for short periods of use.

As for ports, the Flip has two USB Type-C, one USB 3.0, a combination headphone/mic jack, and a microSD card slot to expand the unit’s storage.

Editor’s Pick

Speaking of which, inside it’s running on an RK3399 quad-core 2.0 GHz processor with 4 GB of RAM and 16 GB of storage. In other words, it’s no powerhouse, but it will hold up great for your traditional web browsing and Netflix binging.

But the coolest feature is that it supports Android apps from the Google Play Store, enabling the laptop to act as a clamshell version of your phone. As long as you’re using the same Google account for both devices, things should sync up easily to enable you to switch from one to the other with minimal effort.

Hit the button below to get yours while you can!

Source: Android Zone

The post Deal: Run Android apps (and save $50) on this touchscreen ASUS Chromebook Flip appeared first on trickmost.ml.

Google Pixelbook review: is it worth $999 now?

Google’s previous Chromebook Pixels were pretty mixed bags. The original launched in 2013 for $1299 and its successor for $999. The hardware was definitely worth the cash, but the software wasn’t.

Chrome OS was a glorified browser, which made the laptop inconvenient (or nearly impossible) to use for those who required specialized software. But times have changed and so have Chromebooks. The newest model is piggybacking on Android’s ample app portfolio, making the software struggle much more bearable. On top of that the lineup has undergone a complete re-branding and redesign. Throw in a shiny stylus and you have a whole new concept to show Chrome OS fans.

Are these changes enough to validate spending $999 on the Google Pixelbook though? We’ve spent the last two weeks putting the new Chrome OS 2-in-1 through its paces, so let’s jump in.

It all starts with the display

Love at first sight exists — when it comes to fancy tech, at least. It’s why we can stand in store aisles for hours, staring at fancy 4K content that seems to look better than real life. Screen quality can make or break your experience. It’s what you look at the whole time you use your computer.

Google never skimps on its Chromebook displays, and the Pixelbook is no exception. It touts a 12.3-inch panel with a 2400 x 1600 resolution and 400 nits of brightness; bright enough to work comfortably in direct sunlight. The screen can create a lot of glare, though.

The screen got smaller, but so did the laptop. It’s now more portable. The PPI decreased too, from 239 to 235, but the difference is unnoticeable.

Editor’s Pick

All in all, the screen is very good. It is bright and vibrant, and the colors aren’t over saturated. Text and images look crisp. The only real complaint with the screen is that it has very large bezels (more on that later).

Stunning build quality and a 2-in-1 design to fit every need

Chromebooks made by Google are known for their outstanding build quality. It’s part of why they’re so expensive. The search giant has done it again, delivering an amazingly-built laptop you won’t be ashamed to show off on your coffee shop adventures.

The Pixelbook has an aluminum body, with silicone padding surrounding a glass trackpad. On the lid behind the screen you can also find a Pixel-like glass element, which contrasts very nicely against the otherwise metallic surface. Overall it is a stunning device and nothing ever feels anything short of premium.

…nothing ever feels anything short of premium

At first I was a little hesitant about the silicone areas, but they’re actually more comfortable than cold metal, which can become warm and sweaty after typing. The only bad news is white silicone gets dirty and stains quickly. My unit already has red accents in the corners — from what, I will never know.

The bezels are pretty large compared to what we are used to seeing in other premium laptops, but they’re there for a reason.

Google claims the bezels are there for two reasons. Apparently they sacrificed the bezel-to-screen ratio to make the Pixelbook thinner and more comfortable to hold in tablet mode.

Google claims the big bezels are there for two reasons: for comfort and thinness

But let’s focus on that new and exciting 2-in-1 form factor. Much like the many other devices that have adopted flippy screens that fold all the way back, the Pixelbook can assume multiple forms. You can use it as a traditional laptop, prop it up as a tent, or fold it all the way back to imitate a tablet.

This is certainly convenient to use. You can easily prop it up to watch a movie or fold it into a more traditional angle to get working. The hinge mechanism is solid enough for confident handling. It doesn’t wiggle, move around or make any weird noises.

The Google Pixelbook is super slim, at only 0.4 inches thick. Weighing 2.4 pounds, it is as light as an 11-inch Macbook Air. It’s hard to make such a thin and light laptop feel sturdy, and Google’s done just that.

The 12.3-inch Google Pixelbook is super thin at just 0.4 inches thick and weighs as much as an 11-inch Macbook Air

One thing I did not like was the placement of the power and volume buttons. They are pushed off to the edge — rare in conventional laptops. This shows how much of a priority Google is giving the tablet mode. Those buttons are only intuitive to use when the computer is folded into a pad. It’s a bit weird for those of us who use the laptop mode more often.

Keyboard and trackpad

The keyboard and trackpad are some of the most important factors when choosing a new laptop, as they’re the main forms of interaction with a computer. The Pixelbook doesn’t disappoint here either.

The keyboard buttons feature a soft, rubberized texture. There is a certain sense of security when typing on non-slippery keys, unlike with premium metal keys. They offer solid feedback and comfortable travel, much like previous generations of the Chromebook Pixel.

The trackpad is nice and responsive. It is made of glass, so there is very little friction. The working area is large enough to move the cursor around with confidence.

Performance and hardware

Google’s Chromebooks were historically a little over-powered. Chrome OS didn’t need much to operate efficiently, so the specs seemed wasted. Things have changed, though. Google has since introduced support for Android apps in Chrome OS, apps which require more kick, and make the higher-end specs seem more appropriate.

The base model Pixelbook comes with a 7th-gen Intel Core i5 processor, 8 GB of RAM, and 128 GB of internal storage. The processor can be switched for an i7, the RAM can be upgraded to 16 GB, and storage can be increased to either 256 GB or 512 GB.

The model we used had an i5 chipset, 256 GB of storage, and 8 GB of RAM, which still fared well against a decent workload. We experienced no hiccups and were only limited by internet speeds. Running Android apps was also smooth. The computer is still arguably over-powered, but at least now it can do much more than browse the internet.

The Pixelbook is still arguably over-powered, but now it can do much more than just browse the internet.

Battery life

Google says the Pixelbook should run for about 10 hours of mixed usage. I average around 8 or 9 hours, which is still a good amount of time. Heavy users need not worry, as the Pixelbook charges pretty fast. Google claims you can use it for 2 hours after just 15 minutes of charging. It should be able to run for 7.5 hours after a 60-minute charge.

Software and Android apps

Chrome OS is pretty much the same as you’d expect. It’s a glorified browser with a desktop-like UI which makes the workflow smooth and easy. The operating system is so light it boots up in about 5 seconds.

It’s got the usual browser, shortcuts, and Chrome apps, which make for a great experience, but it now also supports Android apps. Most of these are designed to be used in mobile devices with a touchscreen, so the Pixelbook’s tablet emphasis makes sense.

Chrome OS is no longer held back by its lack of software support. Now it has a huge chunk of one of the largest app portfolios around at its disposal. Over a million Android apps from the Google Play Store can be installed in a Chromebook. It’s gone from an abysmal selection of apps to more than you could ever download; it’s a true Chromebook renaissance.

Casual users will find the wide selection of Android applications very helpful. You can get Microsoft’s Office suite, apps like Adobe Photoshop Lightroom, and countless other goodies. Some of these apps might not be good enough for professionals and more specialized users though.

Remember that Android apps are still mobile applications made to keep you productive on-the-go

Android apps are not made for heavy workloads and busy labor sessions — they are mobile applications made to keep you productive on-the-go. The Office apps are not as complete as the Windows and macOS versions. The same applies to Photoshop Lightroom, which doesn’t get close to the productivity of desktop versions. Some features might be missing, or harder to find.

Because this device essentially works as an oversized Android tablet, things can also look a little wonky. Chrome OS treats these non-optimized apps as windows, which appear floating around the desktop, but that is clearly not the most comfortable way to use an app on a tablet. You can decide to launch it in full screen, but that usually makes the UI look too weird.

As a phone-shaped window, Facebook looks tiny and is annoying to use. The app must then be restarted for switching to full-screen, and once it re-launches things get even weirder. Icons and fonts look too small, while images are huge. Not to mention a weird bug that makes videos play cropped, displaying only a zoomed in section of the clip.

We can no longer complain about a lack of apps — except when they don’t work properly

Things have gotten insanely better for Chrome OS, and the Pixelbook clearly displays its capabilities, but the experience is not as intuitive and smooth as it could be. We can no longer complain about a lack of apps — except when they don’t work properly.

This is also the first laptop to come with Google Assistant built in. You can simply say the now-iconic phrase “OK, Google” and the laptop will begin listening to your commands. You can also hit the dedicated Google Assistant shortcut button, between the Ctrl and Alt keys, or even use the Google Pixelbook Pen to circle content and get help from Google Assistant. Speaking of the pen, let’s get into that.

The almighty stylus!

The Google Pixelbook Pen is made in tune with the laptop. About 3/5 of its body is aluminum, with an end covered in silicone, much like the Pixelbook. The pen is made to work — and look — simple, featuring a single button for circling content you want Google Assistant to help you with.

The stylus is great, but its use is a little limited

The pen works well. It fits snug in the hand and has a light-yet-sturdy feel to it — for $99 extra, it had better. It offers pressure sensitivity and tilt support, making it a handy gadget for artists and creatives.

The pen is great, but its use is a little limited. There are plenty of drawing apps, but they all seem to have some kind of downside. Some are not optimized for a screen this size, others don’t offer the best stylus support. Even if you find the perfect application to use the pen with, they all seem to lag when it comes to stylus input. The only application in which I was able to draw with no issues was Squid.

Serious artists might see the Pixelbook Pen as pretty much a glorified pointer and Google Assistant tool, but the pen is still quite usable if you are not too picky. Making notes was simple (though laggy), and Squid is a pretty good app for drawing. Using a physical stylus for navigating can be very useful for certain apps though, especially for those of us who like editing photos or video.

So… is it worth the $999?

Chrome OS continues to be a fast, convenient, no-hassle operating system, but it is only as productive as Chrome and a selection of Android apps allow it to be. Very few have been modified to work well with a Chromebook. The “Apps for your Chromebooks” section in the Google Play Store only features 13 applications.

The Pixelbook is a great computer — at least until you start using it

The Pixelbook is certainly worth its price in terms of hardware. Its design is amazing. Its performance is on point. The battery life is great. The screen looks good. Overall, it’s a great computer — at least until you start using it. Chrome OS continues to limit the experience. It will be hard to get things done without some workarounds and hoop jumping. Android apps certainly help, but they are also wonky a lot of the time.

The way I see it, where we once were able to see the potential in Chrome OS, we can now feel it, but it’s just not quite there yet. Content needs to keep getting optimized, as the software evolves to better merge Chrome and Android. Until then, the Google Pixelbook will stay more of a novelty item, much like previous Chromebook Pixel models.

If you want a simple laptop mostly for browsing the internet and using some apps from time to time, this is a good option — albeit an expensive one. More demanding users will find this machine can get the job done, but computers with other operating systems at similar price points will get it done better and with less hassle.

Source: Android Zone

The post Google Pixelbook review: is it worth $999 now? appeared first on trickmost.ml.

How to Start a Fashion Blog (and Make Money) – Step by Step

Are you looking to start a fashion blog but don’t know where to begin? It is easy to start a blog, but the difficult part is to be successful and make money from it. In this article, we will show you how to start a fashion blog as well as share tips on how to make money from your fashion blog.

Starting a fashion blog and making money

Why You Should Start a Fashion Blog?

If you are passionate about fashion and style, then you must have seen some top fashion bloggers and influencers on Instagram.

These fashion blogs not only provide a platform to the bloggers, but they also bring lots of opportunities their way. You will be surprised to discover the many ways fashion bloggers make money from their blogs.

According to Harper’s Bazaar, designers and top brands spend over a BILLION dollar each year advertising on Instagram alone.

Top 10 Fashion Blog Examples That Are Crushing it in 2018

Top fashion blog examples

Apart from money, a fashion blog allows you to express yourself in the most creative way. Here are some of the top fashion blog examples that you can follow for inspiration.

  1. We Wore What – (Danielle Bernstein)
  2. Sincerely Jules – (Julie Sariñana)
  3. The Blonde Salad – (Chiara Ferragni)
  4. Gal Meets Glam – (Julia Engel)
  5. Song of Style – (Aimee Song)
  6. Kayture – (Kristina Bazan)
  7. Wendy’s Lookbook – (Wendy Nguyen)
  8. Atlantic-Pacific – (Blair Eadie)
  9. The Chriselle Factor – (Chriselle Lim)
  10. Gary Pepper Girl – (Nicole Warne)

One thing you’ll notice about each of the top fashion blog examples above, is that they all have their own unique voice, personality, and taste in fashion. These fashion bloggers bring their own unique perspective to highlight their favorite products, merchandise, and brands.

If you believe that you have a unique take on fashion and style, then you should definitely start a fashion blog.

While setting up the fashion blog part is easy, like all important things in life making the blog popular and monetizing it requires effort.

However if you do it right, then you’ll certainly find the experience to be rewarding and fulfilling.

What You’ll Need to Start Your Fashion Blog

Fashion blogging

First, you need to choose the right platform to build your own fashion blog. You have plenty of choices, but each one of them have its own pros and cons (see our comparison of the best blogging platforms).

For example, you can start a free blog on a platform like WordPress.com, Tumblr, Blogger, etc.

These are called free blogs, and they are very limited in terms of features and flexibility when it comes to growing your personal brand. Most important limitation is your ability to make money from your content.

What about Starting a Fashion Blog with Instagram?

Instagram is awesome, but you don’t own it. You can build a huge following and all of this can go away immediately if Instagram decides that your content violated some of their policy.

We are not saying that you shouldn’t use Instagram. You must use it to build a large audience, but you will need a central platform that you can control where you can keep the audience coming back for years to come.

The best way to build your fashion blog is by creating your own website with complete ownership and full control.

Now the question is, how could a beginner with no knowledge of coding can build a website?

This is where WordPress.org comes in. It is a powerful website builder which gives you absolute control and full ownership of your website. It’s important not to confuse WordPress.org with WordPress.com. They’re two different platforms. (See our comparison of WordPress.com vs WordPress.org for more details).

There are three things you need to start a fashion blog using WordPress.org:

  1. Domain name – This will be your website’s address and what users will type in browser to visit your blog (Example, wpbeginner.com).
  2. Web hosting – This will be your blog’s home and where you will store all your website files.
  3. Your undivided attention for 30 mins

Yes, you can start a brand new fashion blog in 30 minutes, and we’ll walk you through the whole set up step by step.

In this tutorial, we will cover the following:

  • How to Register a Domain Name for Free
  • How to Choose the Best Web Hosting
  • How to Install WordPress
  • How to Find the Perfect Theme (website design) for Your Fashion Blog
  • How to Add Content to Your Fashion Blog
  • How to Get More Visitors to Your Fashion Blog
  • How to Make Money from Your Food Blog
  • Resources to Learn WordPress and Grow Your Fashion Blog

Ready? Let’s get started.

Setting up a Fashion Blog Using WordPress

A domain name typically costs $14.99 / year and web hosting normally costs $7.99 / month.

That’s a lot for beginners who are just starting out.

Luckily, our friends at Bluehost are offering a free domain, a free SSL, and a 60% discount on hosting to our readers.

Basically, you can get started for as low as $2.75 / month.

← Click here to Claim this Exclusive Bluehost offer →

NOTE: At WPBeginner we believe in transparency. If you sign up with Bluehost using our referral link, we will earn a small commission at no extra cost to you (in fact, you will save money and get a free domain). We would get this commission for recommending just about any WordPress hosting company, but we only recommend products that we use personally use and believe will add value to our readers.

Let’s go ahead and setup your web hosting + domain so you can get started.

First you need to go to the Bluehost website and click on the get started button.

On the next screen, you will be asked to choose a plan. We recommend either the basic or plus plans. You can always upgrade later if you need to.

Next, it will ask you to choose a domain name for your website.

Choose domain name

Domain name is your website’s address and this is what your users will type in their browsers to visit your blog.

You need to choose a domain name that reflects your personal voice. It should be unique, creative, and interesting. For more details, see our tips on choosing a great domain name for your website.

After you enter your domain name, you need to fill out your details to complete the purchase.

You will receive your account details in an email sent to the address you provided during signup. This email contains your web hosting dashboard link and login information.

Once you have purchased hosting, the next step is to install WordPress. You can do that by following the instructions in our step by step guide on how to start a blog.

Choosing a Design for Your Fashion Blog

Fashion blog design examples

A blog about fashion and style cannot just go with a plain looking business or blogging layout. Your website needs a design that represents your unique sense of style and creativity.

Most fashion bloggers are not website designers, so how do create a website design that is unique, elegant, stylish, and of course creative?

Luckily there are thousands of pre-made WordPress templates that you can choose from.

Our editors have hand-picked the best WordPress themes for fashion blogs that you can check out. All themes in the list feature creative designs with flexible options to easily make them uniquely yours. Most importantly, all of them are responsive (aka mobile friendly) which means they look good on mobile and tablets as well.

Each of these themes comes with its own settings page. This is where you will set up the theme, add your website logo, choose colors, and select basic settings.

Depending on which theme you choose, you will find tons of customization options. We recommend striving for simplicity in your website’s design for a cleaner look.

Add Useful Content To Your Fashion Blog

Gal Meets Glam - a top fashion blog

Once you have a functioning design in place, you can start working on content. We recommend adding the static content first.

Static content are pages that are common among all websites on the internet. This includes a contact form page, about us page, and a privacy policy page.

If your theme includes a page builder plugin, then you can use it to create other static landing pages as well.

Next, you would want to start adding articles / blog posts. See our guide on how to add a new blog post in WordPress and utilize all the features.

Now, this is where you will develop your own voice. Your blog posts need to be entertaining, informative, and helpful. Running a blog means, you will need to regularly come up with new ideas for your blog posts. Check out these 73 types of blog posts that are proven to work, and you can easily adapt them for your fashion blog.

We recommend choosing a consistent frequency for your articles. Busier and larger websites post new content every day. You can start by adding a few posts per week and then gradually increase your frequency to daily updates.

To come up with regular blog post ideas, visit popular blogs in the fashion industry to gather inspiration. See what these top blogs are doing and replicate it on your blog.

Hashtag fashion on Instagram

We are not saying that you should just steal / recreate the same content.

You just need to gather topics, collect ideas, and get inspiration. After that you should use those ideas on your blog by adding your own unique voice, style, and flavor to it.

Optimize Your Fashion Blog to Get More Visitors

Once you start adding useful content, the next step is to make sure that users can find your website.

Here is how you ensure that your website gets visitors and those visitors engage with your content.

Start Working on Your Website’s SEO

Improve your blog SEO

Most popular blogs get a large portion of their traffic from search engines like Google and Bing. Marketers use SEO, Search Engine Optimization, to optimize their website for higher rankings.

WordPress itself is quite SEO friendly out of the box, but there are still things you can do to further optimize it. Follow our step by step WordPress SEO guide for improving your website ranking.

Improve Website Speed

Improve your blog speed

Speed is one of the most important factors that affects user experience on your website. It also affects your website’s search engine rankings as Google considers speed one of the top ranking factors.

You can make your website significantly faster by implementing certain performance tweaks in WordPress. We have created a complete step by step guide on how to speed up WordPress and boost performance.

Track User Engagement

Following user activities on your blog

Things your users do after arriving on your website are called user engagement. Highly engaged audience means, more page views and more success for your fashion blog.

This is where you’ll need Google Analytics. It tells you where your visitors are coming from, what they do on your website, and how you can keep them coming back.

Simply head over to our tutorial on how to install Google Analytics in WordPress, and it will start tracking your website traffic.

Google Analytics offers a lot of data. How do you figure out where to look for the information you need?

To answer this question, we have a separate article on how to track user engagement in WordPress using Google Analytics.

Start Making Money from Your Fashion Blog

Making money from your fashion blog

Ever wondered how fashion bloggers afford their clothes, makeup, and accessories? Actually, they don’t have to. Most successful fashion bloggers promote sponsored content where brands pay them to promote products.

Paid and sponsored content is the major source of revenue for many fashion bloggers. Here we will list the most effective ways you can start making money from your fashion blog when you’re first starting out.

1. Display Ads Using Google AdSense

Most websites on the internet rely on ads to generate revenue. Google AdSense allows you to easily display ads on your website and make money from your blog even when you’re just starting.

See our step by step guide on how to properly add Google AdSense in WordPress for detailed instructions.

2. Affiliate Marketing

Affiliate marketing allows you to recommend products you love. You get a referral commission when your users purchase a product after clicking on your link.

To make money with affiliate marketing, you will need to find fashion products and brands with an affiliate program. The biggest affiliate partner you can sign up for is Amazon Affiliates. They have tons of products in fashion, clothing, and accessories that you can recommend and get paid for it.

See our guide on how to add and manage affiliate links in WordPress.

3. Build an Instagram Following

Instagram has placed itself as the top social network for fashion and style influencers. You need to join Instagram and start posting with relevant hashtags to make sure that your posts reach the right audience.

The best way to come up with an Instagram strategy is by following other top fashion blogs on Instagram. Study their posts, descriptions, and hashtags and try to replicate the same effect with your Instagram posts.

You should also network with other influencers and do S4S, share for share, campaigns. In this strategy, each party will share the other’s Instagram posts and tag them. It helps both people increase their following.

Another easy way to build Instagram following is by sharing your Instagram posts on your WordPress blog.

4. Brand Promotions

Allow brands to reachout to you

Reach out to brands, fashion startups, and agencies to partner up with them. The best way to find which companies are doing blog promotions is to keep an eye on top fashion bloggers and their Instagram posts.

For more ways to generate revenue from your fashion blog, see our guide on proven ways to make money from your blog.

Mastering WordPress Skills

WordPress is easy to use and beginner friendly. However, whenever you start using a new platform, there are always new things to discover and learn. This is where WPBeginner can help.

WPBeginner is the largest free WordPress resource site for beginners. We have lots of helpful content which is created specifically for beginners, business owners, and bloggers.

To expand your WordPress skills you should check out:

  • WPBeginner Dictionary – Our WordPress glossary is the best place to familiarize yourself with the WordPress lingo
  • WPBeginner Videos – New WordPress users can start with these 23 videos to master WordPress.
  • WPBeginner Blog – The central place for all our WordPress tutorials and guides.

You can also subscribe to our YouTube Channel where we regularly upload new video tutorials to help you learn WordPress.

We hope this article helped you start your fashion blog and make money from it. You may also want to see our ultimate WordPress security guide to keep your blog safe.

If you liked this article, then please subscribe to our YouTube Channel for WordPress video tutorials. You can also find us on Twitter and Facebook.

The post How to Start a Fashion Blog (and Make Money) – Step by Step appeared first on WPBeginner.

Source: Wordpres

The post How to Start a Fashion Blog (and Make Money) – Step by Step appeared first on trickmost.ml.

Xiaomi deletes poll which finds Android One more popular than MIUI

  • Xiaomi has removed a Twitter poll in which its MIUI software skin was outvoted by Android One.
  • The poll, launched last week, attracted 14,769 votes and saw the stock Android software receive a 57% share.
  • Why Xiaomi deleted the poll is unclear.

Xiaomi has deleted a Twitter poll which saw its MIUI skin lose a popularity contest to Android One (stock Android). The poll, which garnered 14,769 votes, was posted on February 8th and removed within the following two days (via Android Police).

While Xiaomi didn’t specifically announce what people were voting for, it clearly pitted its own MIUI 9 software skin against Android One, with the latter receiving 57% of the votes compared to the former’s 43%. We don’t know why the poll was removed, but we can speculate it’s because Xiaomi didn’t want to publicly show its own skin losing to Google’s unmodified OS.

While the results may have been disappointing for Xiaomi, they probably won’t surprise those familiar with the online Android community—stock Android would win in a poll against any third-party UI. How Xiaomi didn’t see that coming is odd, though it may have assumed those following it on Twitter would be among its most dedicated fans.

Editor’s Pick

The deletion of the poll also seems petty when you look at how close it was—Xiaomi’s often maligned skin was only narrowly beaten by the favorite. What’s more, the Chinese manufacturer offers an Android One phone, the Xiaomi Mi A1 which launched last November; this could have been read as Xiaomi making moves to deliver what its community wants (or even trying to understand the community better for future products).

Sure, websites might have picked it up and poked fun at Xiaomi, but it wasn’t a catastrophic defeat. Now that Xiaomi has deleted it, however, it stands to draw unnecessary attention and made the company look silly. Where do you stand on the matter? Let us know in the comments.

Source: Android Zone

The post Xiaomi deletes poll which finds Android One more popular than MIUI appeared first on trickmost.ml.