Arm unveils new image processors for better HDR pictures

Before we head into a melee of CES 2019 announcements, Arm has detailed its latest Mali-C52 and Mali-C32 image signal processors (ISPs). Although these processors aren’t aimed at the high-end photography market, they are designed to boost image quality and processing capabilities in the fastest growing market segments. This includes the IP camera, drone, and robotics markets.

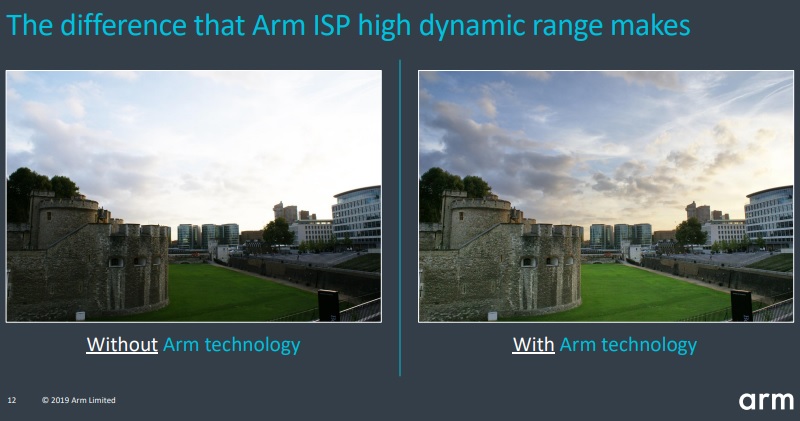
The key capabilities inside the new ISPs are support for HDR bit depth management and accurate tone mapping, thanks to a number of its in-house technologies. The aim is to improve image quality via better-looking colors and superior contrast. Low-light pictures should also be in for a boost, as Arm’s ISP accelerates multi-exposure and several denoise techniques that are often used to achieve better low light pics. In total, there are 25 different processing steps inside these ISPs. This includes RAW processing, noise reduction, demosaic, HDR processing, and color management.

Editor’s Pick

Better image quality also has knock-on improvements for additional processing down the line. If a company uses the ISP in conjunction with machine learning techniques, such as for picture improvements or object detection, the quality of those results is improved by ensuring a high-quality source image. As such, Arm envisions that this ISP will be paired up with some of its latest Cortex-A series CPUs and GPUs, along with its Trillium NPU dedicated to machine learning.

Both the Mali-C52 and C32 support up to 16-megapixel resolution cameras. The ISPs boast a throughput of 600 million pixels per second, which is enough to support a 4K 60fps video stream. The C52 boasts a larger, more powerful noise reduction engine that ensures better texture detail and also supports 3D color lookup enhancements that aren’t available with the C32.

Arm Mali-C52 ISP HDR photo example

Arm notes that the new ISPs are primarily targeted at embedded applications such as security cameras, drones, and home assistants. The C52 covers the whole spectrum, while the C32 is for customers more concerned about power and area budgets. The Mali-C71 ISP remains dedicated to the extra security requirements of the automotive market.

Arm is supporting its new products via drivers for Linux or bare metal coding, which includes software for auto-white balance, exposure, and focus.  However, the Mali-C52’s capabilities are also suited to mid-tier smartphones, ones that don’t require huge resolution cameras but want to accelerate tone-mapping and high dynamic range processing. Although the big mobile SoC vendors already have their own ISPs. Developers could also port the software over to Android Things to help build a wider range of smart home products equipped with HDR cameras.

Source: Android Zone

The post Arm unveils new image processors for better HDR pictures appeared first on TuneMaster.ml.

How to Create a Reusable Block in WordPress Block Editor (Gutenberg)

Do you often use the same content snippets in your WordPress posts? If you do, then you’ll love the Reusable Block feature in the new WordPress block editor. It allows you to save any content block and reuse them in other posts and pages on your website.

In this article, we will show you how to easily create a reusable block in WordPress Block editor also known as Gutenberg. We will also show you how to add reusable blocks in your WordPress posts and export them to use on your other WordPress websites.

Creating a reusable block in WordPress Gutenberg editor

What is a Reusable Block in WordPress Block Editor (Gutenberg)?

A reusable block in WordPress editor is a content block saved individually to be used later.

Many bloggers often add the same content snippets in multiple articles such as call-to-actions at the end of the blog post or links to follow the blog in social media.

Most people just save their content snippets as text files on their computers and then copy and paste them when needed.

The Gutenberg WordPress editor solves this problem by introducing reusable blocks.

Basically, you can now save content snippets in your WordPress editor and then reuse them anywhere almost instantly.

Following are just some of the scenarios when a reusable block can help you work more efficiently:

  • Asking users to follow you on social media at the end of each article.
  • Adding call-to-action buttons in your WordPress posts and pages.
  • Saving and reusing tables
  • Quickly adding feedback forms to your pages
  • Manually adding inline affiliate banners
  • and more…

That being said, let’s take a look at how to easily create a reusable block in WordPress block editor.

Creating a Reusable Block in WordPress Editor

All Gutenberg blocks are individual content elements in WordPress editor and they can be saved individually as a reusable block

First, you need to create a new post or edit an existing one. On the post edit screen, click on the add new block button and then choose a block type according to the content you are going to save.

Add a new block to Gutenberg editor

In this example, we are going to save a few lines of text in a paragraph block.

After adding the block, you need to add the content that you want to reuse. You can use the styling and formatting options in the block toolbar and block settings.

Editing a block

Once you are done editing, click on the three-dot menu button in the toolbar and then select ‘Add to Reusable Blocks’ option.

Add to reusable blocks

You will be asked to enter a name for the reusable block. We recommend using a name that helps you quickly identify the block and what it does.

Add block name

Finally, click on the Save button to store your reusable block.

Your block will be saved in the WordPress database with all its settings.

Adding Reusable Block in Other Posts and Pages

Now that we have learned how to create a reusable block in WordPress, let’s see how to add reusable blocks in your WordPress posts and pages.

Once again create a new post or edit a post where you want to add the reusable block. On the post edit screen, click on the add new block button.

Your reusable block is located under the ‘Reusable’ tab. You can also find it by typing its name in the search box.

Adding reusable block

You can take your mouse over it to see a quick preview of the block. Go ahead and click on the block to insert it into your post.

Your reusable block will appear in the post editor.

Reusable block added into a post

You can also edit the reusable block by clicking on the edit button on the block.

However, please keep in mind that changing a reusable block will change it on all locations where you have used it.

If you just want to make a change that only appears on this particular post, then you need to convert it to a regular block first.

Click on the three-dot menu in the block toolbar and then select ‘Convert to Regular Block’ option.

Convert to regular block

This will convert your reusable block into a regular block, and you will be able to make changes to it without affecting the original reusable block.

Managing All Reusable Blocks in WordPress Editor

After using reusable blocks for a while, you may have some blocks that you don’t use anymore or some blocks that you want to rename.

Gutenberg Editor allows you to easily manage all your reusable blocks from one screen.

To manage your blocks, click on the add block button and then locate the Reusables tab. You’ll see a link to manage your reusable blocks page.

Manage reusable blocks link

Clicking on the link will bring you to block management page. From here, you can edit, delete, export, and import your blocks.

Manage reusable blocks

Exporting / Importing Reusable Blocks

Reusable blocks are not just reusable on the website they were created for. You can also use them on any other WordPress website.

You can export the blocks from the block management screen. Simply click on the export button below a block, and WordPress will send it to you as a JSON file.

Exporting a reusable block

You can now switch to another WordPress site’s admin area. Go to the block management screen and then click on the ‘Import from JSON’ button.

This will show a file upload box. Click on the choose file button to select the block you downloaded earlier and then click on the import button.

WordPress will now import your reusable block and save it in the database. You can go ahead and start using it on the new site.

We hope this article helped you learn how to create a reusable block in WordPress Gutenberg editor. You may also want to see our tips on growing your online business without spending a fortune.

If you liked this article, then please subscribe to our YouTube Channel for WordPress video tutorials. You can also find us on Twitter and Facebook.

The post How to Create a Reusable Block in WordPress Block Editor (Gutenberg) appeared first on WPBeginner.

Source: Wordpres

The post How to Create a Reusable Block in WordPress Block Editor (Gutenberg) appeared first on TuneMaster.ml.