How to Verify Your WordPress Site on Pinterest (Step by Step)

Do you want to verify your WordPress site on Pinterest? Verifying your website on Pinterest will unlock neat features like Pinterest analytics, ads program, stats for your photos, and more. In this article, we will show you how to easily verify your WordPress site on Pinterest.

Verify Pinterest Site on WordPress

Video Tutorial

If you don’t like the video or need more instructions, then continue reading.

Why You Should Verify Your WordPress Site on Pinterest?

Pinterest is one of the most popular social media platforms to share your photos, videos, and other visual content. It allows you to create an account and manage your images like Instagram or Flickr.

It also allows other users to collect websites, links, and other visual content by creating boards.

If you are running a photography website or any other type of blog with images and videos, then Pinterest can be an important source of traffic.

Verifying your website on Pinterest will help you learn more about your visitors using Pinterest Analytics. You will also be able to participate in their ad program and plan a strategy to grow your Pinterest traffic.

That being said, let’s take a look at how to easily verify your WordPress site on Pinterest.

Verifying Your WordPress Site on Pinterest

Before we start, you’ll need to upgrade your Pinterest profile to a business account. This will allow you to use all their Pro tools like analytics, ads program, and more. The Pinterest business account is free and easy to set up.

Ready, let’s get started.

Step 1. Upgrade Your Pinterest Account to Business

You need to log into your Pinterest account and click on the three-dots menu at the top right corner of your screen. It will show you an Upgrade Now button.

Upgrade to Pinterest business account

When you click on this button, it will take you to the business account setup page. You need to enter your business name, website URL, and select a business type.
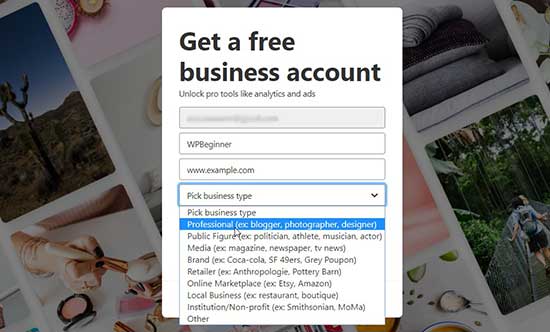
Add business information on Pinterest

Now that you have entered all the required information, go ahead and click on the Continue button, and your personal account will be upgraded to a Pinterest business account.

Note: If you don’t want to convert your personal account, then go ahead and create a new business account on Pinterest.

Step 2. Claim Your Website on Pinterest

To claim your website, you need to go to the three-dot menu from the top right corner again and click on Settings.

Pinterest settings

On this page, you need to head over to Claim Website section in the left menu and enter your website URL.
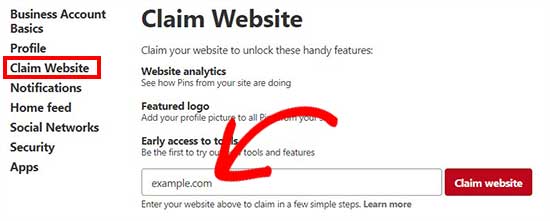
Claim website

When you click on the Claim website button, it will display two methods that you can use to claim your website (HTML tag or HTML file).
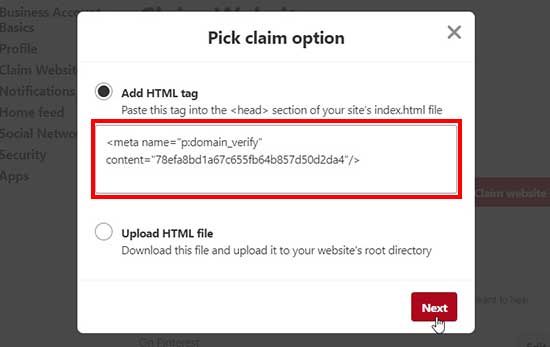
Add HTML tag

We are choosing the HTML tag option because it is easier. However, you can also download the HTML file and upload it to your website’s root directory using an FTP client.

Step 3. Add HTML Tag in Your WordPress Site

There are multiple ways to add a HTML tag to your website’s header, but we will only cover the two easiest methods.

First, if you have the Yoast SEO plugin installed on your WordPress site, then visit SEO » Social page from your WordPress admin area.

Under the Facebook tab, you need to make sure that open graph settings are enabled.
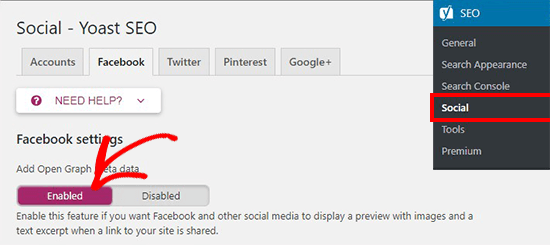
Open graph enabled

Next, you need to go to the Pinterest tab. In the Pinterest confirmation field, you need to paste HTML tag that you copied previously.
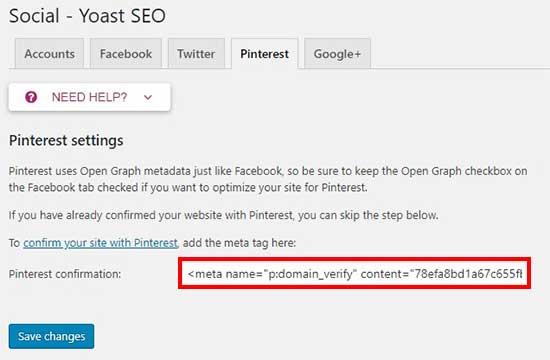
Add HTML tag in Pinterest confirmation field

Once you are done, click on the Save Changes button.

If you are not using the Yoast SEO plugin, then you need to install and activate Insert Headers and Footers plugin. For more details, see our step by step guide on how to install a WordPress plugin.

Upon activation, you need to visit Settings » Insert Headers and Footers page in your WordPress admin area. In the Scrips in Header section, you need to paste the HTML tag and click on the Save button.
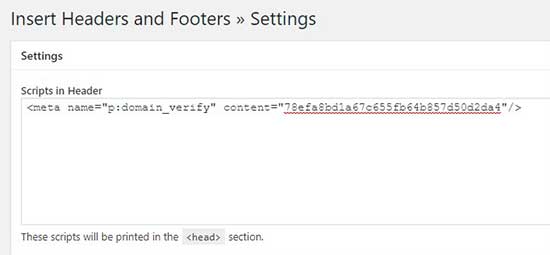
Insert HTML tag in header script section

Once the HTML tag is added in your website’s header section, you need to go back to the Pinterest screen and click on the Next button in the popup. It will now ask for confirmation to send your site to review.
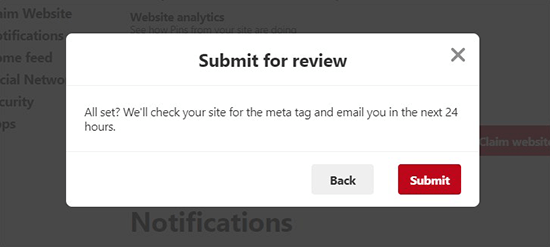
Submit website to review on Pinterest

Normally, the process takes 24 hours, and you get an email about the verification of your website. Once it’s done, you’ll also see the confirmation on Claim Website section in Pinterest.

Website claimed on Pinterest

After verification, you can use Pinterest tools like analytics, ads program, image stats, and more. You can also add Pinterest Pin-it button on your blog images, so the visitors can share your photos on this Pinterest boards.

We hope this article helped you learn how to verify your WordPress site on Pinterest. You may also want to see our expert pick of the best social media sharing plugins for WordPress to improve the social presence of your website.

If you liked this article, then please subscribe to our YouTube Channel for WordPress video tutorials. You can also find us on Twitter and Facebook.

The post How to Verify Your WordPress Site on Pinterest (Step by Step) appeared first on WPBeginner.

Source: Wordpres

The post How to Verify Your WordPress Site on Pinterest (Step by Step) appeared first on TuneMaster.ml.

How to Create an Event Registration Page in WordPress

Do you want to add an event registration page on your WordPress site? Recently one of our readers asked if they can allow users to sign up and buy tickets online for their events. In this article, we will show you how to easily create an event registration page in WordPress and sell tickets online.

Creating an event registration page in WordPress

Why Create an Event Registration Page in WordPress?

There are plenty of third-party event registration and ticketing tools available in the market. You can also add Facebook events to your WordPress site.

However, many third-party event registration and ticketing services will charge a small fee for each ticket you sell. This quickly adds up, and you could end up paying a lot more than expected.

You will have limited options to promote your event on social media and even on your own website. Some event management services will insist on displaying their branding in your event emails, widgets, and tickets.

You can avoid some of these issues by creating your own event registration page in WordPress. This will allow you to collect online payments directly, store attendee information on your website, and use your own brand name when promoting the event.

That being said, let’s take a look at how to easily create an event registration page in WordPress.

Creating an Event Registration Page in WordPress

First thing you need to do is install and activate the WPForms plugin. For more details, see our step by step guide on how to install a WordPress plugin.

WPForms is a paid plugin, and you will need at least their PRO plan to access the PayPal add-on, which we will be using in this tutorial.

Upon activation, you need to visit the WPForms page in your WordPress admin area and click on the Add New button.

Add New Form

On the form builder, first you need to enter a title for your event registration form. Below that, you will see a list of ready-to-use form templates that you can select. Click on the Billing / Order Form template to continue.

New Event Registration Form

This template will set up a basic online order form asking users for their information like name, email, phone, address, available items, and more.

You can point and click on any field to edit or delete it. You can also add new form fields from the column on your left.

Billing / Order form template

To add tickets, click on the available items field and change it to attendees or tickets.

Add Tickets / Attendees Details

Your users will see the calculated price in the Total Amount field. Next, you need to set up the payment method.

Let’s go ahead and connect your event registration form to a payment service provider.

You need to click on the Payments tab in the left column and then click on the ‘Addons page’ link.

Note: You can also visit the addons page from your WordPress admin area by going to WPForms » Addons.

Install Payment Addon Service

This will take you to the addons page. WPForms comes with addons for PayPal and Stripe. You can install either or both of them.

Note: In order to use Stripe, your website must have HTTPS / SSL enabled.

Click on the install button below the addon and then click on the activate button.

Once activated, you need to go back to Payments section to configure payment services on your form. Select your payment service and enable it.

You need to add the details like PayPal email address, mode, payment type, cancel URL, and more.

Edit Payment Service

If you are using Stripe, then you will need to enter the API keys. For detailed instructions see how to use the Stripe addon with WPForms.

You will also need to enter a credit card field to your form before you can set up Stripe. Simply switch to the ‘Fields’ section and add a credit card field.

Add a credit card field to the form

After setting up payments, let’s set up notification emails for both you and your users.

Simply go to Settings » Notifications and click on the Add New Notification button.

Add New Email Notification

In the Send To Email Address section, you need to select user’s email from Smart Tags to send the ticket receipt.

Add Users Email

Now you need to scroll down to the Message section and add your custom message with the fields that you created for the registration from using Smart Tags.

Custom Message for Tickets

Once you are done, you can save your changes and close the form builder.

You can display this form on any page on your WordPress site. Let’s create a new event registration page in WordPress to display the form.

On the page edit screen, you will see a new button labeled ‘Add Form’ just above the editor.

Add form button

Clicking on it will bring up a popup where you will be able to select and insert the event registration form you created earlier.

Insert event registration form

The plugin will now add the required shortcode to your page editor. You can save your changes and click on the preview to see your event registration page in action.

Event registration form preview

We hope this article helped you learn how to create an event registration page in WordPress. You may also want to see our list of the best WordPress booking plugins.

If you liked this article, then please subscribe to our YouTube Channel for WordPress video tutorials. You can also find us on Twitter and Facebook.

The post How to Create an Event Registration Page in WordPress appeared first on WPBeginner.

Source: Wordpres

The post How to Create an Event Registration Page in WordPress appeared first on TuneMaster.ml.

Deal: Project Fi offers the Android One Moto X4 for $249, Pixel XL for $549

Project Fi’s latest promotion knocks $150 and $120 off the Moto X4 and Pixel XL, respectively.
You have from now through Valentine’s Day to get the discounted prices.
The Moto X4 is the newer phone, though both are slated to receive timely software updates.

If you are on the hunt for an Android smartphone that is not overly expensive, Project Fi‘s promotion brings the Moto X4 and Pixel XL down to $250 and $580, respectively.
The Moto X4 normally goes for $400, while the Pixel XL sells for $700. The phones are automatically discounted during checkout, but make sure to activate Project Fi within 30 days of the device’s shipment. Otherwise, whatever discount you received will be charged to your Google Payments account.
Finally, the promotion goes through February 14 or while supplies last.
Motorola launched the Moto X4 in October 2017 with Android Nougat, though the phone received an update to Oreo in December. The Project Fi version of the Moto X4 is slated to receive timely updates, thanks to it being part of the Android One program.
Editor’s PickKilling the ‘Google can’t innovate anymore’ argumentGooglers leaving Google is not always news, but when an outspoken former Google advocate breaks free and starts flamebaiting, it’s worth considering their thoughts.

Steve Yegge’s blog about leaving Google after 13 years in the colorful, …
The phone features a 5.2-inch display with 1080p resolution, dual 12 MP and 8 MP rear cameras, Qualcomm’s Snapdragon 630 chipset, 3 GB of RAM, and 32 GB of expandable storage.
The Pixel XL launched in October 2016 and features a 5.5-inch display with 1440p resolution, 12 MP camera, Qualcomm’s Snapdragon 821 chipset, 4 GB of RAM, and either 32 GB or 128 GB of storage. The phone is slated to get Android P and security updates directly from Google until the end of 2019.
The Moto X4 might be the newer phone, but both will get Android P and timely software updates. This boils down to whether the Moto X4’s hardware entices you more than the Pixel XL’s.
You can make that decision at the link below.
Get the Moto X4 or Pixel XL on Project Fi
Source: Trickmost.ml

The post Deal: Project Fi offers the Android One Moto X4 for $249, Pixel XL for $549 appeared first on trickmost.ml.